Loomsuite is mainly Facebook and Instagram based marketing application. You have to import your Facebook and Instagram accounts to Loomsuite.
You can import only your Facebook account if you only want to use Loomsuite for Facebook pages.
Importing Facebook and Instagram accounts into Loomsuite is easy and straightforward. Just follow the instructions, and you can import Facebook and Instagram accounts in no time.
Import Facebook and Instagram accounts
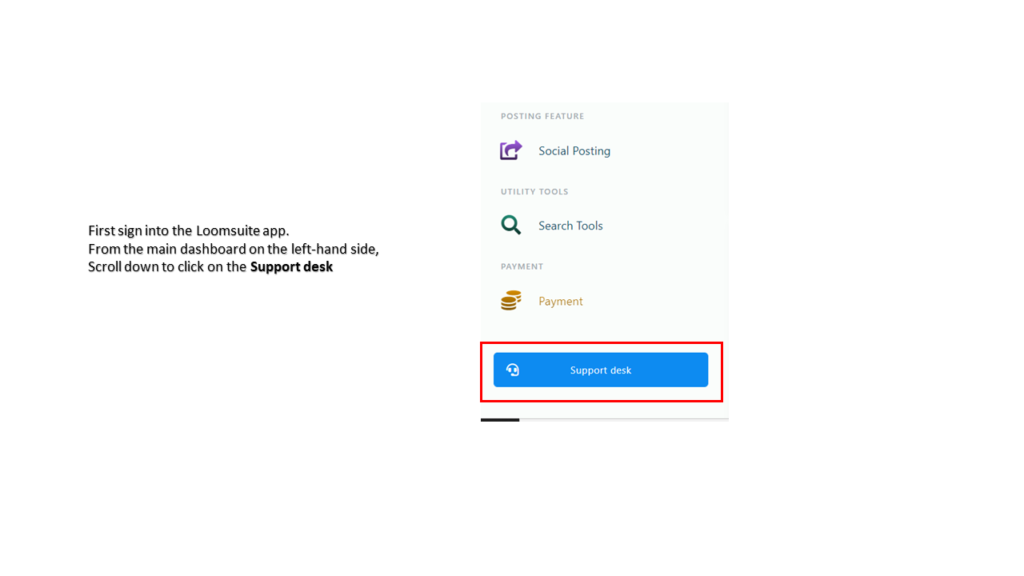
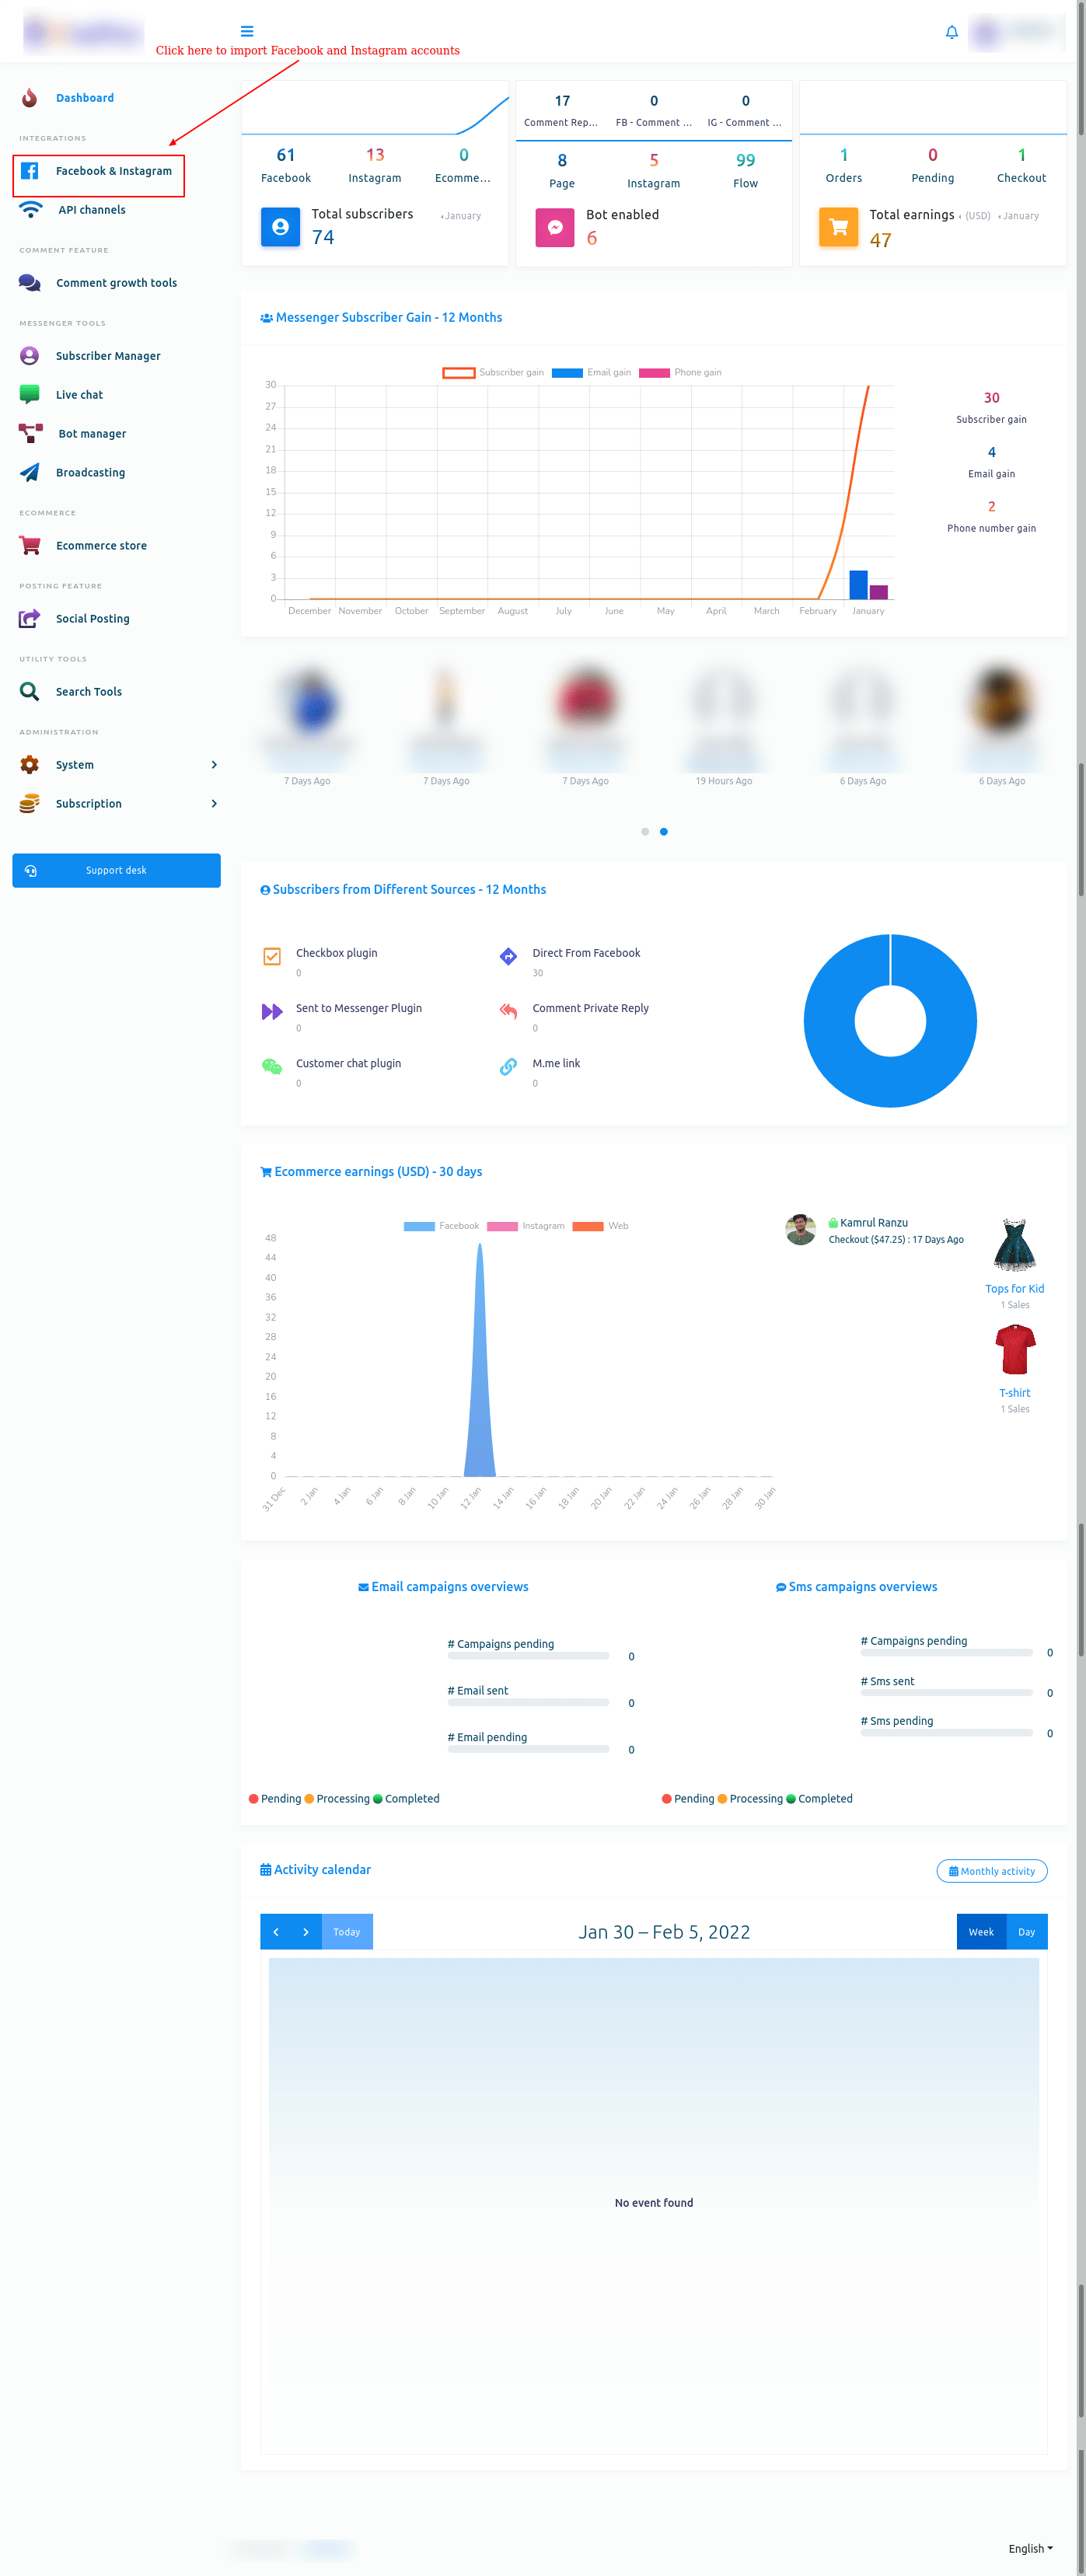
To import Facebook and Instagram accounts, first, go to the dashboard of Loomsuite. At the left sidebar of the dashboard, you will see a menu called Facebook and Instagram. Click on the menu.
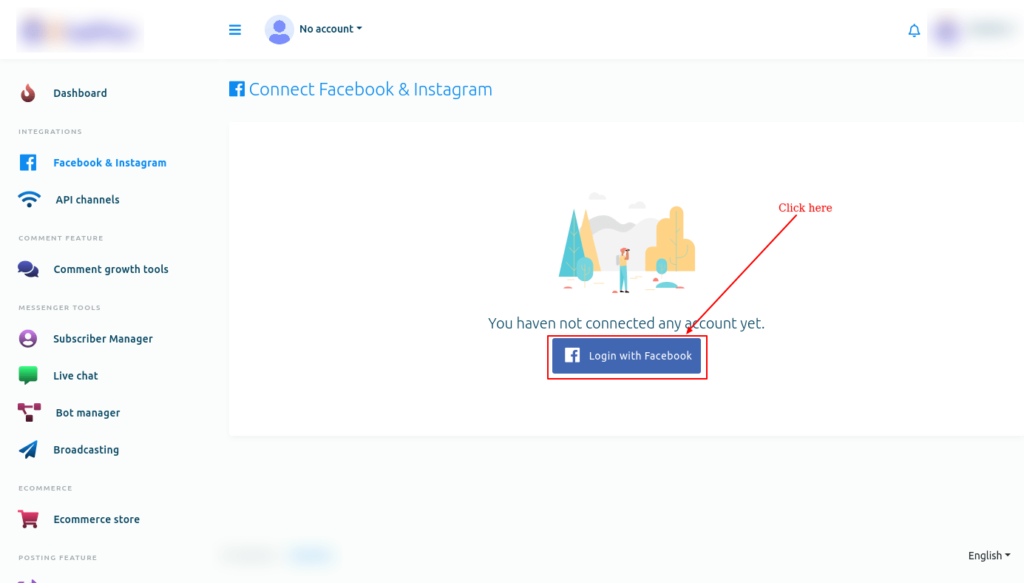
Instantly, a page called connect Facebook and Instagram will appear with a button called Login with Facebook.
Not that, to import Facebook and Instagram accounts, Facebook(Logged In) has to be opened on another tab of the same browser.
Well, now click on the Login with Facebook button.
Instantly, a modal form will appear on Facebook with three buttons edit settings, continue as your profile name and log into another account.
Click on the edit settings button if you want to edit the settings.
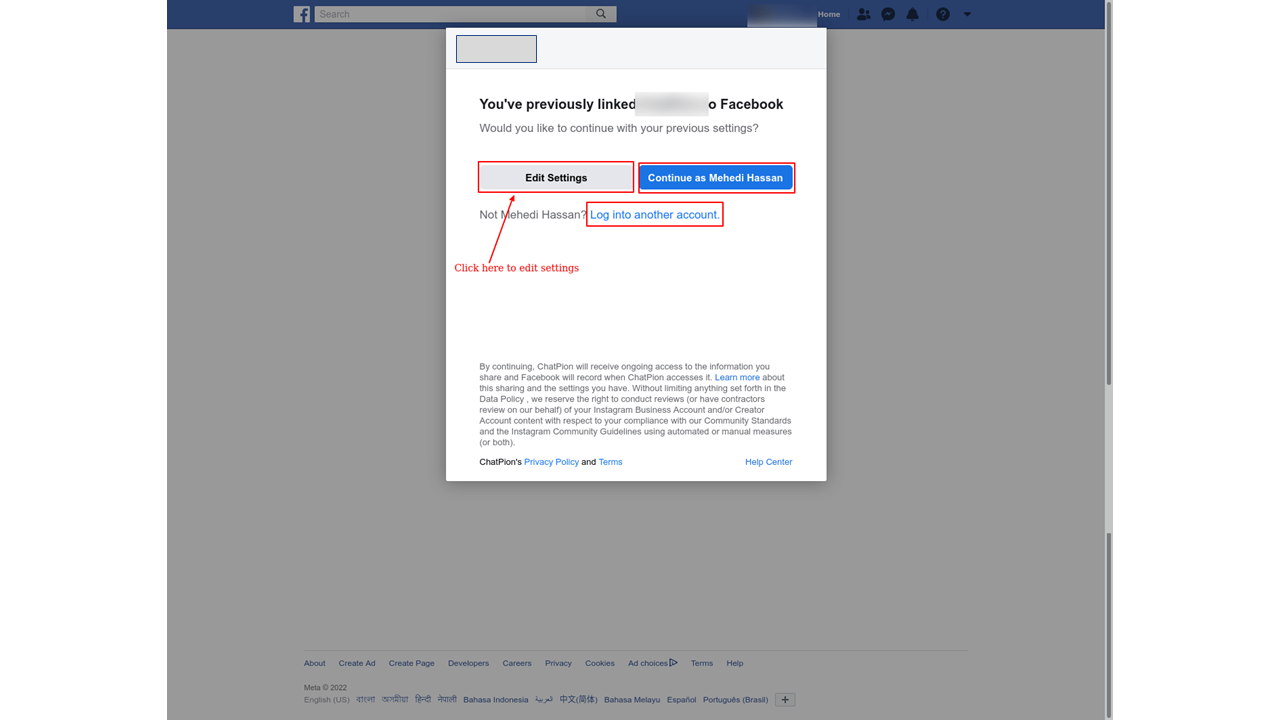
Just as you click on the edit settings button, a modal form will appear on the Facebook profile that is opened on another tab of the browser.
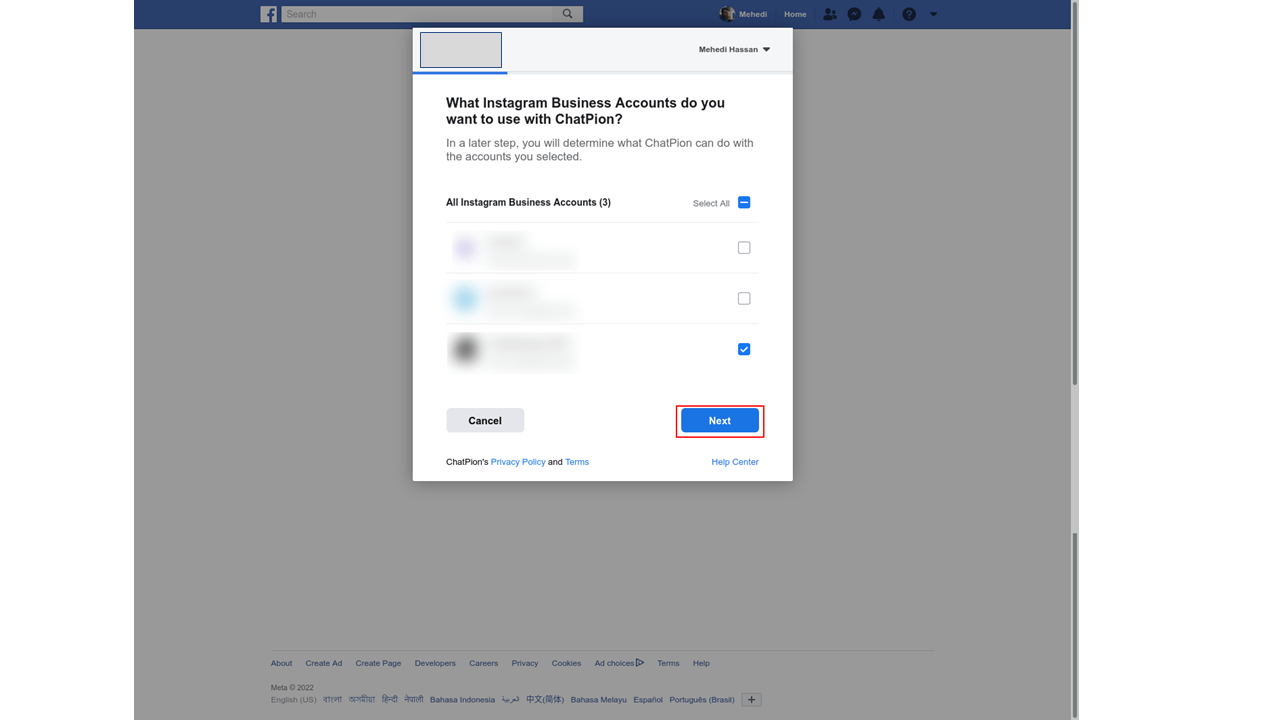
On the modal form, you have to select Instagram business accounts you want to use with Loomsuite.
To import Instagram account with your Facebook account, you must have connected your Facebook page to your Instagram account.
Visit this page to connect your Facebook and Instagram account, CLICK HERE
Of course, you can select multiple or all Instagram business accounts.
Then click on the Next button.
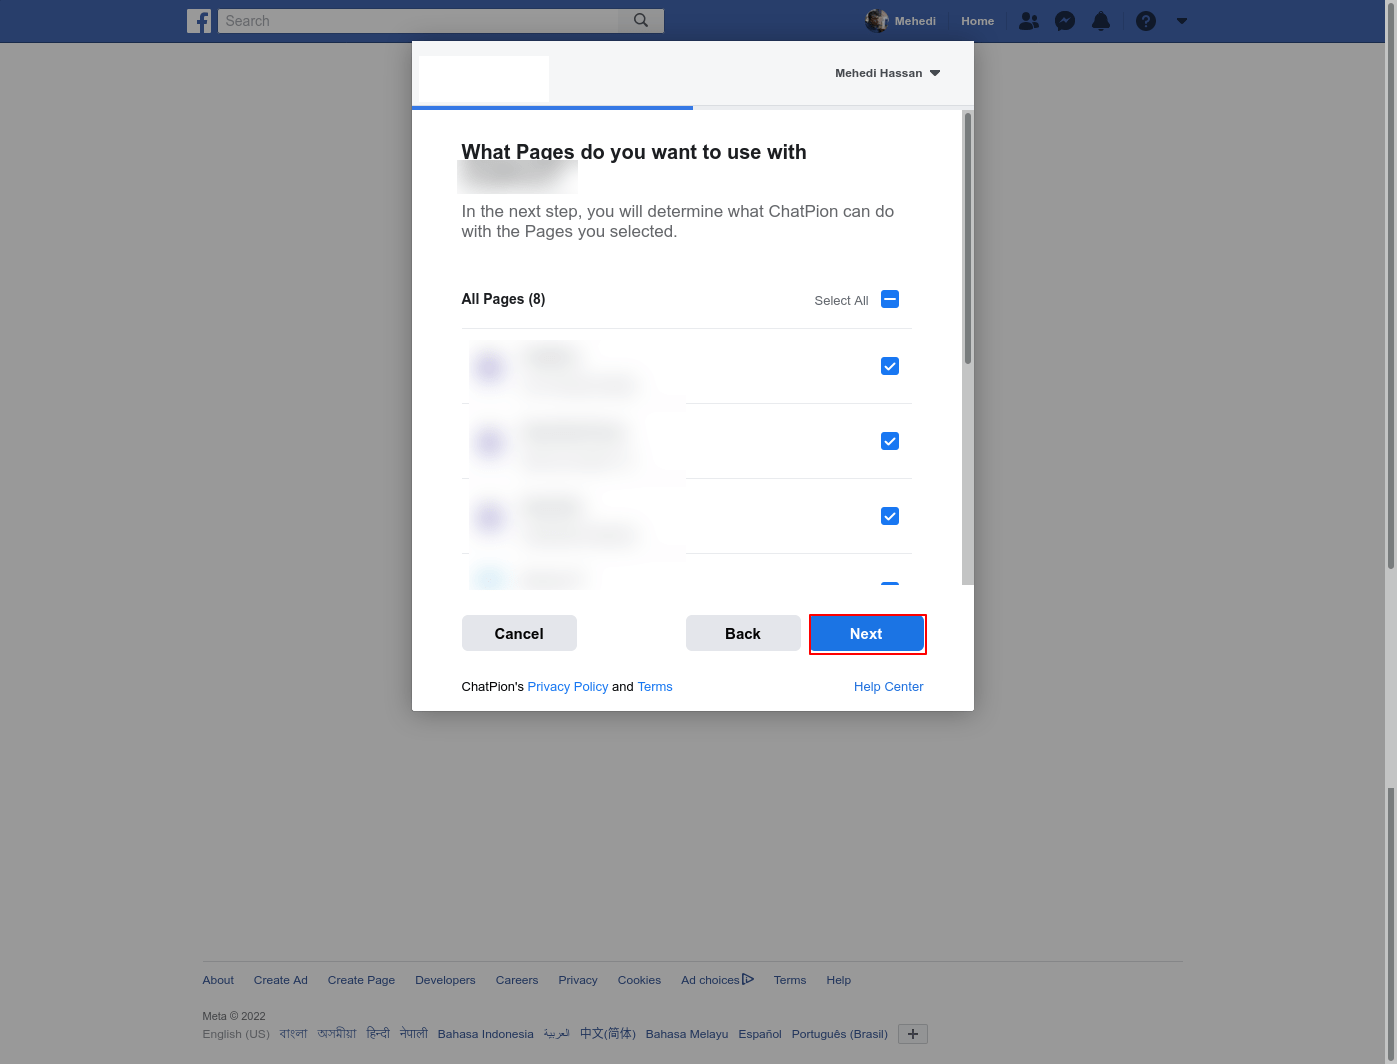
Instantly, another modal form will appear on the Facebook profile. On the modal form, you have to select the Facebook pages you want to use with Loomsuite. Of course, you can select multiple or all Facebook pages.
Then, click on the Next button.
Instantly, another modal form will appear with a message that now you have linked Loomsuite to Facebook and the Ok button.
Now click on the OK button.

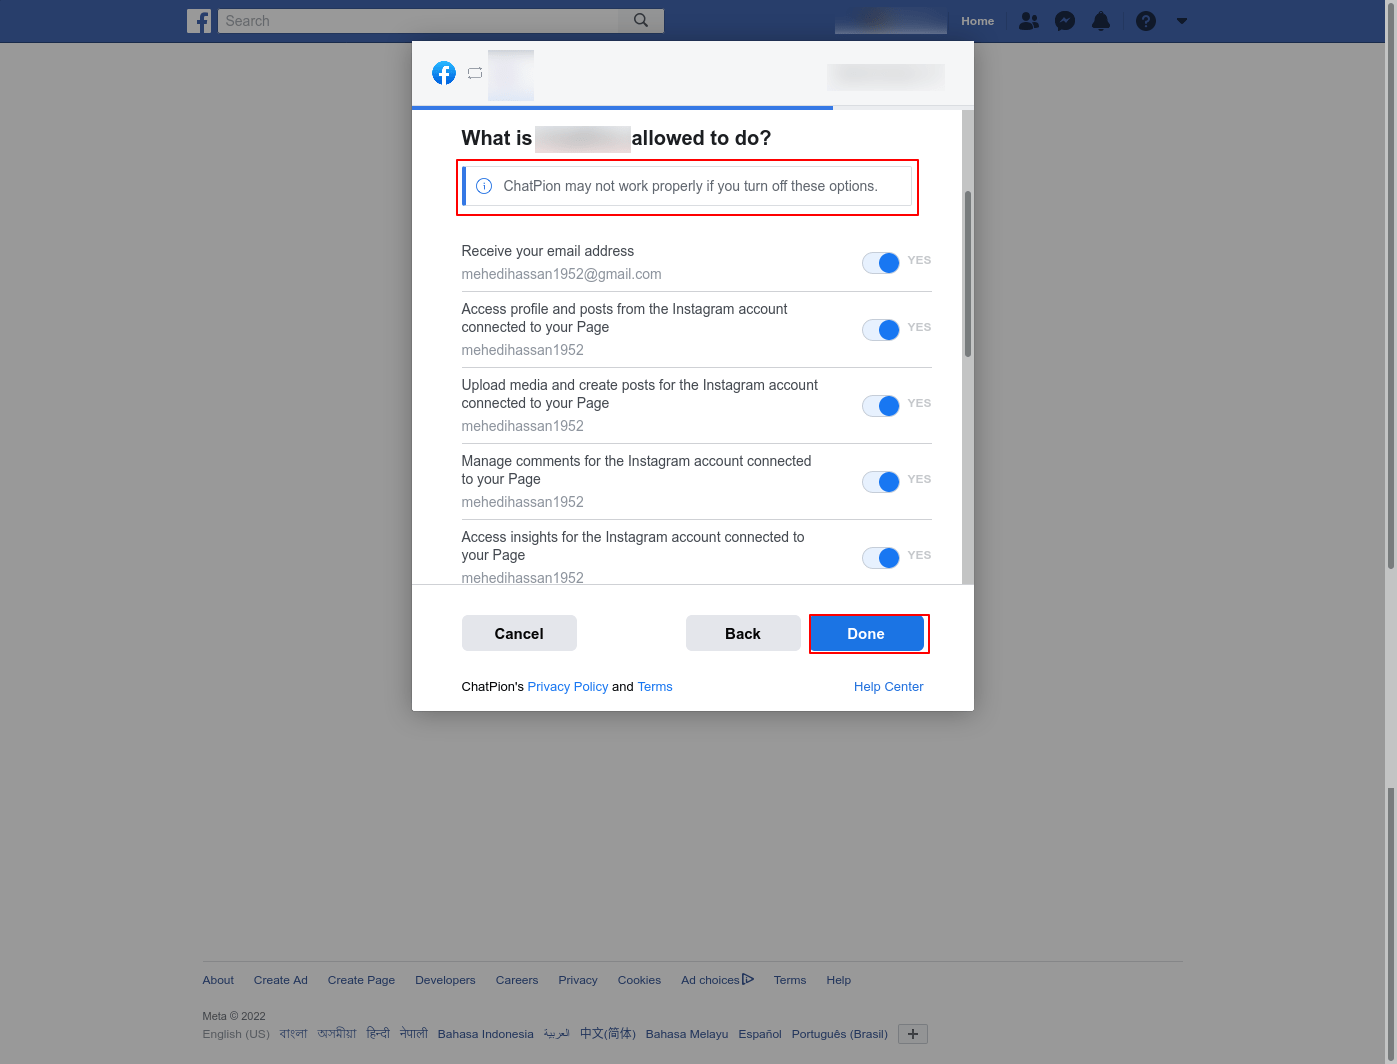
Instantly, a modal form will appear. On the modal form, you have to select what Loomsuite is allowed to do. Keep every option turned on.
Then click on the Done button.
Instantly, a modal form will appear. On the modal form, you have to select what Loomsuite is allowed to do. Keep every option turned on.
Then click on the Done button.
Instantly, another modal form will appear with a message that now you have linked Loomsuite to Facebook and the Ok button.
Now click on the OK button.

Import account directly
By clicking on the Continue as Profile name, you can import Facebook accounts directly.

Import another account
You can also import another account by clicking on the log-in into another account button.
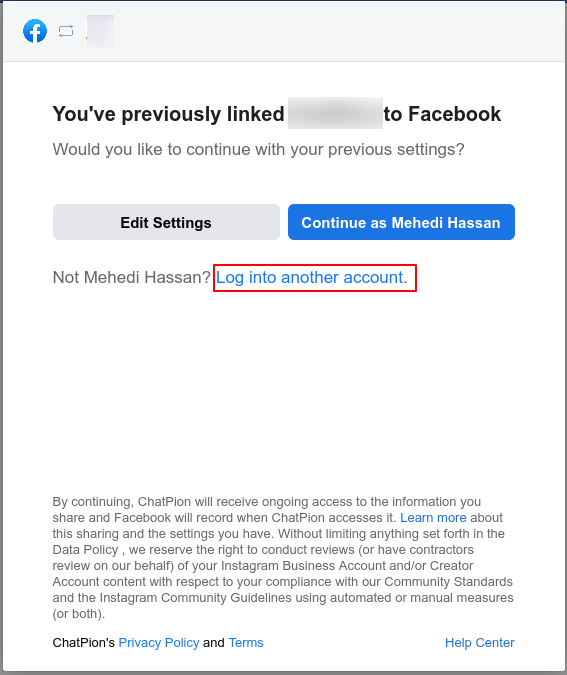
Click on the Log in into another account button and the Facebook login page will appear.
Now Log in with the Facebook and the account will be imported into ChatPion.

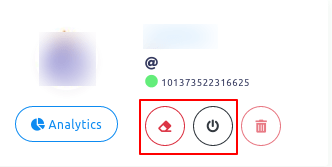
Instantly, the Connect Facebook and Instagram page will appear with a successful message and Facebook profile and Facebook page. Under the Facebook pages, you will see two buttons — the plug button and the delete button.
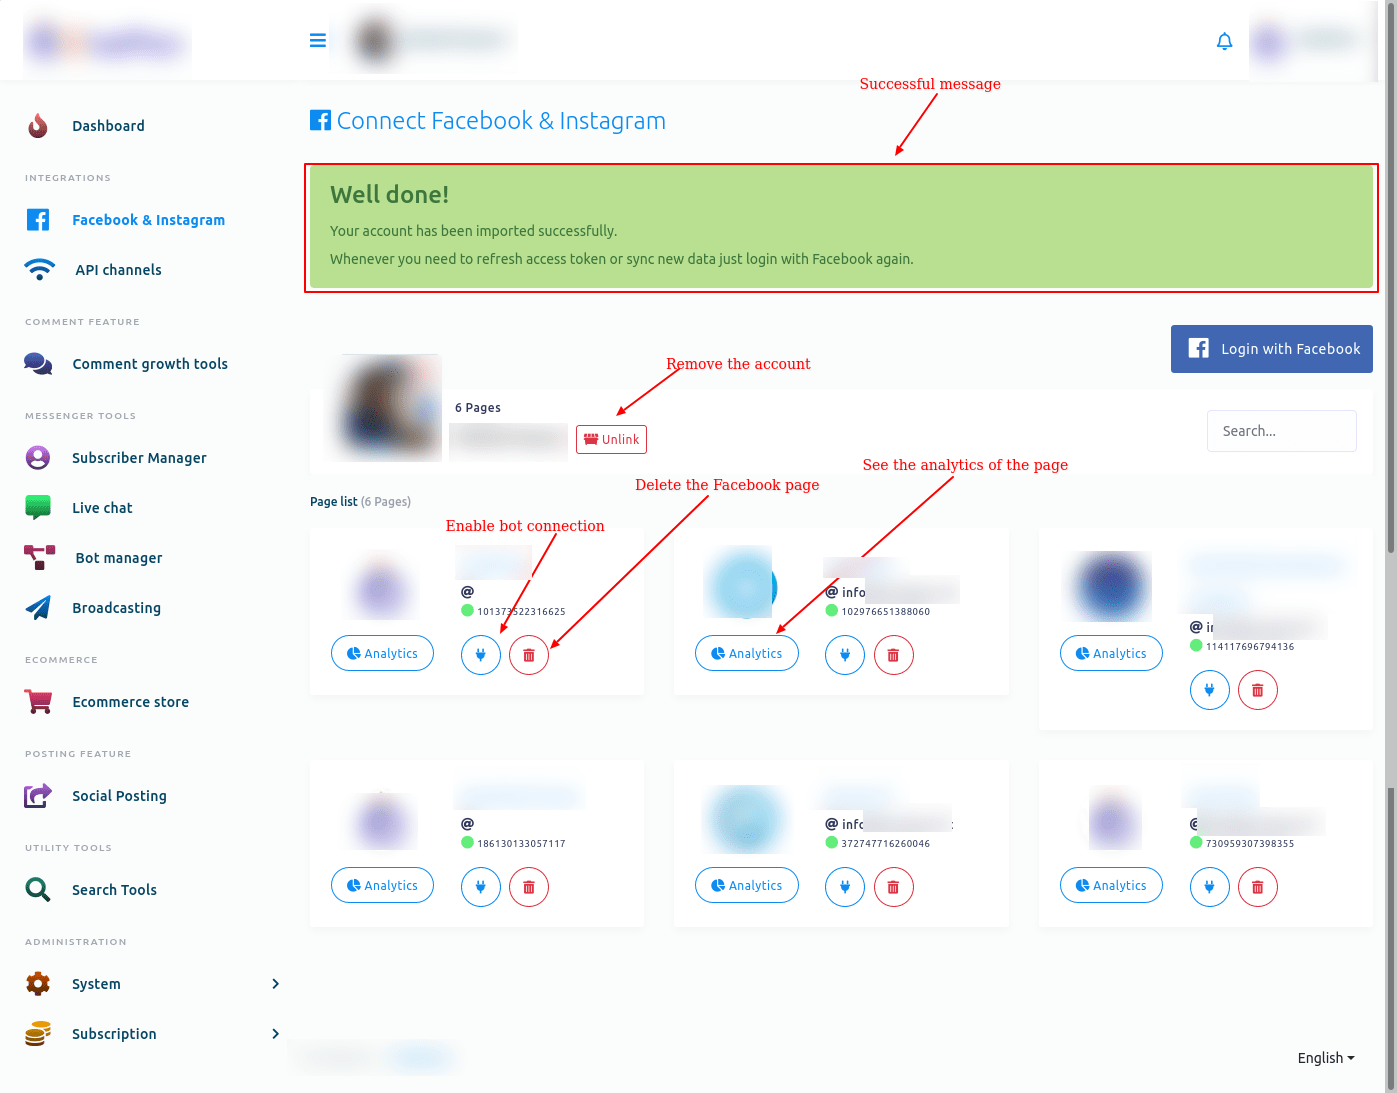
Enable bot connection
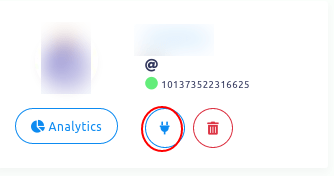
Now you have to enable bot connection for the pages. To enable bot connection for a page, click on the plug button under the page.
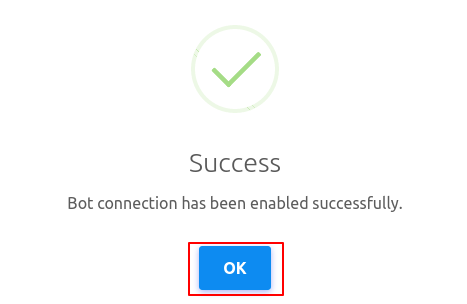
Instantly, a modal will appear with Cancel and OK button. Click on the OK button.

And a successful message — Bot connection has been enabled successfully — will appear.
Instead of the plug button, you will see two more buttons — the Eraser button and the Power button.
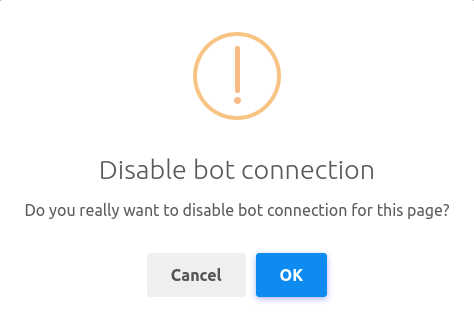
Disable bot connection
By clicking on the power button, you can disable the bot connection. Just as you click on the power button, a modal will appear with Cancel and OK buttons. Click on the OK button and the bot will be disabled.
And Instead of the power button, a radio button will appear.
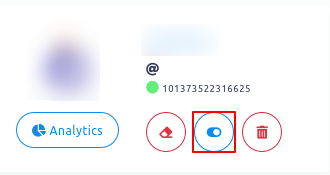
Re-start bot connection
To re-start the bot connection, click on the radio button. Instantly, a modal will appear with Cancel and OK buttons. Click on the OK button and the bot will be restarted.
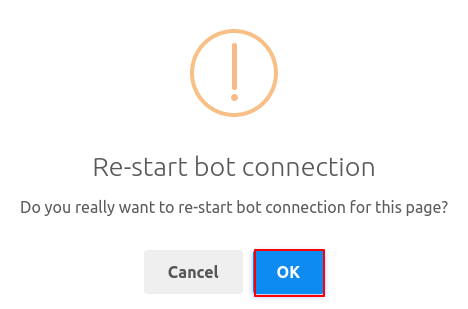
And instead of the radio button, the power button will appear.
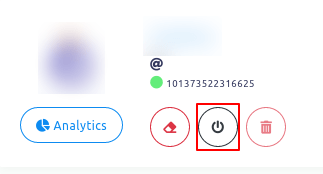
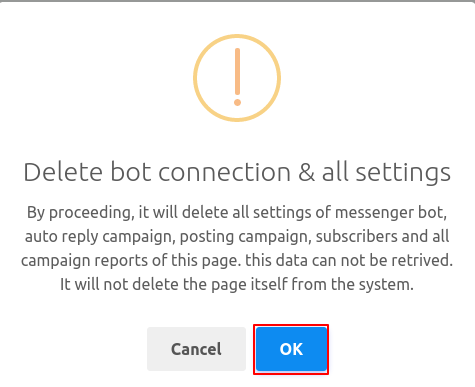
Delete bot connection
To delete the bot connection and all settings, click on the Erase button. And a successful message will appear.
Then, instead of the Erase and Power button, the plug button will re-appear.
Delete Facebook page
You can also remove the Facebook account. To remove the Facebook account, click on the Unlink button. Instantly, a modal will appear with Cancel and OK button.
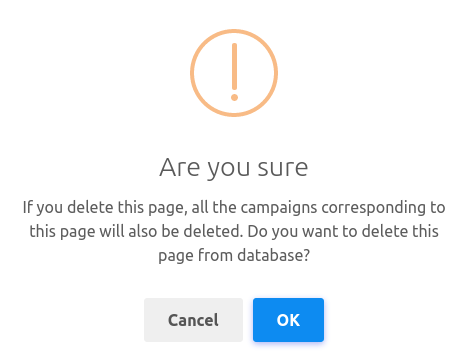
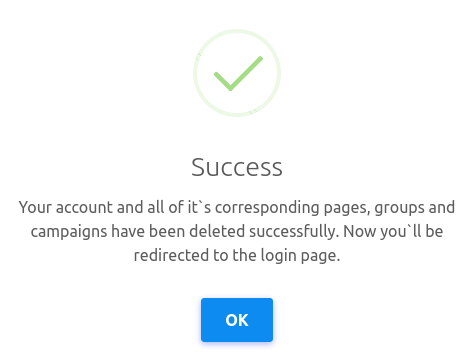
Click on the OK button and a successful message will appear. And the Facebook Page will be deleted.
See analytics
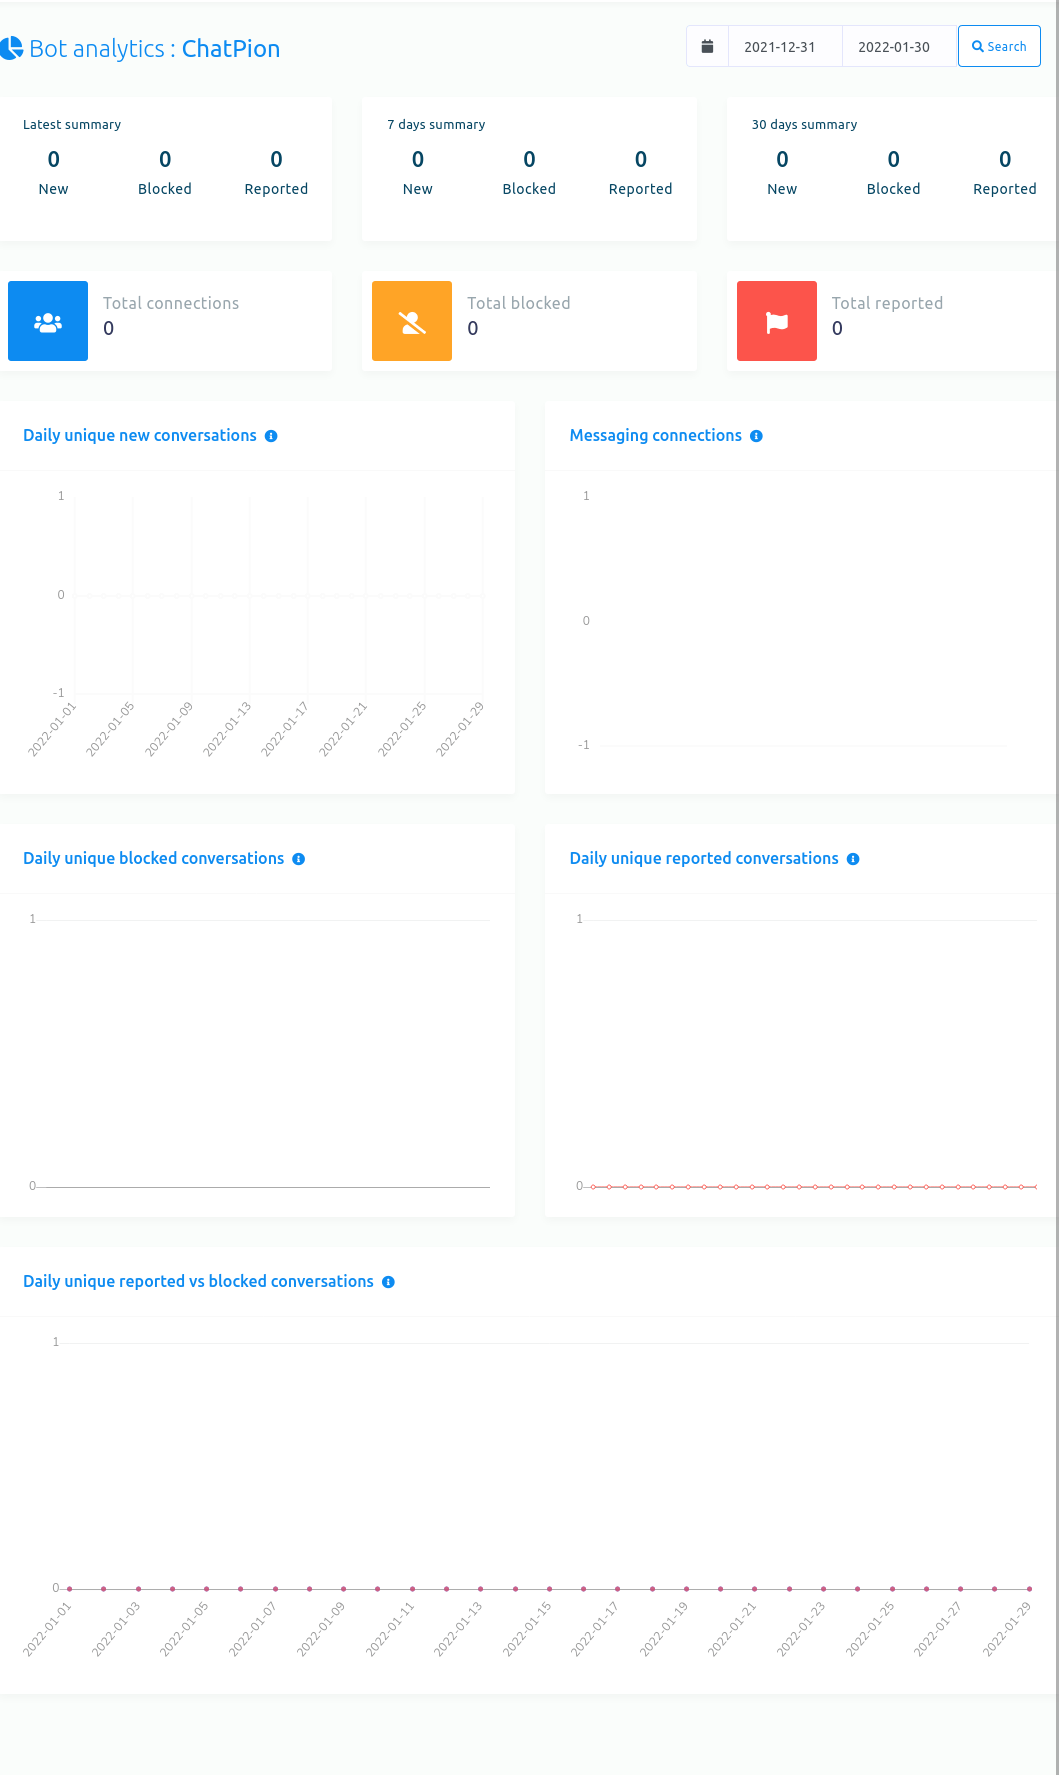
You can see the analytics of the page. To see the analytics of a page, click on the analytics button.
Instantly, a page called bot analytics will appear. You can see the bot analytics of the Facebook page on the web page.
The Comment growth tools is a fantastic feature of Loomsuite. And you can easily use the feature. Just read the article and follow the commands, and “Comment growth tools” will be set to work instantly.
Once the feature starts working, it will continue without your supervision until you stop it. The feature will take full responsibility for interacting and dealing with your valuable clients via the Facebook page and Instagram accounts.
How to use the Comment growth tools
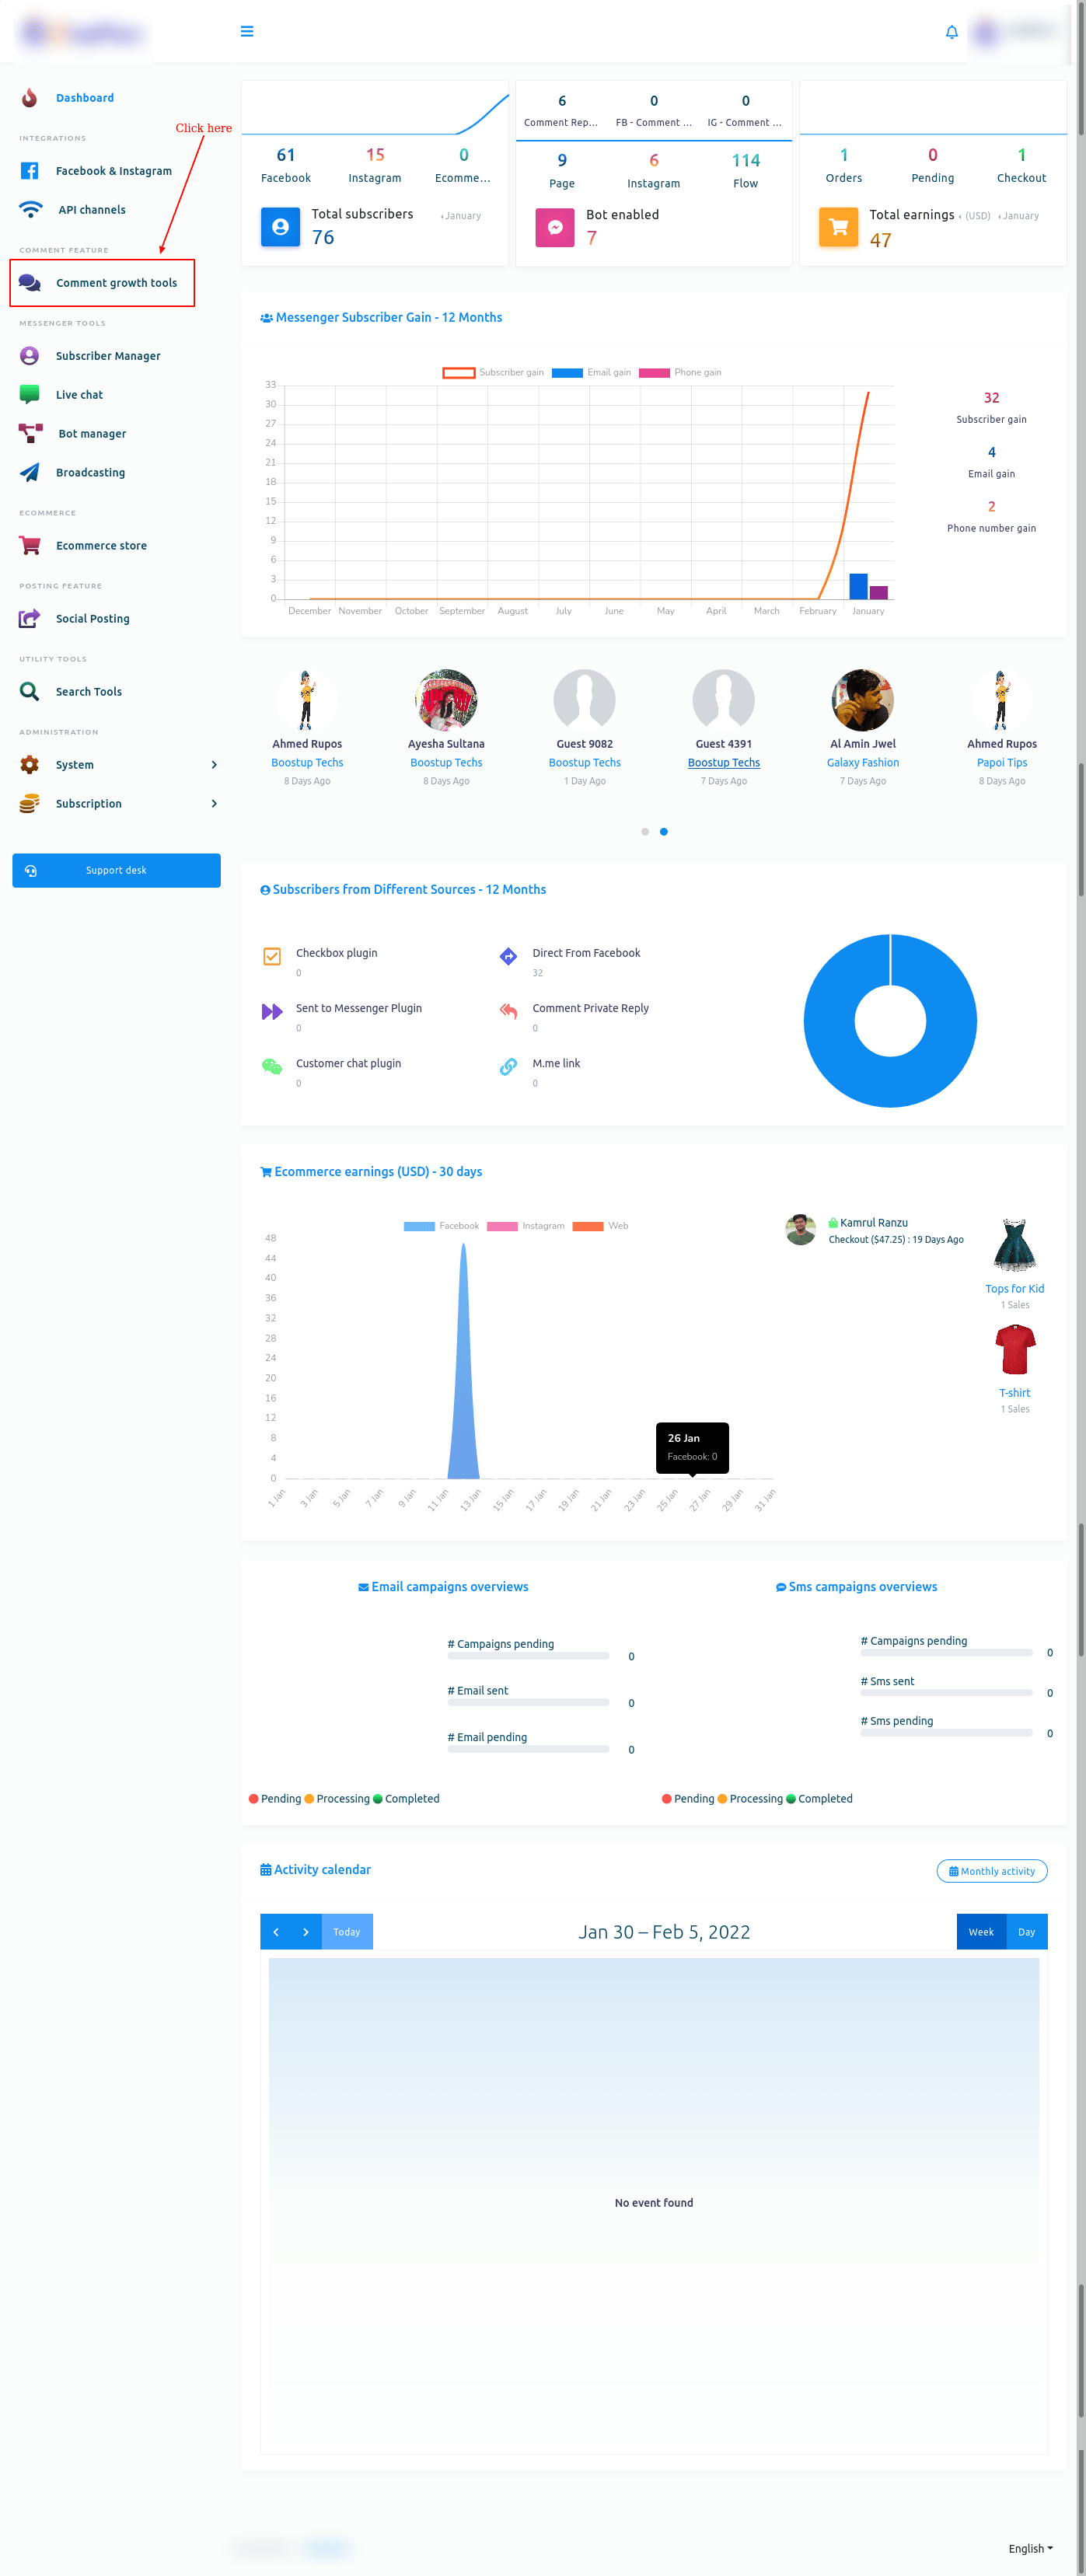
First, go to the dashboard of Loomsuite. At the left panel of the dashboard, you will see a menu called comment growth tools. Click on the menu.
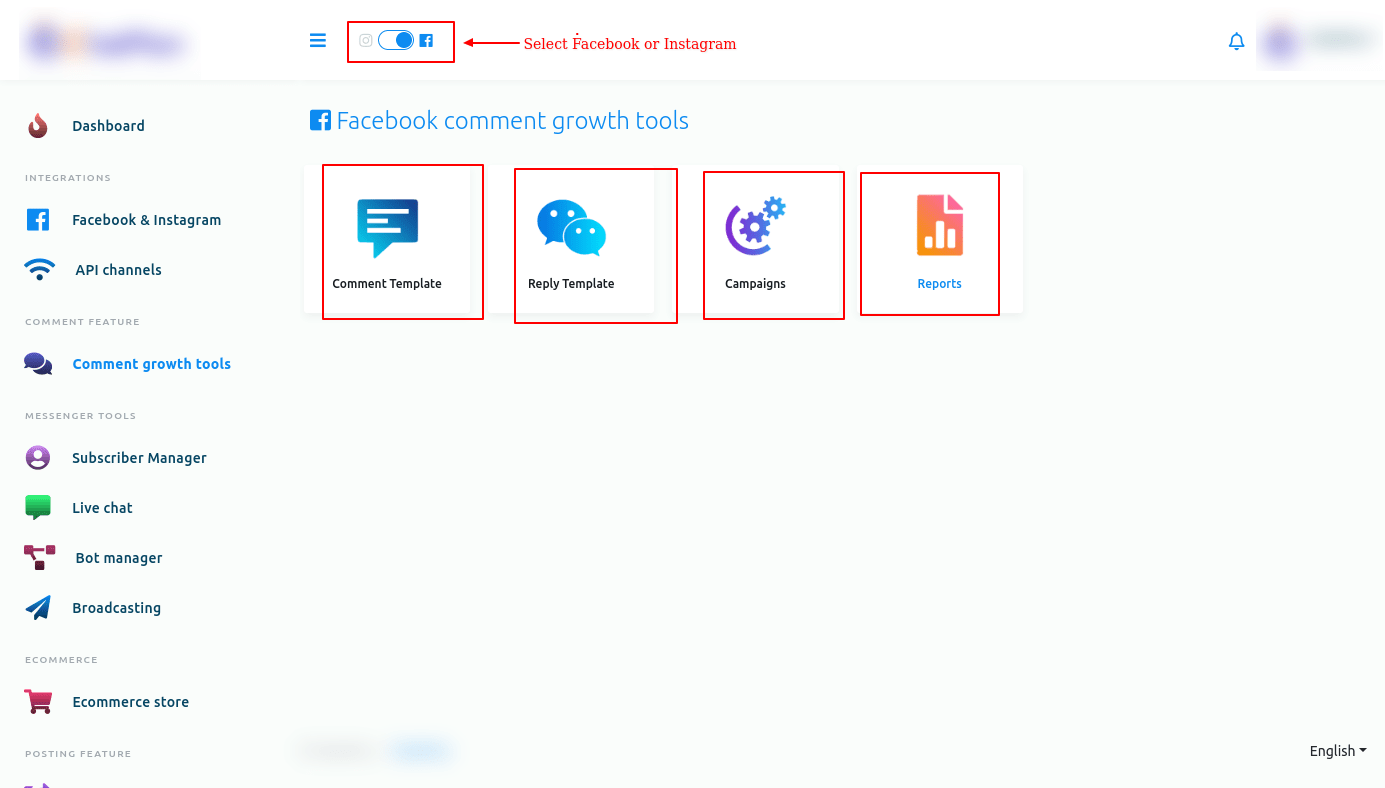
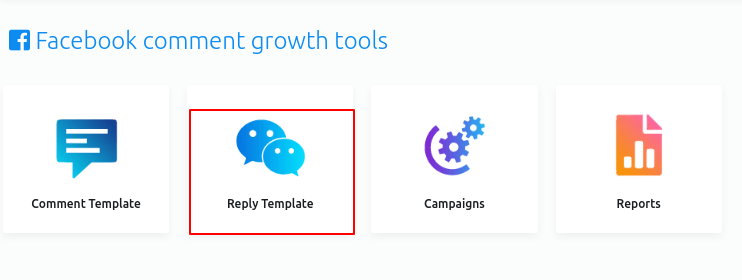
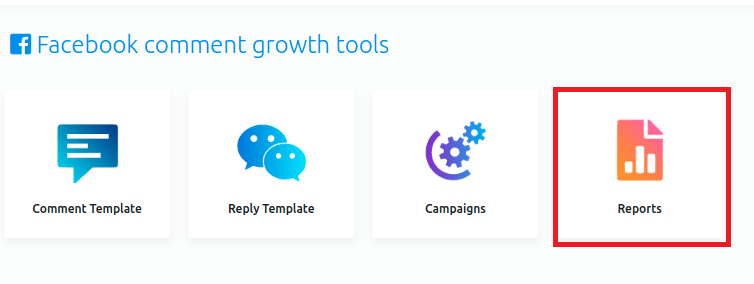
Instantly, the Comment growth tools page will appear. The page has three options — Comment Template, Reply Template, Campaigns, and reports.
On the page, you can select Facebook or Instagram. If you want to create a campaign for Facebook, select Facebook. On the other hand, if you want to create a campaign for Instagram, select Instagram.
Now let’s see how to create a Comment growth tools campaign for Facebook. Therefore, First, select Facebook.
Creating auto comment template
To create a comment template, click on the comment template option.
auto_comment_in_comment_growth_tools.png 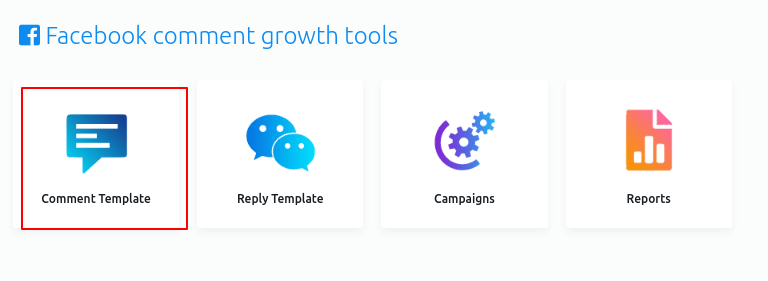
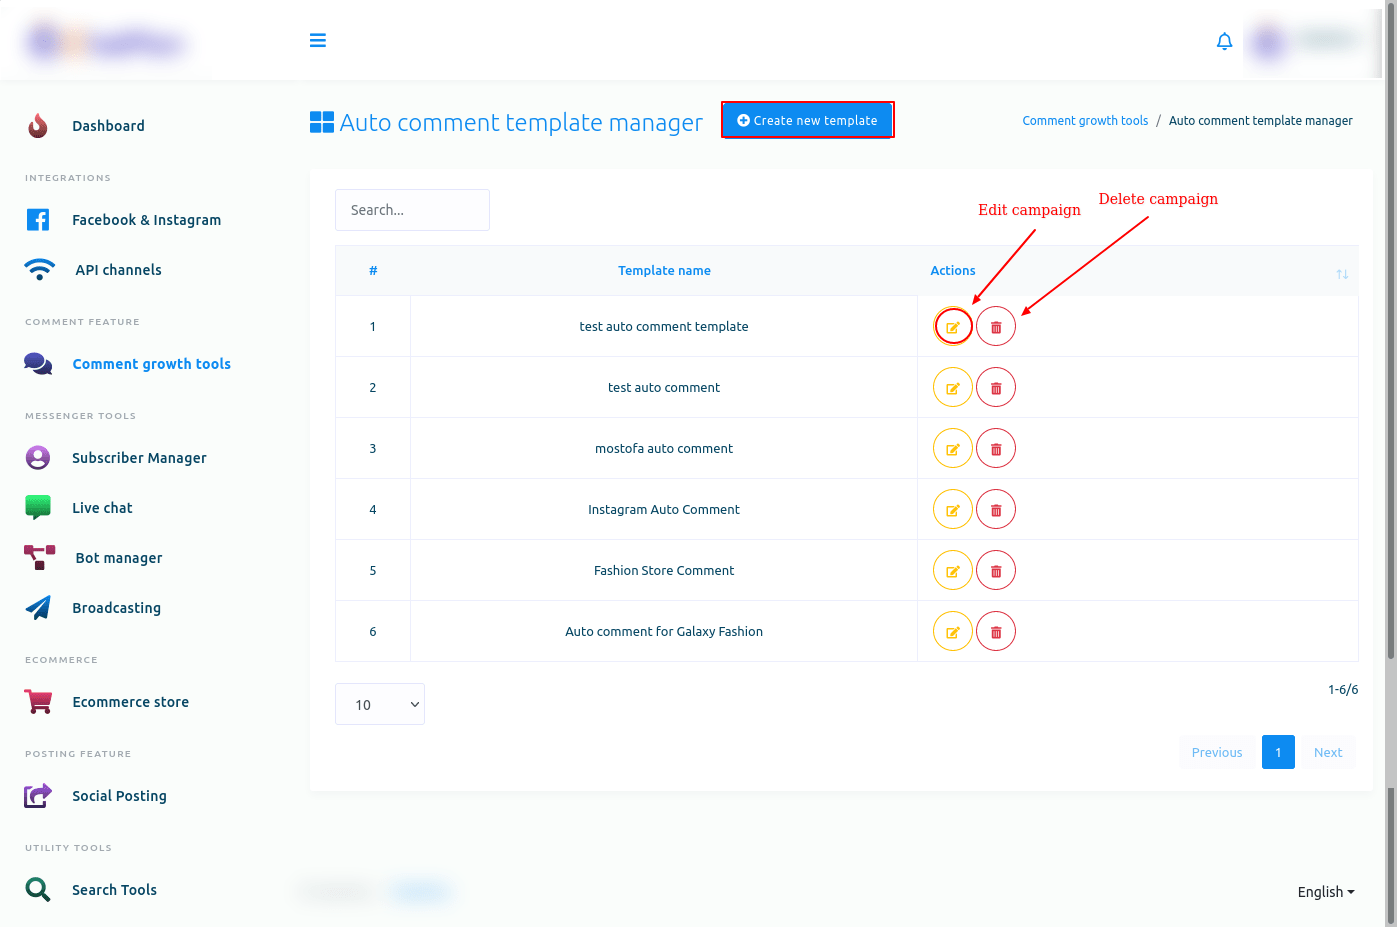
Instantly, the Auto comment template manager page will appear with a button called Create new template. Now click on the Create new template button.
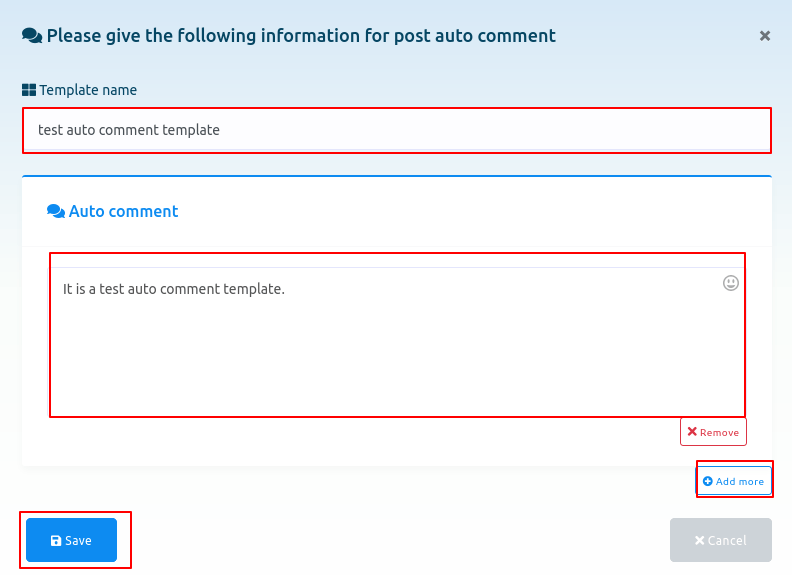
Instantly, a modal form will appear— you have to fill out the form to create an auto comment template.
Write a ‘Template name’ in the ‘Template name’ box. Then write a comment in the ‘Auto comment’ box, the comment that will be made automatically under your Facebook pages’ posts. You can add as many comments as you want by clicking on the ‘Add more’ button. Then click on the ‘Save’ button.
Instantly, a successful message will appear.
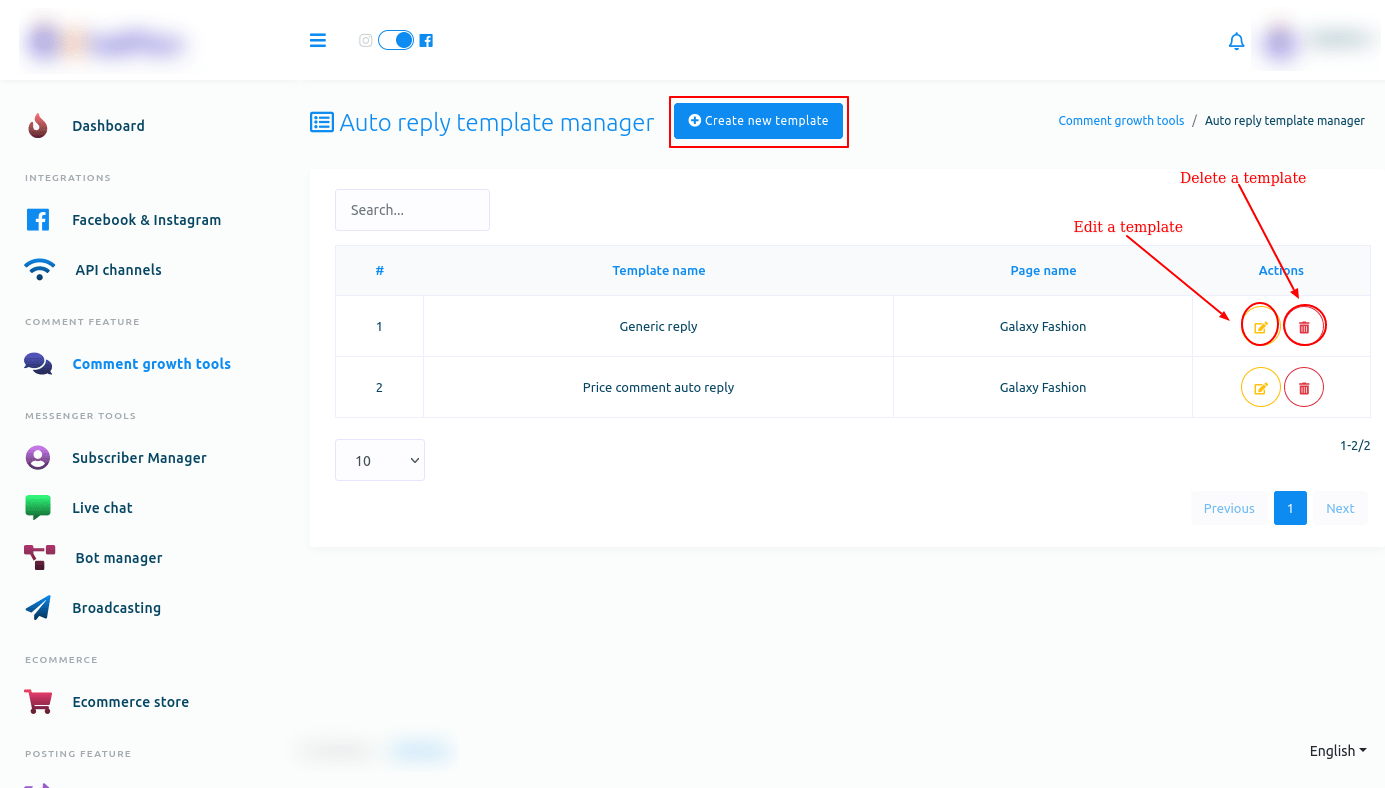
Now the template is created, and you can see the template name on the page called ‘Auto comment template manager’. Next to the template name, you will see the ‘edit’ and ‘delete’ icons. By clicking on the ‘Edit’ icon, you can edit the campaign. And by clicking on the ‘Delete’ icon, you can delete the template. Of course, you can create another template by clicking on the ‘Create new template’ button— you can create as many templates as you want.
Creating auto reply template
To create auto reply template, click on the Reply template option on the Comment growth tool page.
Instantly, Auto reply template manager page will appear with a button called Create new template.
Now click on the Create new template button.
Instantly, a modal form will appear — you have to fill out the form.
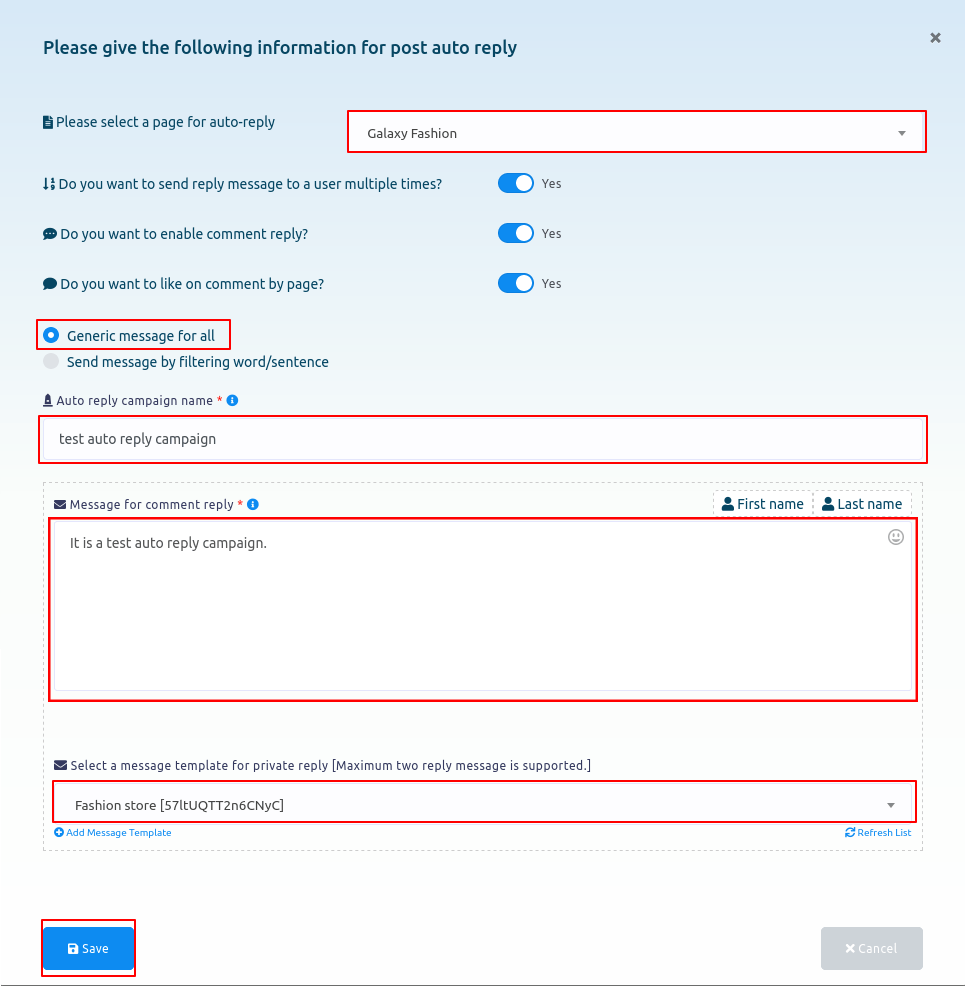
First, you have to select a Facebook page from the drop-down menu.
You can enable three options if you want to.
Generic message for all
After that, select Generic message for all option. And instantly, three fields will appear.
Write a template name in the Auto reply campaign name field.
Then write a message for Message for comment reply field.
After that, you have to select a message template for private reply.
Then click on the Save button.
Send message by filtering
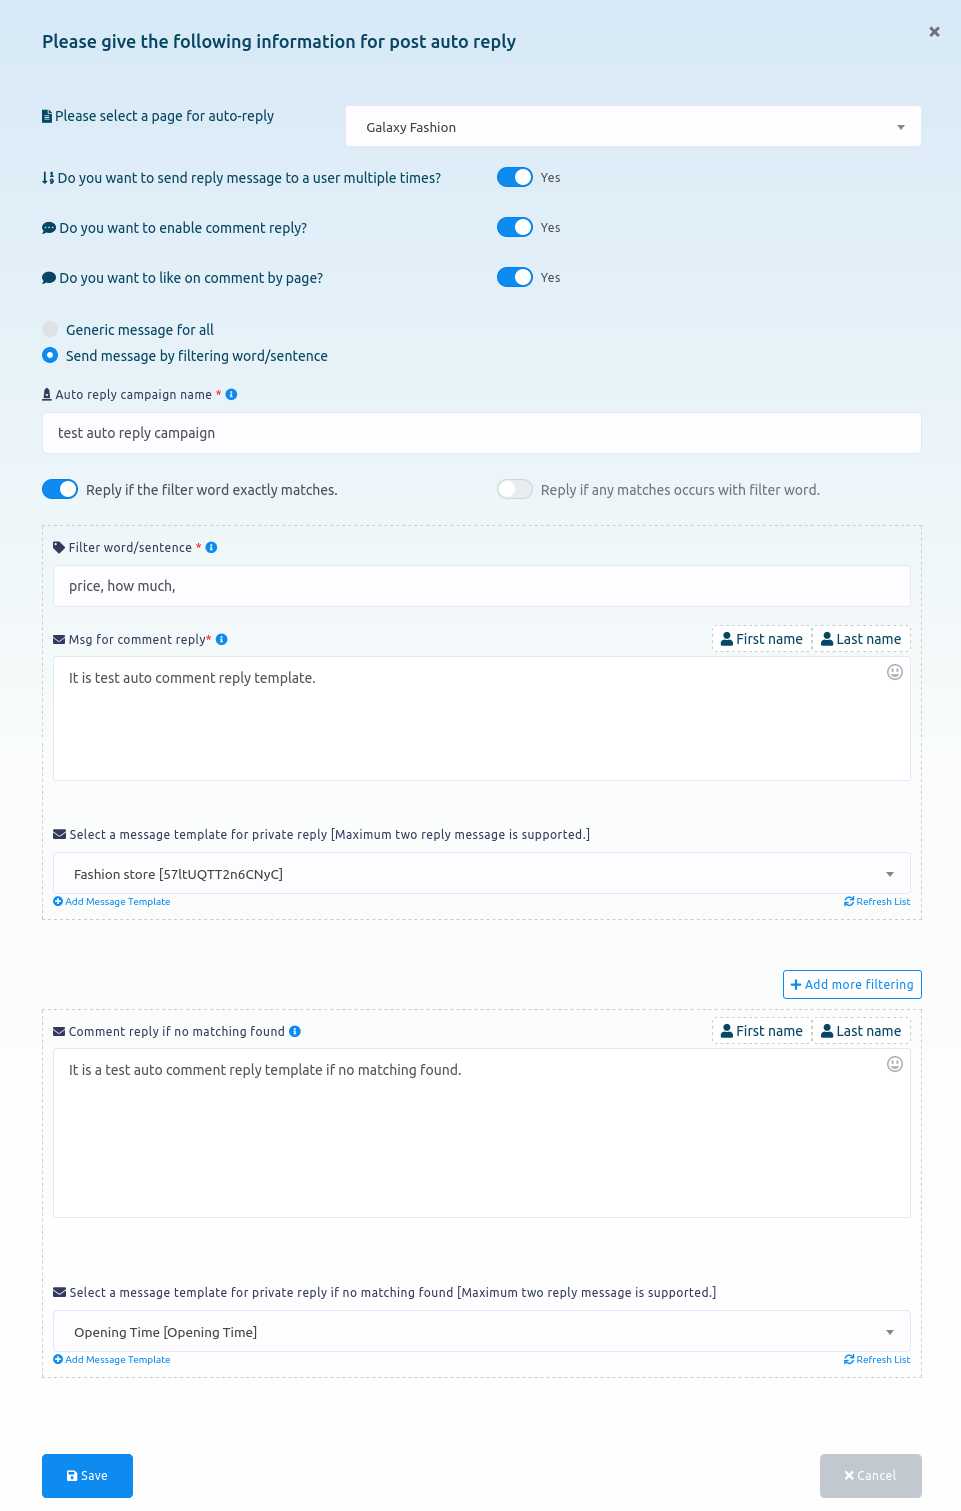
On the other hand, if you select Send message by filtering word/sentence, some more fields will appear.
First, write a campaign name in the Auto reply campaign name field.
Then you have to enable one option from two options — Reply if the filter word exactly matches and Reply if any matches occurs with filter word.
Then you have to write filter word or sentence in appropriate field.
After that, write a message for Comment reply.
Then select a message template for private reply.
Then write a comment in the Comment reply if no matching found field.
Then select a message template for private reply if no matching found.
Then click on the Save button.
Create campaigns
To create campaigns, click on the Campaigns option on the Comment growth tools page.
Instantly, a Facebook comment automation campaign page will appear.
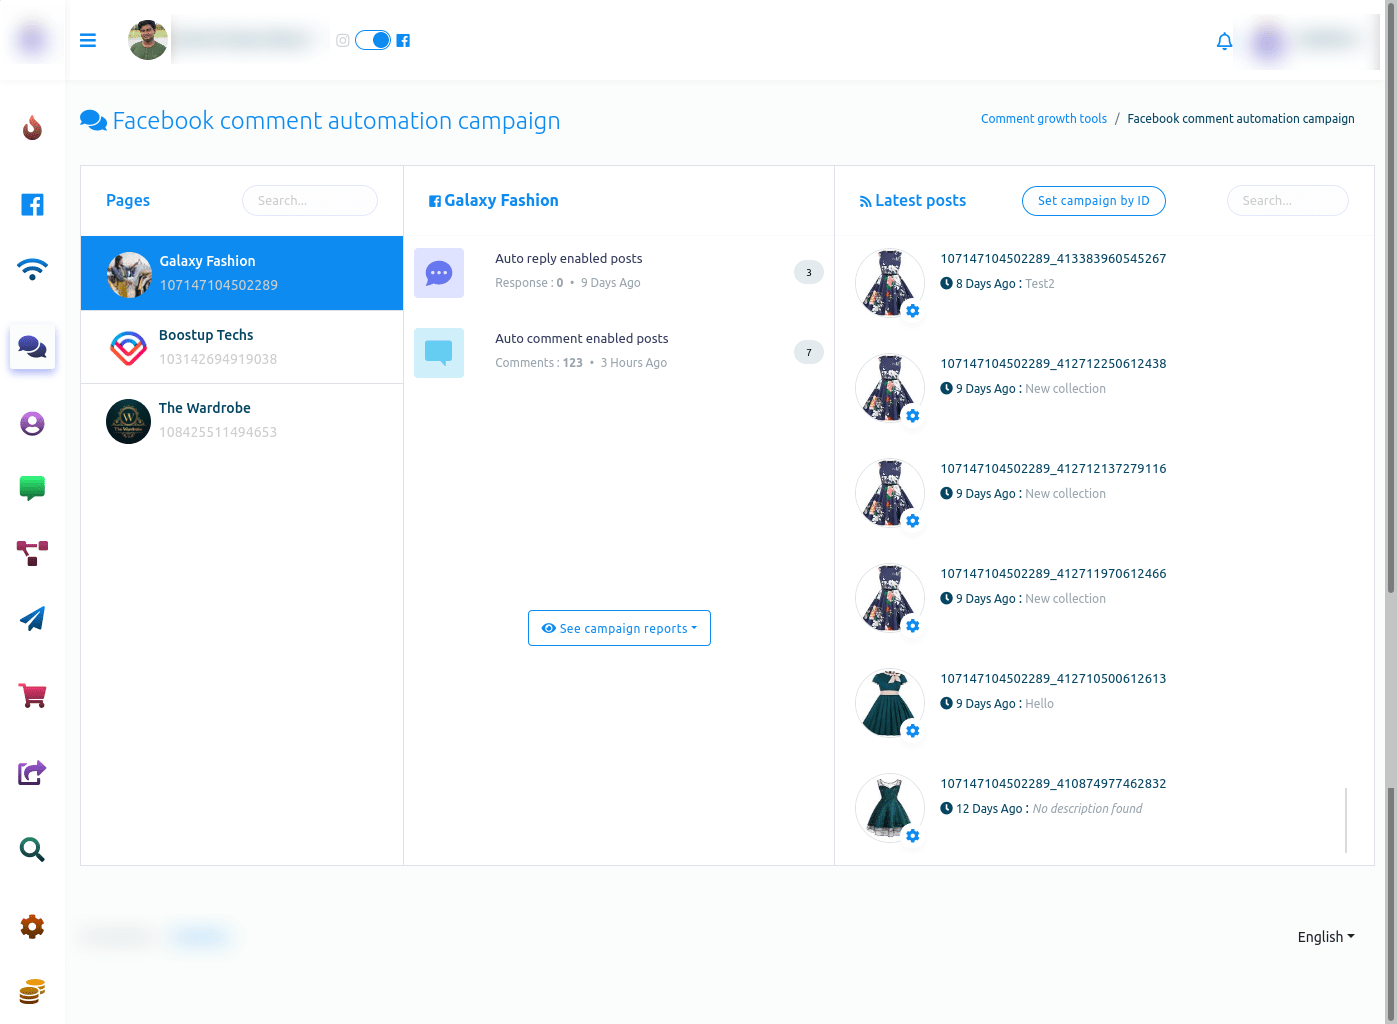
The page is divided into three sections.
On the Pages section, you have to select a Facebook page. In the middle section, you can see reports.
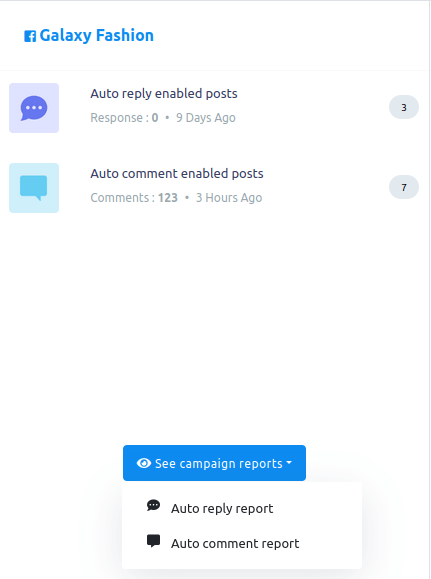
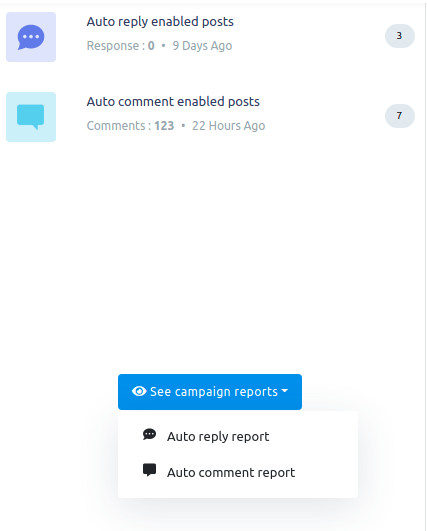
Initially, you can see the number of auto reply enabled posts and auto comment enabled posts.
If you want to see campaign reports in detail, click on the see campaign reports button. Instantly, a drop-down menu of two options — auto reply report and auto comment report will appear.
 Auto reply report
Auto reply report
To see auto reply report, click on the auto reply report option.
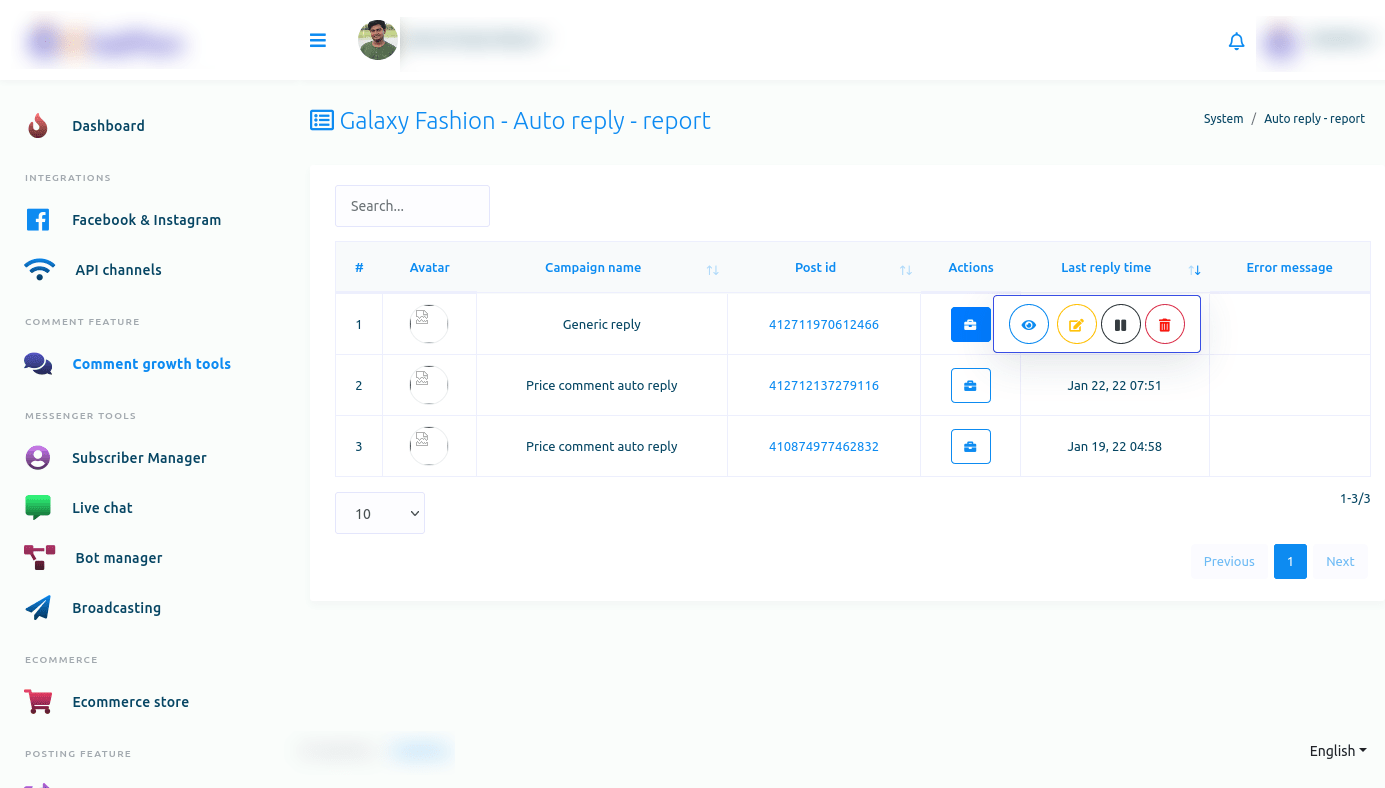
Instantly, auto reply report of the selected page will appear.
On the page, you can see the details of the campaign. And you can edit, pause and delete any campaign and see the report of any campaign.
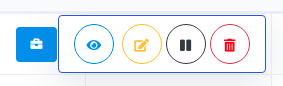
Click on the action button of a campaign and a pop-up menu of four buttons — eye icon button, edit button, pause button, and delete button.
To see the report of a campaign, click on the eye icon button.
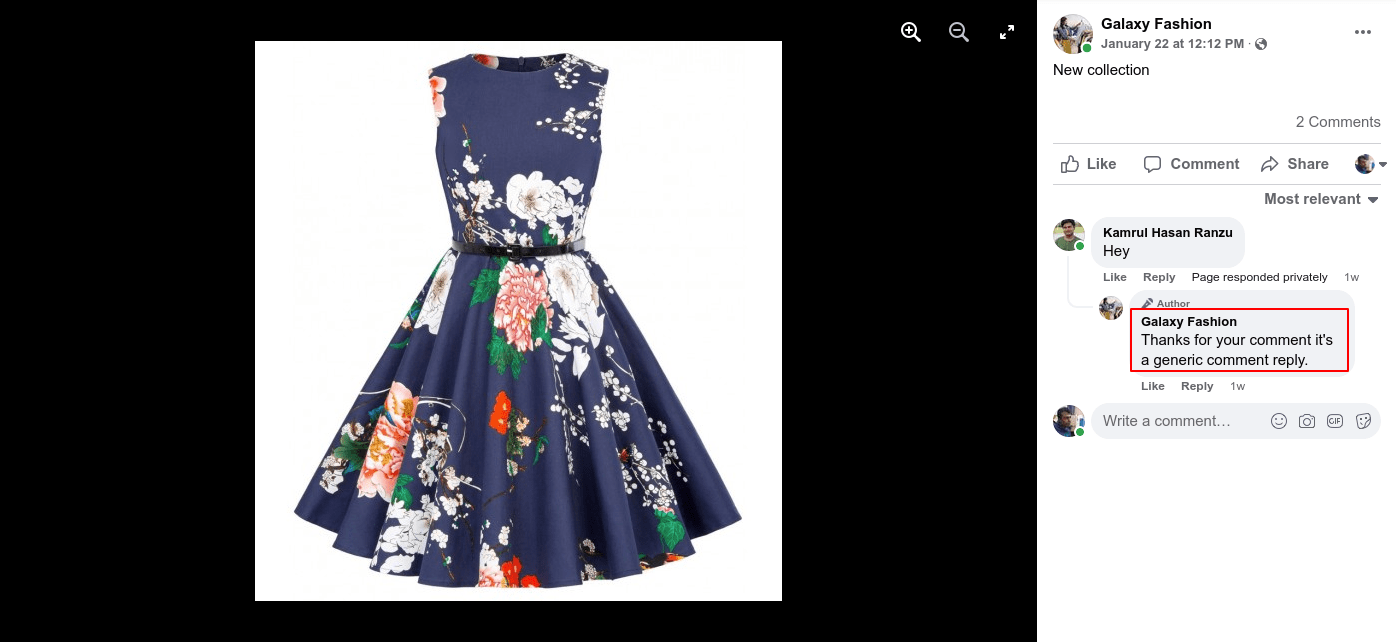
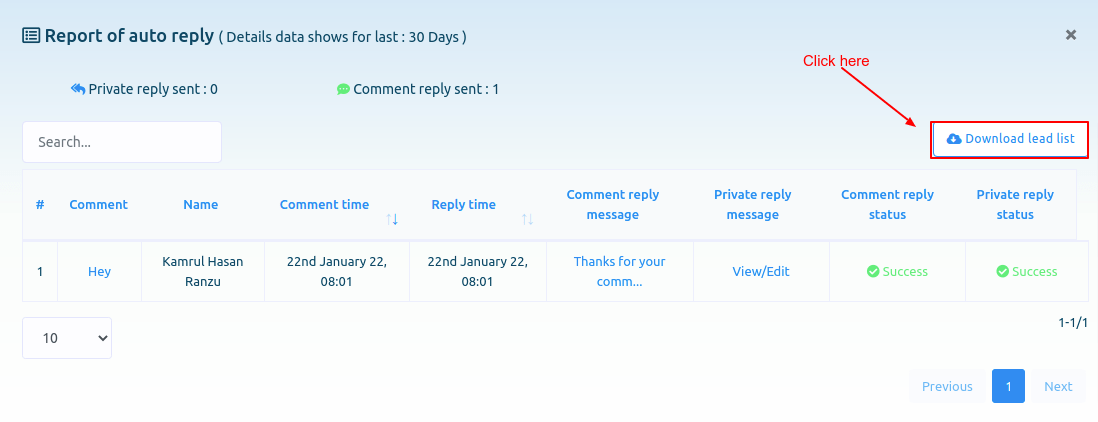
Instantly, a modal called Report of auto reply will appear. On the modal, you can see the report of the auto reply.
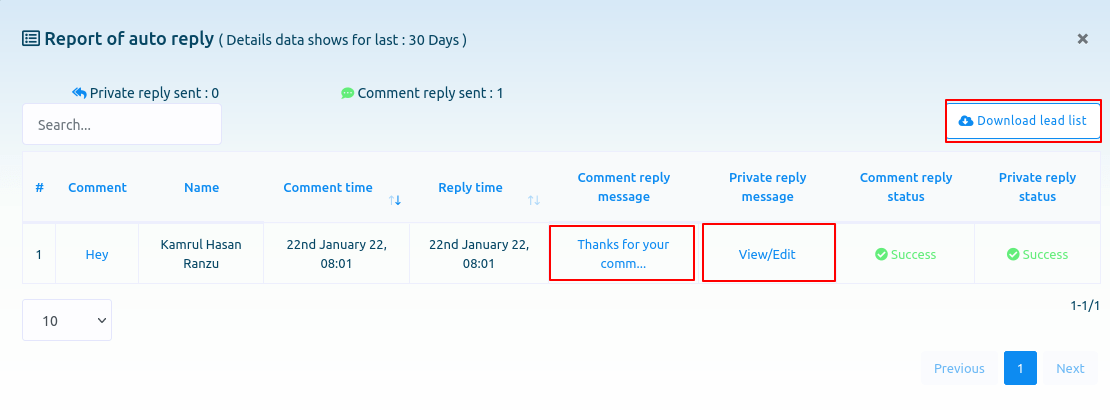
By clicking on the view/edit button under the private reply message option, you can view and edit private reply message template.
Just as you click on the view/edit button, a page called edit Facebook post-back template will appear. And on the page, you can edit the postback template easily.

And under the comment reply message option, you can see the comment reply message. And if you click on the comment reply message, the post will appear under which the comment is posted.
By clicking on the download lead list button, you can download the lead list in a CSV file.
Likewise, by clicking on the edit, pause and delete button, you can edit, pause and delete the campaign.
Auto comment report
To see the auto comment report, click on the Auto comment report option of the drop-down menu.
Instantly, a page called All auto comment report will appear. Now click on the Action button of an Auto comment campaign and a pop-up menu of different buttons — eye icon button, edit button, pause button, force processing button and delete button — will appear.
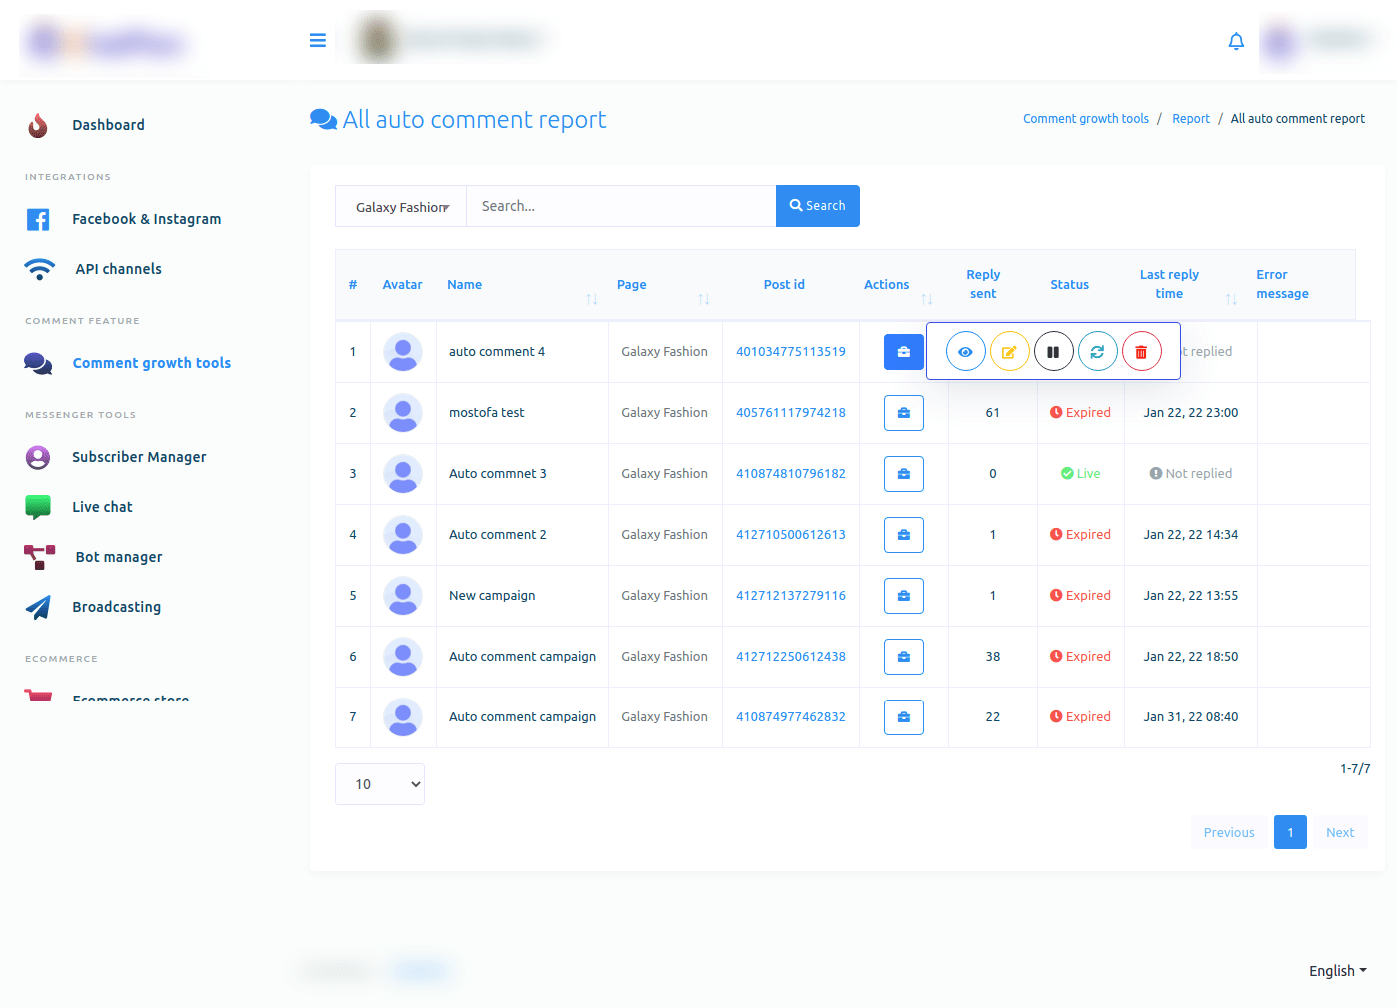
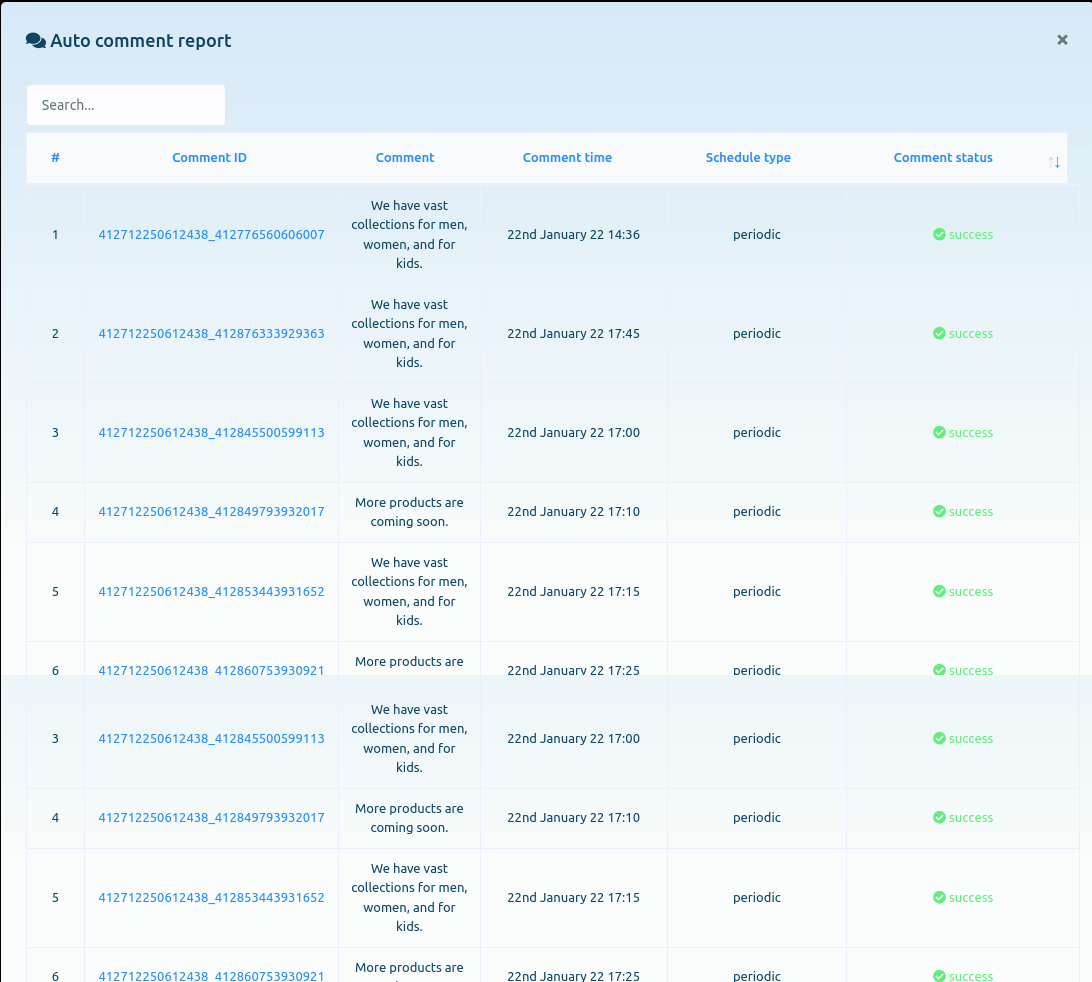
Now click on the eye icon button and instantly, a modal form called Auto comment report will appear. And on the page, you can see the report of the auto comment report.
Likewise, you can edit, pause, force processing and delete the campaign.
Latest Posts
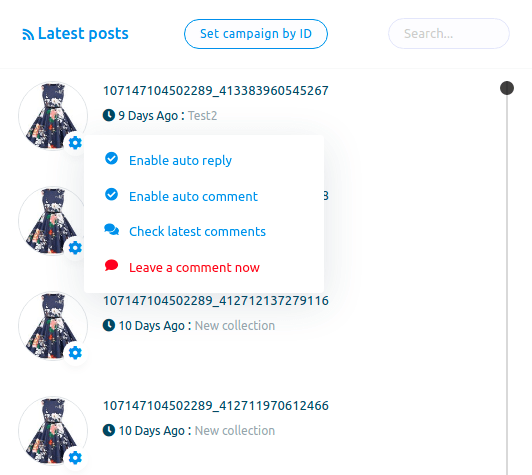
Now come to the latest post sections. In the section, you can see the list of latest posts.
Now click on the gear icon of any post and a drop-down menu of different options — Enable auto reply, Enable auto comment, Check latest comments, Leave a comment now.
Enable auto reply
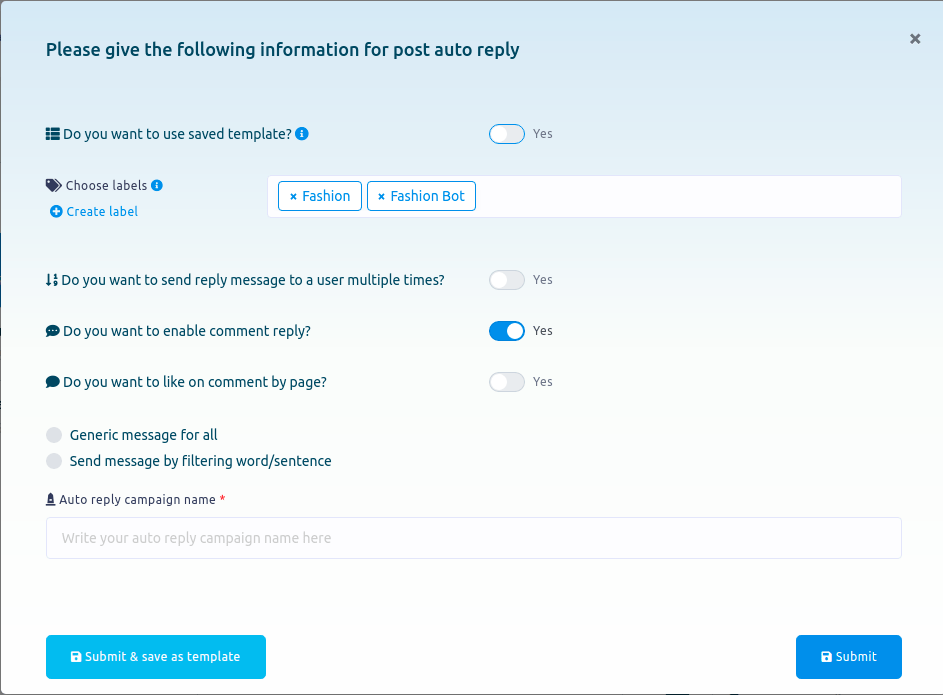
To enable auto reply for the post, click on the Enable auto reply option.
Instantly a modal form will appear. Now you have to fill out the modal form.
If you want to use a saved template, keep the radio button turned on.
Now select labels from the choose labels fields. Of course, you can select multiple labels.
Then you have to select an auto reply template.
Now click on the submit button.
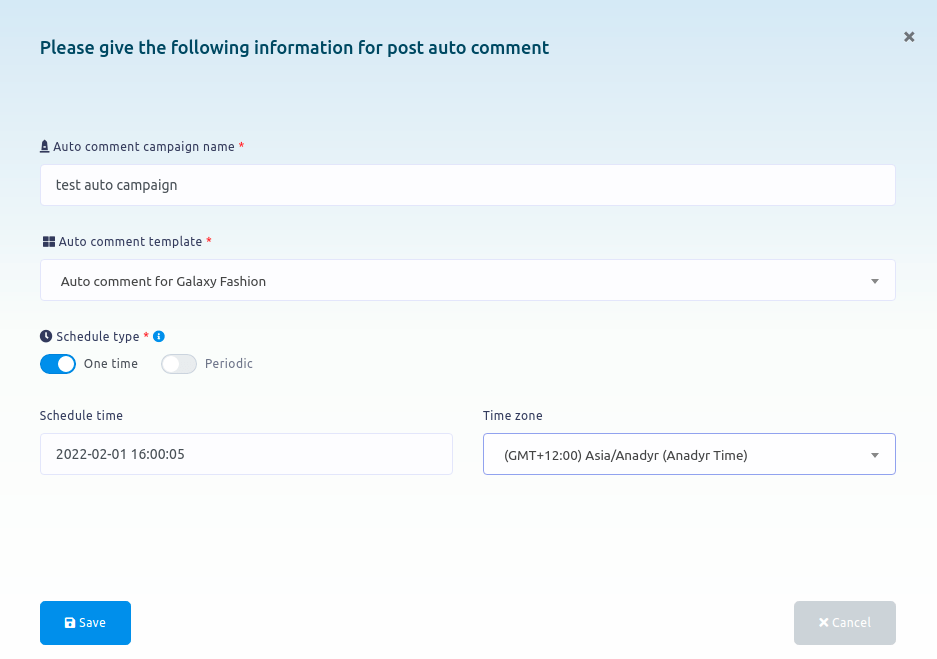
Enable auto comment
To enable auto comment, click on the Enable auto comment option.
Instantly, a modal form will appear. Now you have to fill out the form.
Check latest comments
To check latest comments, click on the Check latest comments opinion. And instantly, all the latest comments will appear on a modal form.

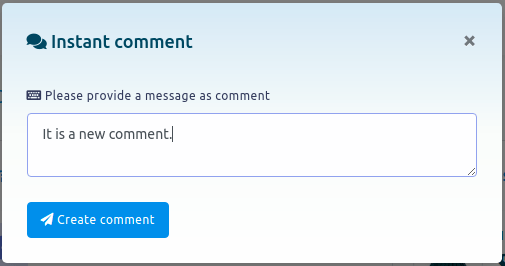
Leave a comment
To leave a comment under a post now, click on the Leave a comment option.
Instantly, a modal form will appear. Write a comment in the field and click Create comment button.
Reports
Also, you can see all the reports by clicking on the Reports option.
Subscriber Manager
With the subscriber manager feature of Loomsuite, you can see all of your subscribers. And you can scan subscriber lists and enable auto scan and search subscribers. Moreover, you can migrate page conversations as subscribers, download search results, assign labels to selected subscribers, and delete subscribers. Besides, you can create New labels on the page.
First, go to the dashboard of the Loomsuite. At the left sidebar of the dashboard, you will see a menu called subscriber manager. Click on the subscriber manager menu.
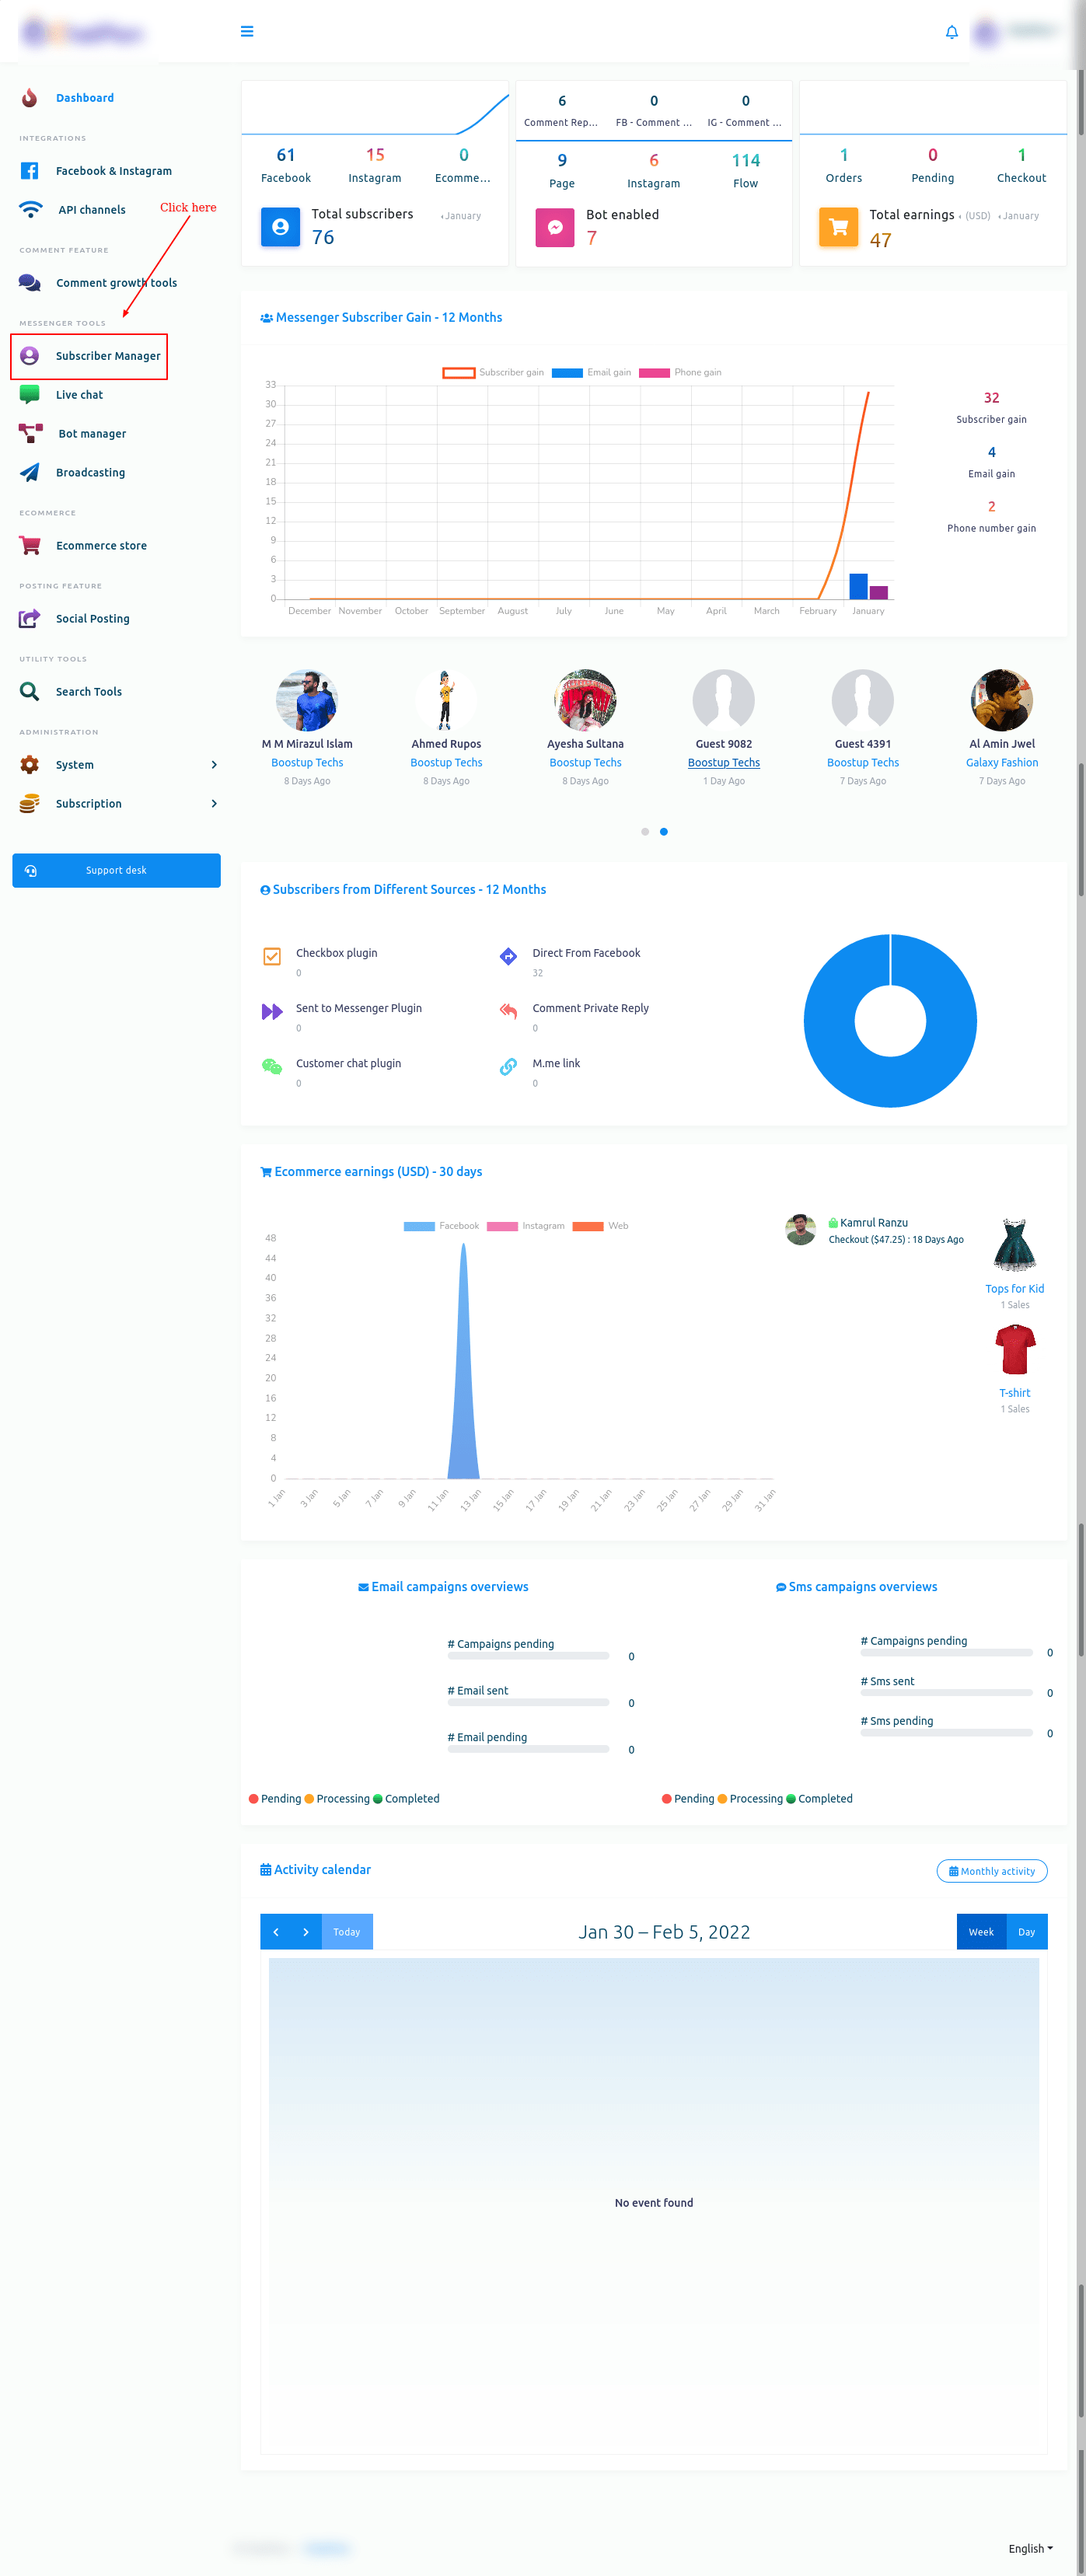
Subscriber manager
Instantly, a page called Subscriber manager will appear.
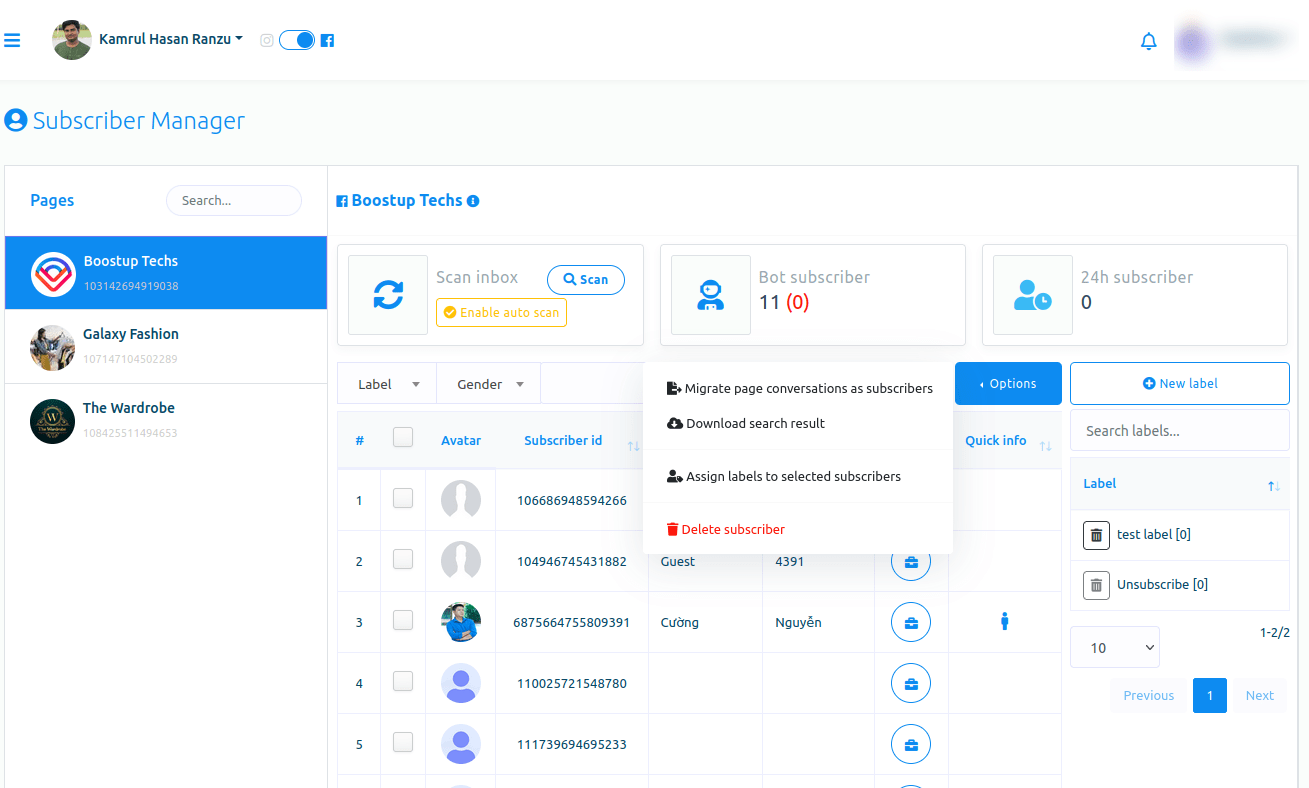
Using the Subscriber manager feature of Loomsuite is very easy. Just look at the page, and you will understand everything.
Live Chat
Loomsuite, a chatbot-building platform, and multichannel marketing software, has recently presented a feature called Live Chat. On the Live Chat interface, you can see the recent conversations between your users and your Facebook page or Instagram account. Of course, on the Live Chat, you can directly converse via your Facebook page or Instagram account with the users. In one word, you can do everything that you can do on Facebook or Instagram messenger. As well, you can accomplish some other tasks such as creating labels, assigning labels to users, and setting sequence messages.
Moreover, you can subscribe and unsubscribe a user at any time. Likewise, you can pause and resume bot replies for a specific user.
In this article, I will talk about how to perfectly use the feature, Live Chat.
Using Live Chat is as easy as using Facebook and Instagram messenger. That is, using Live Chat is super simple and straightforward.
Let’s see how to use Live Chat
First, go to the dashboard of Loomsuite. You will see the live chat menu at the left sidebar of the dashboard. Just click on the Live Chat option.
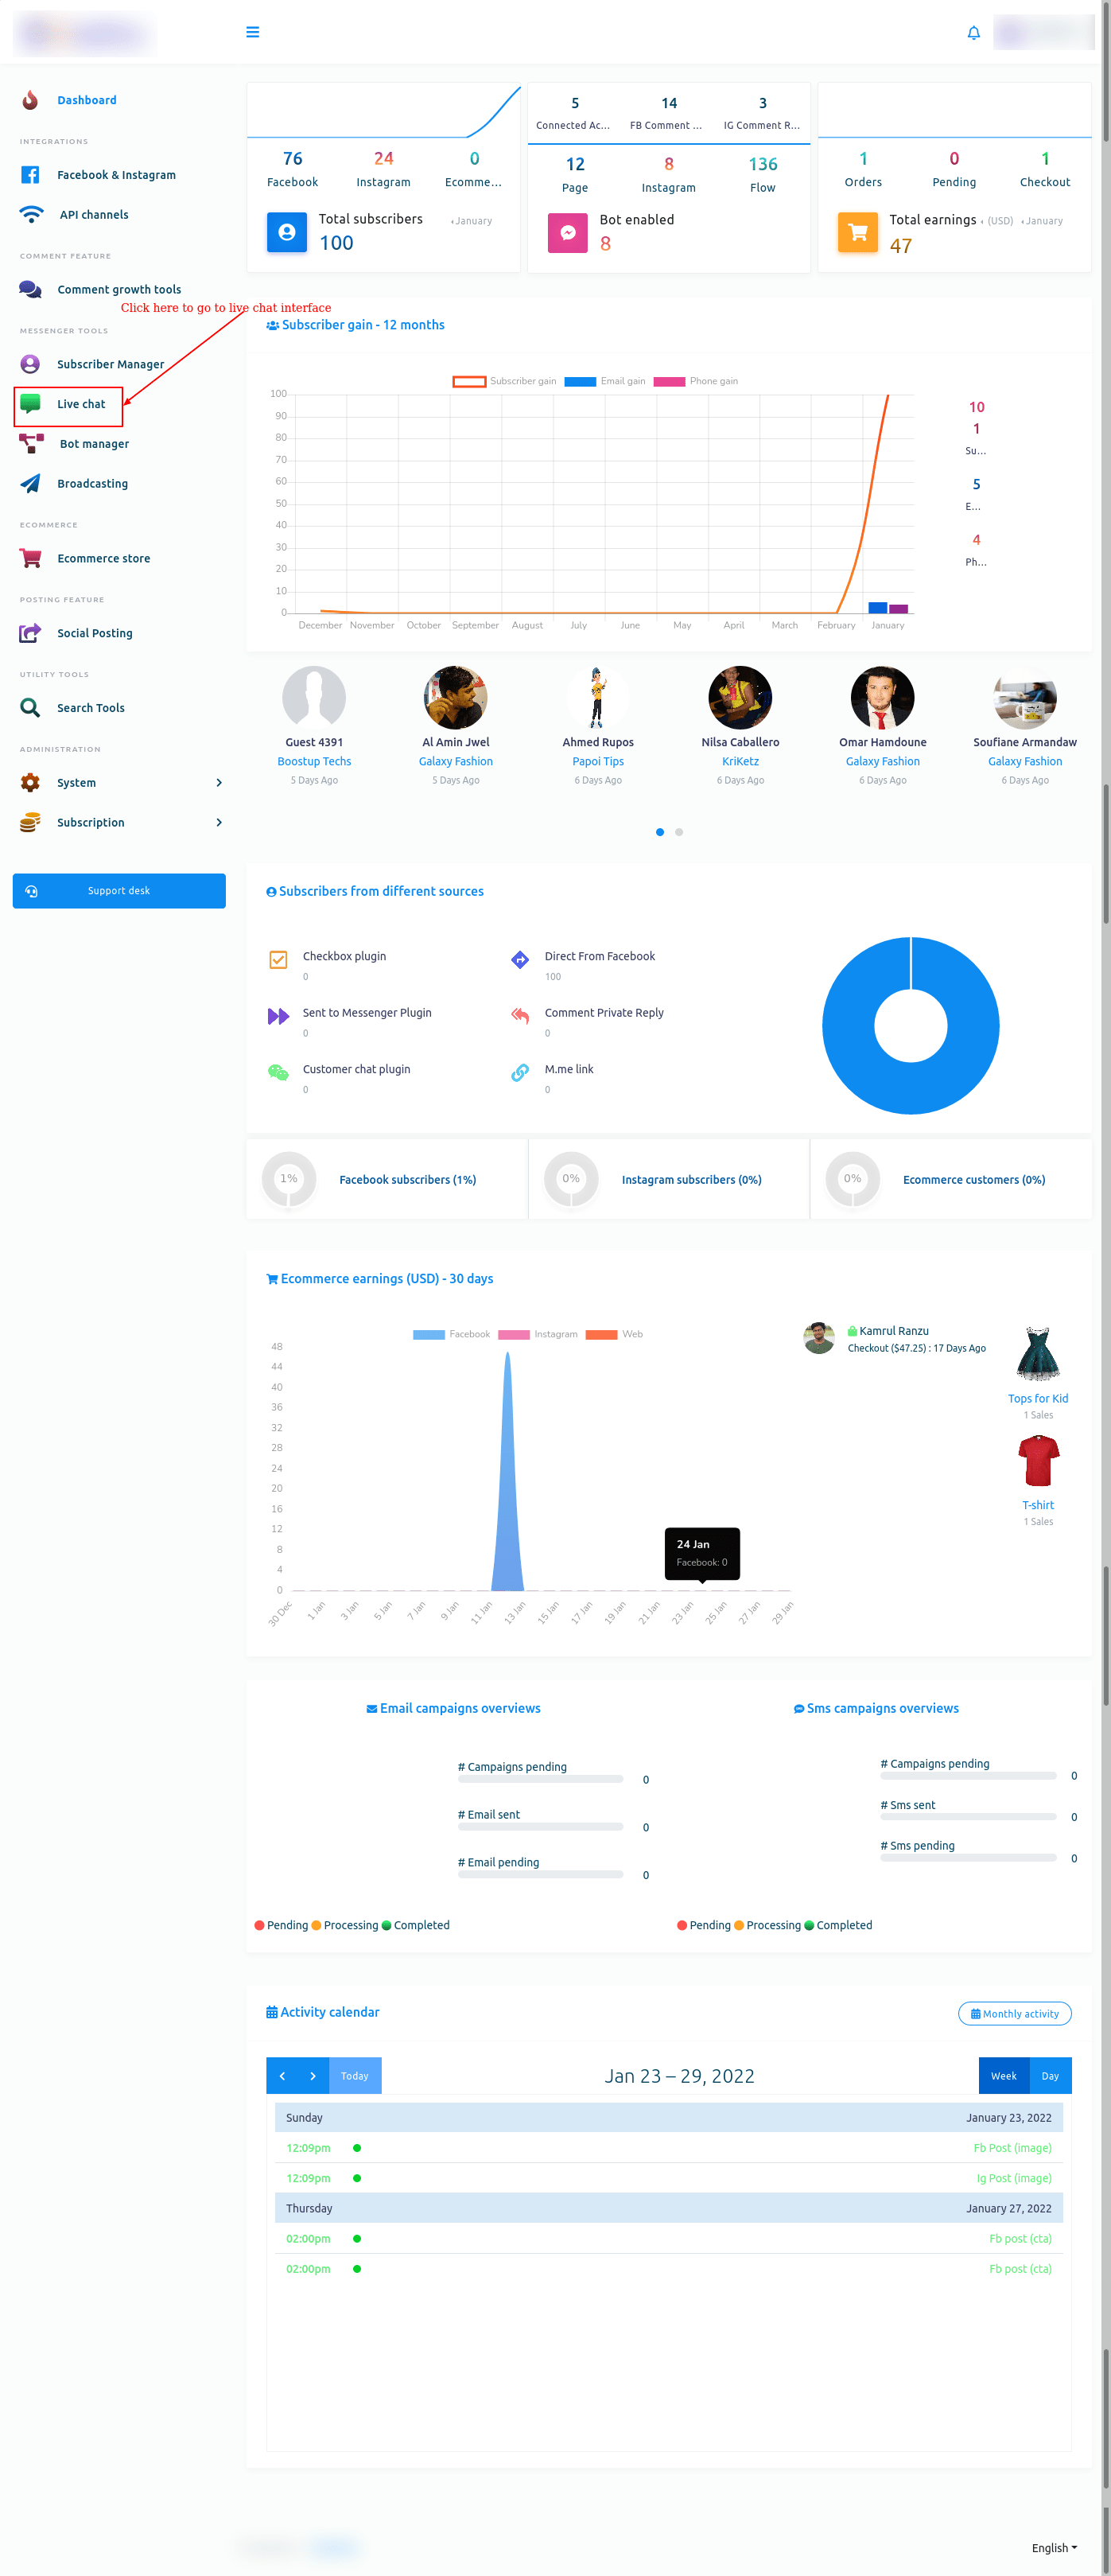
Instantly, the interface of the live chat will appear.
Live Chat interface is divided into three sections– subscribers list, messaging window, and actions.
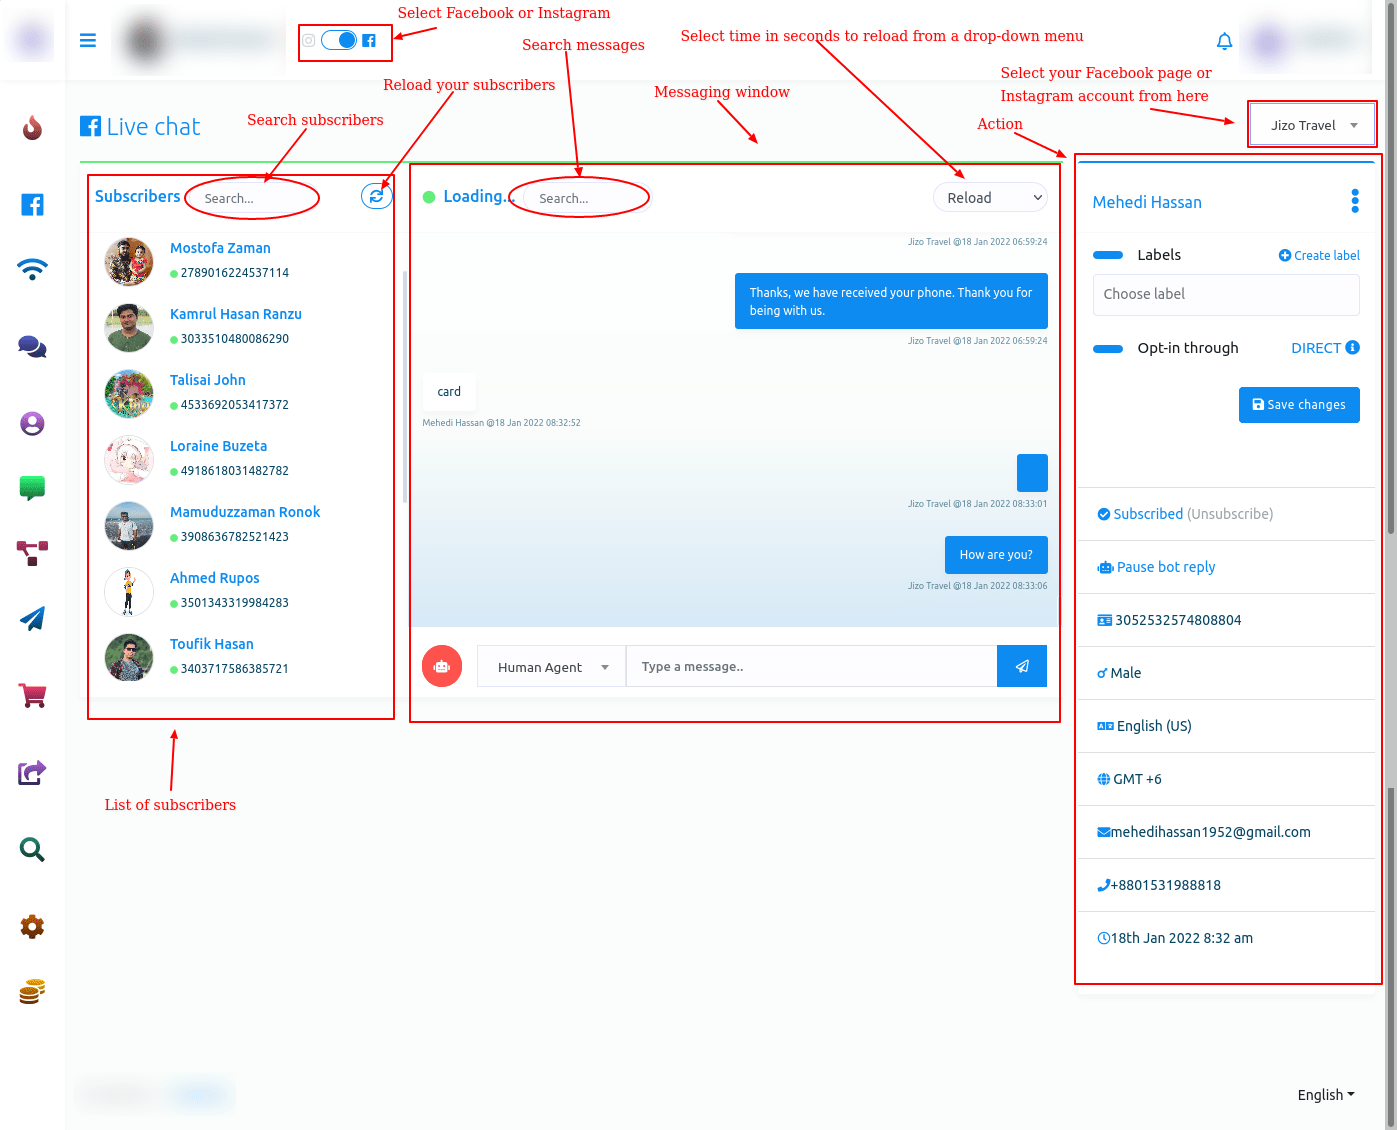
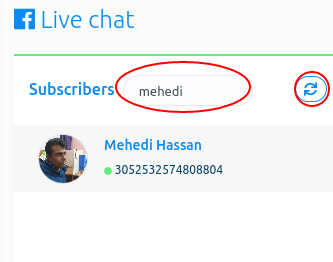
Subscribers’ list
In the subscribers’ list section, you can see the list of subscribers who you have conversed with recently. Also, you can search for a subscriber on the search bar. And by clicking on the reload button, you can reload the Live Chat, though the live chat reloads automatically at times.
Messaging window
The messaging window is for directly chatting with users.
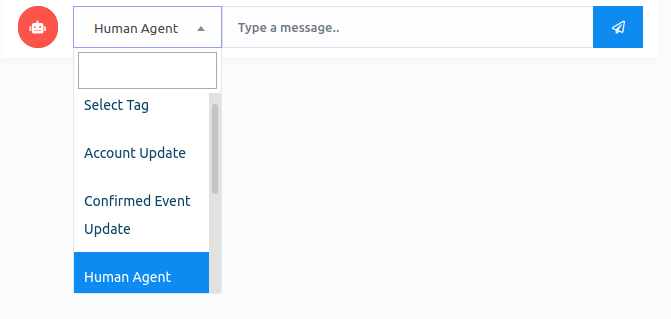
In the message tag field, you have to select a message tag. Click on the message tag field and instantly will appear a drop-down menu of different message tags such as Human agent, Account update, Confirmed Event, Post purchase Update, Non-promotional(NP registered only). If you select the human agent message tag, you have to reply to the message from users within 24 hours, otherwise, you will get an error. In this case, you have to use other message tags. If you want to know the usage of message tags, read the article by Facebook for developers.
Moreover, you can also search messages on the search bar in the messaging window.
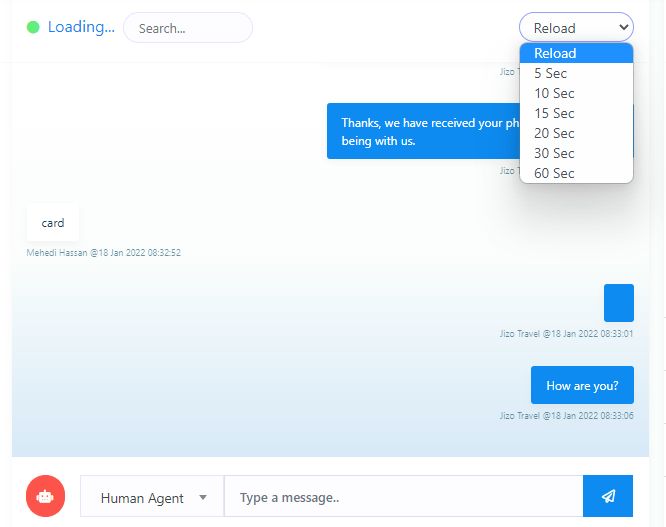
Also, you can select a time for automatic reloading by clicking on the reload button. Click on the reload button, and a dropdown menu of different times will appear. Now just select a time. After that, the live chat will reload automatically between the time you have selected.
Actions
In the action sections, you can accomplish some tasks. Moreover, you can see the primary data of users.
Select Labels
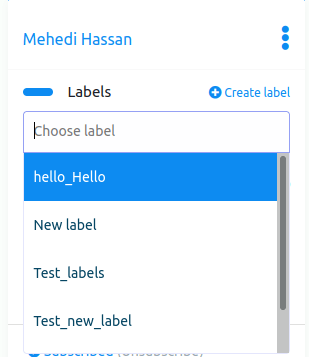
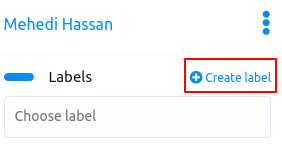
First, you will see a form called a label. From the label field, you can assign a label to a specific user. Click on the label form and instantly appear a drop-down menu of different labels you have created before. Then you have to select a label to assign the label to a subscriber list. The selected labels will appear on the label form. Well, you can select as many labels as you want for a specific user. True, you can remove labels one after another by clicking on the cross icon next to the label name. Of course, you can remove all the labels by clicking on the cross icon in the field.

Create Labels
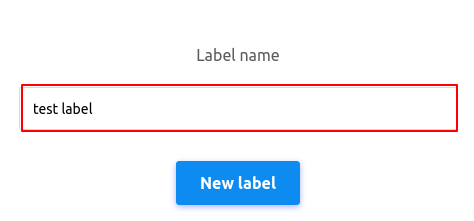
Moreover, you can create a new label from here. Click on the create label button and a modal form with one field will appear. Write the name of the new label in the field and click on the new label button, and the label will be created and selected in the field automatically.
After you have selected labels in the Labels field, click on the save changes button to save the changes.
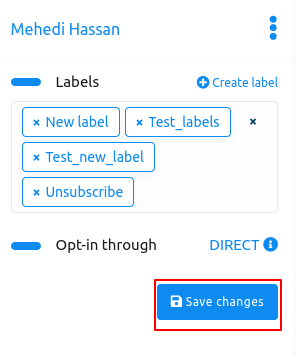
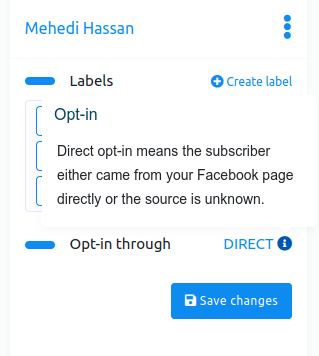
Opt-in through
Well, in the opt-in through option, you can see whether the subscriber has come directly through the Facebook page or the source is unknown. If you see the word Direct beside the opt-in through, you know that the user has come through the Facebook page or the Instagram account directly.
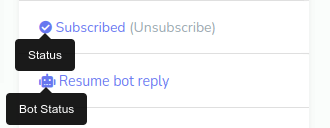
Status
By clicking on the status button, you can unsubscribe and resubscribe a user. And by clicking on the bot status button, you can pause and resume the bot reply.
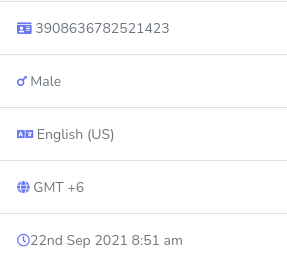
Primary Information
You can see the primary information of the subscribers– subscriber ID, gender, language, time, and date.
Conclusion
If a bot forwards a subscriber to a human agent, you can directly chat with the user from the Live Chat without opening the messenger. And on the live chat, any employee can chat with the users without being moderate on the Facebook page or the owner of the Instagram account.
In one word, using Live Chat, you or your employee can easily see the latest conversations and chat with them directly without going to Facebook and Instagram messenger.
How to build bot with flow builder
In this blog, I will show you how to create Facebook Messenger bot and Instagram DM bot with Loomsuite Flow Builder. Please follow the instructional blog step by step to create an interactive Facebook Messenger bot or Instagram DM bot.
To build a bot, First, go to the dashboard of the Loomsuite. Now click on the Bot manager option at the left sidebar of the dashboard.
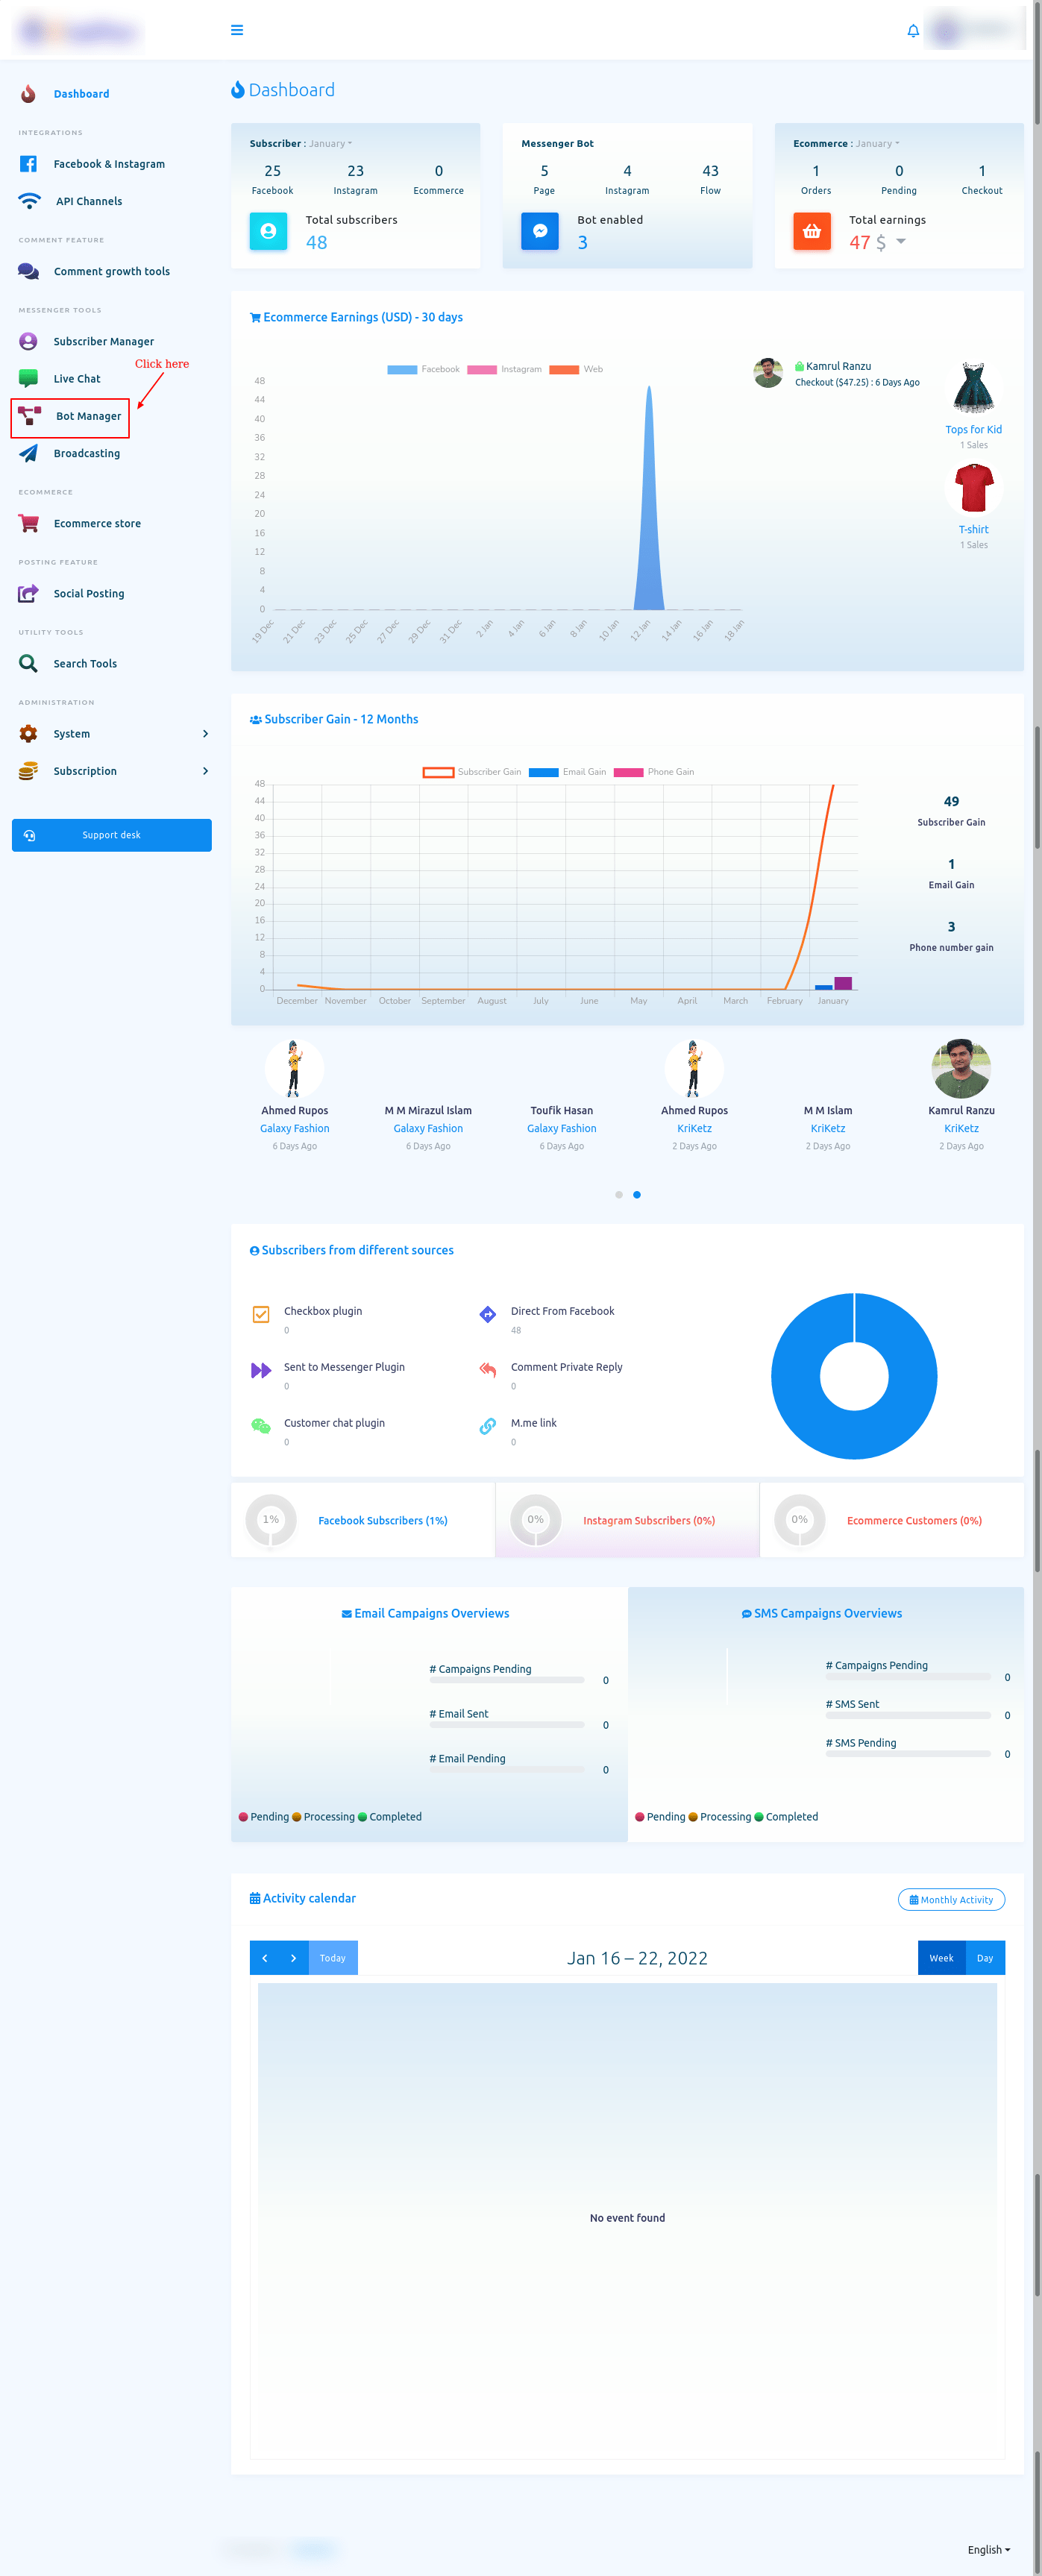
Bot Manager
And instantly, the Bot Manager page will appear. At the top of the page, you will see the profile of your Facebook account. If you have imported one more Facebook Profile, you can change the Facebook profile.
To build a bot on the Facebook page, select the radio button to Facebook. On the other hand, to build a bot on Instagram, select the radio button to Instagram.
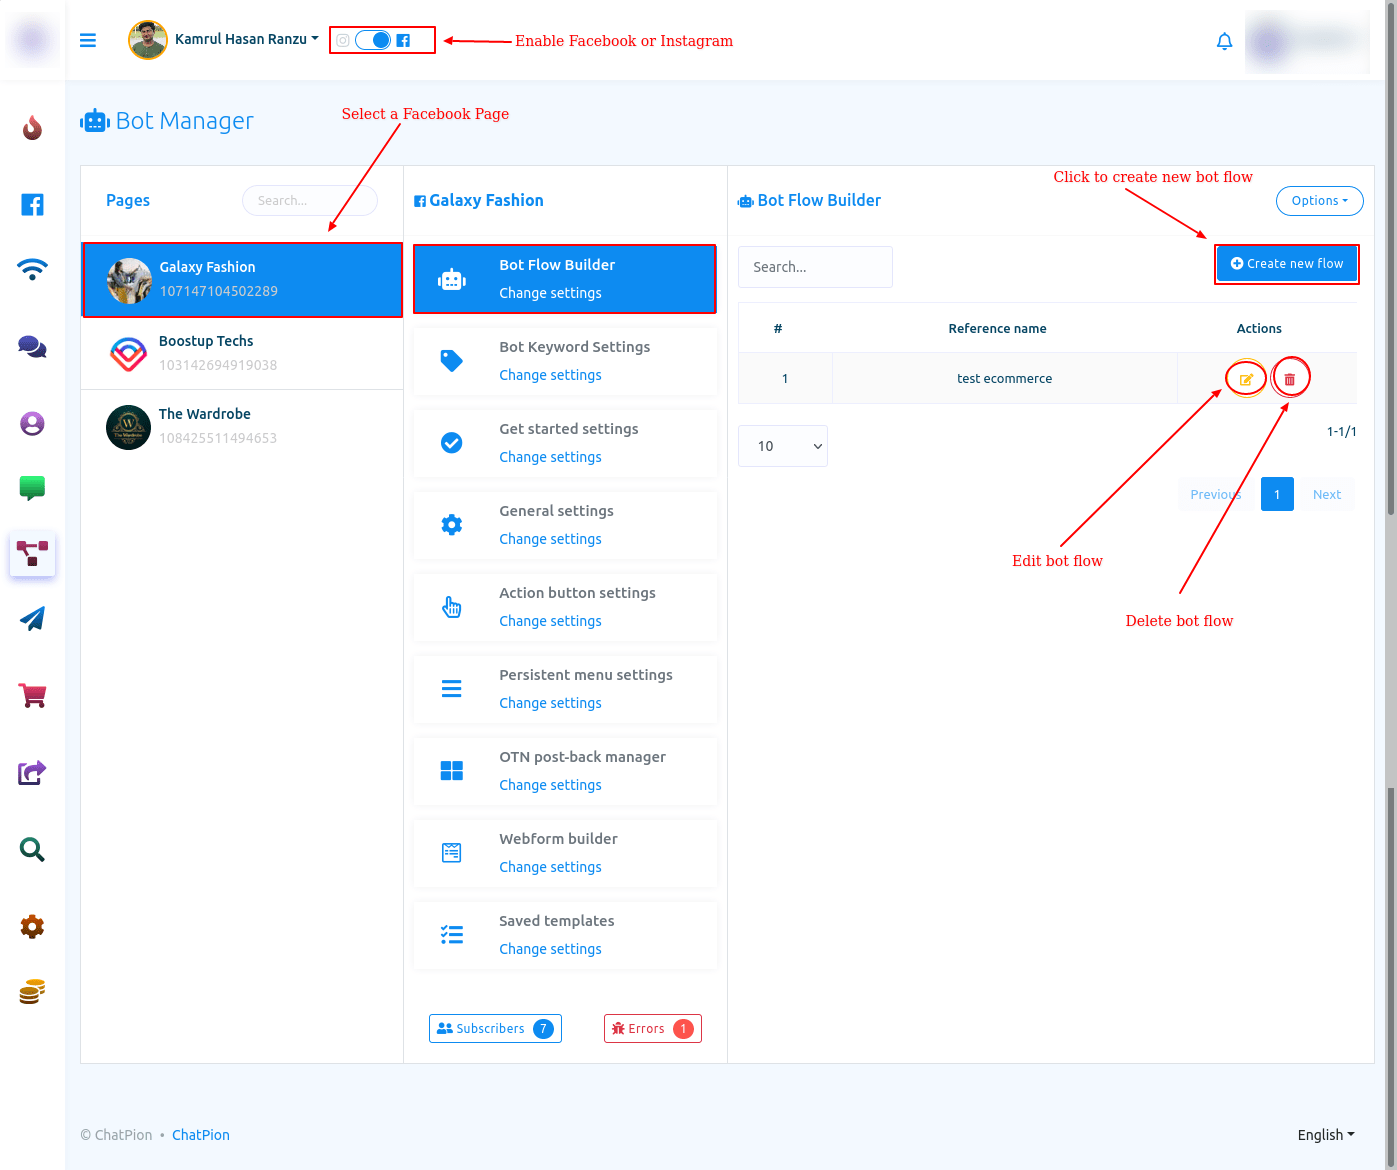
Visual Flow Builder Editor
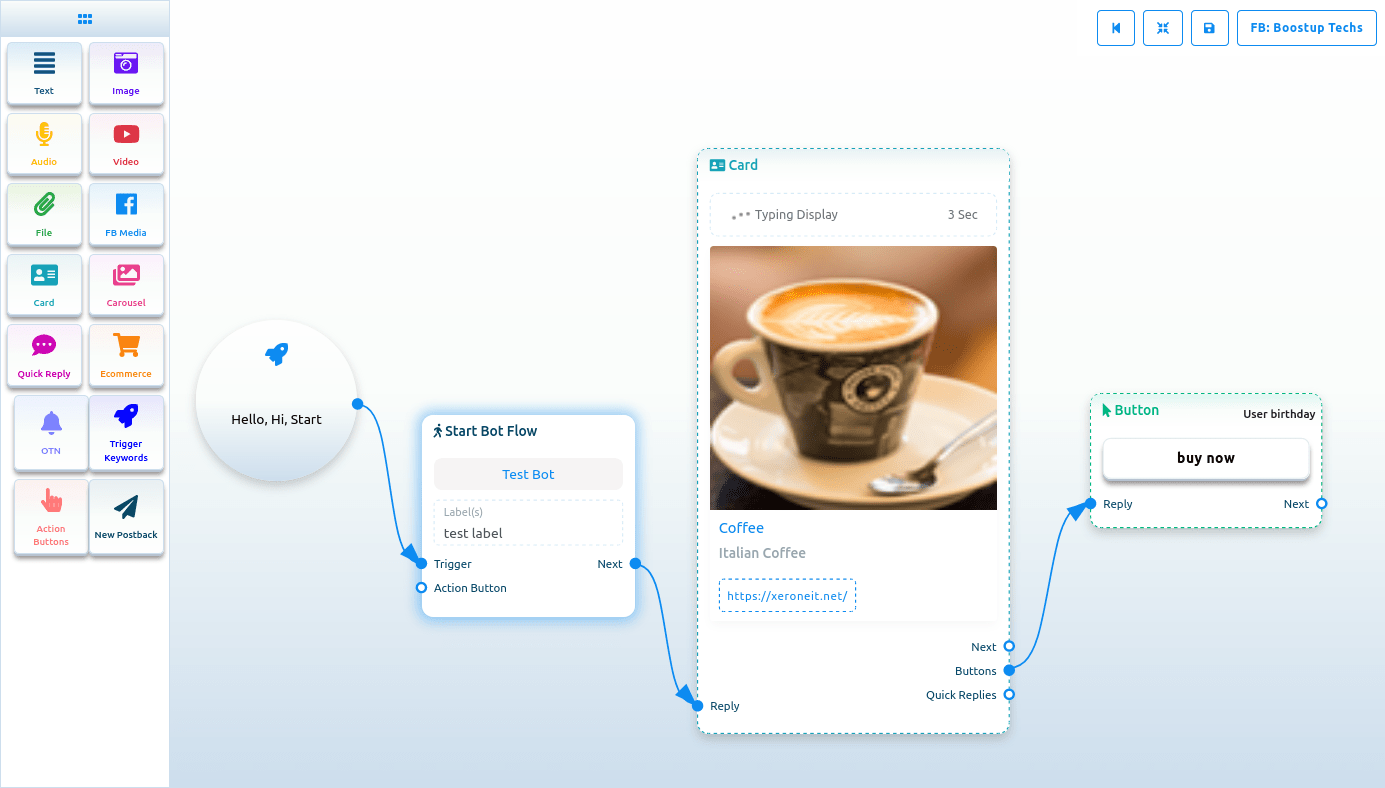
Well, to build a bot, click on the “Create New Flow” button. And instantly, the editor of the Flow Builder will appear. The editor is divided into two parts – Doc-menu and editor. On the Doc-menu, all the components are gathered together. To build a bot, you have to drag components from the Doc-menu and drop them on the editor. Then you have to configure the components and connect them to each other. On the Doc-menu, there are 14 components.
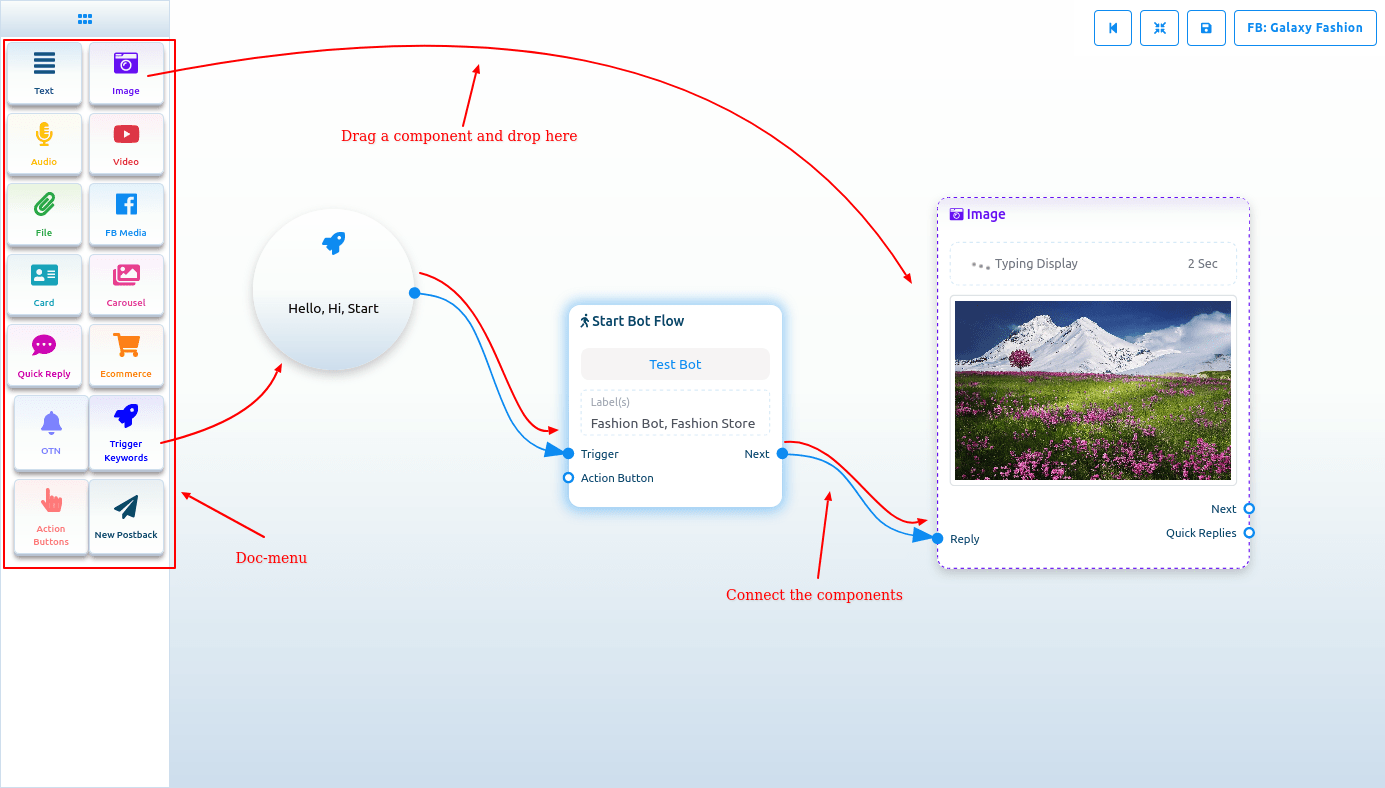
Start bot flow
On the Editor, you will see an element called start bot flow. This component is essential to building the bot. Double-click on the Start bot Flow element and the Right Sidebar called Configure Reference will appear with two fields – Title and Choose Labels. In the title field, give a title for the bot.
And in the Choose labels field, you have to select labels from a drop-down menu of different fields. You can select multiple labels in the Choose labels field. Now click on the Done button and the information will be added to the element.
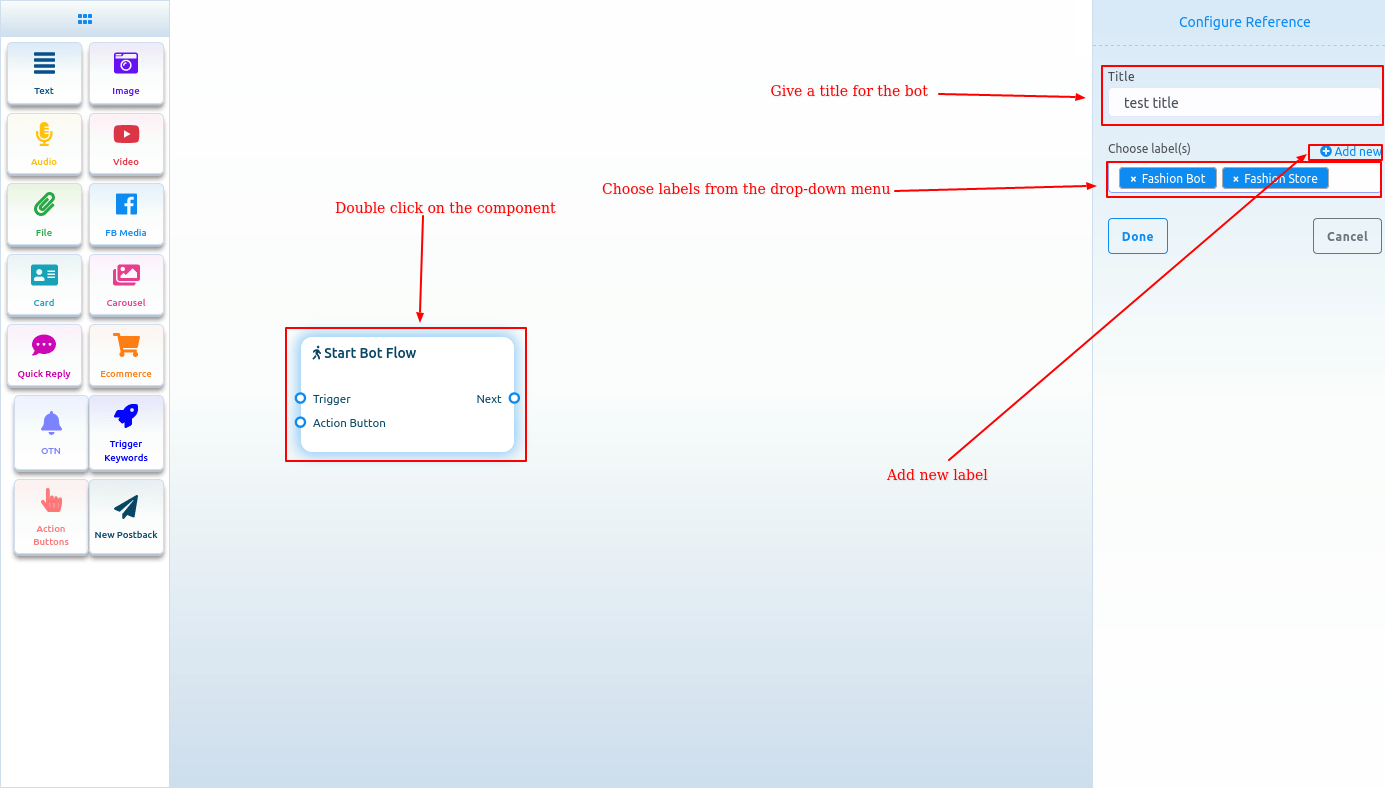
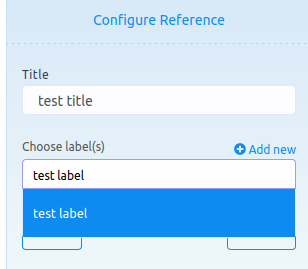
Add new label
And from the Choose labels field, you can add a new label. Just write down the name of the label and press enter.
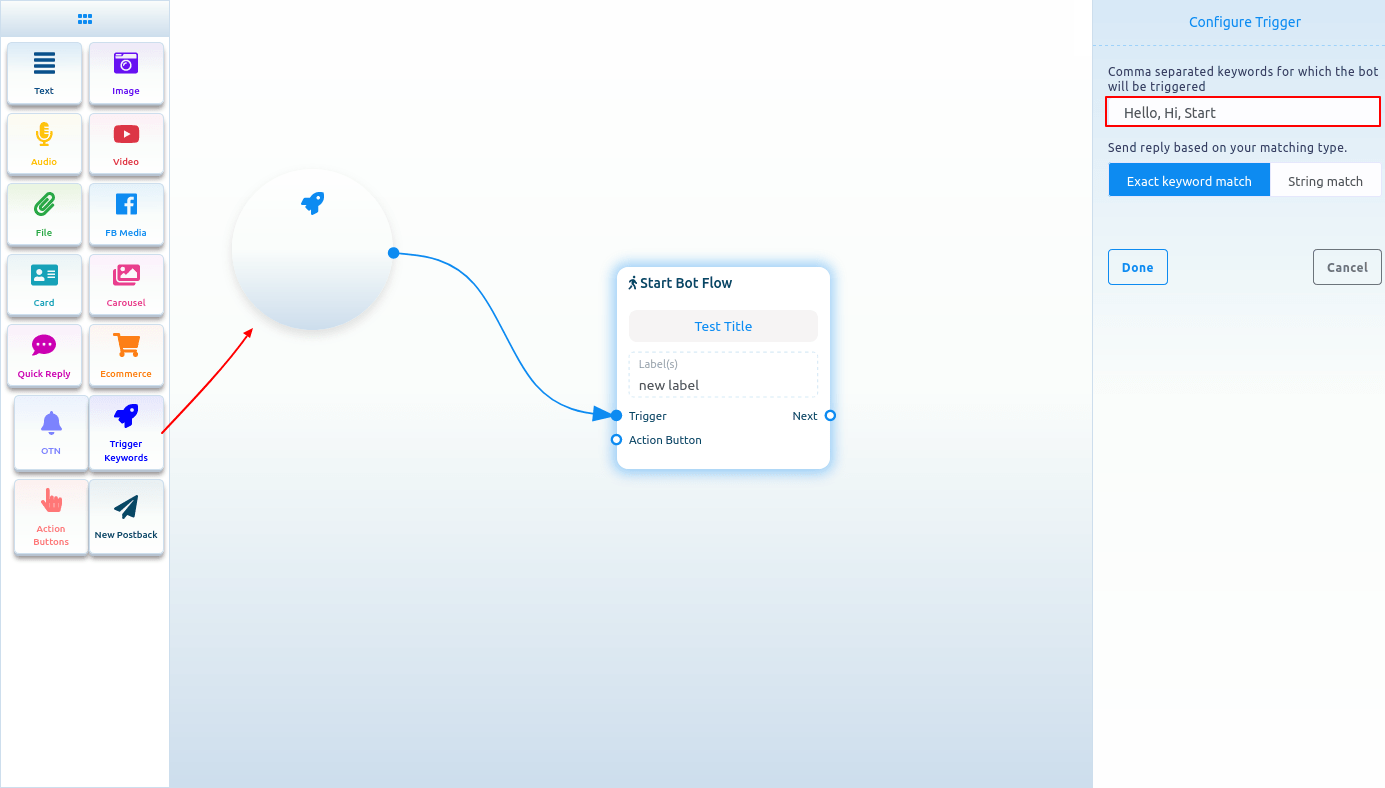
Trigger keywords
Now drag the trigger keywords element and drop it on the editor. Now double-click on the component and a sidebar called configure Trigger will appear. In the field, you have to provide comma-separated keywords. When a user writes one of the keywords, the bot will start. Also, you can select a matching type – Exact keyword match and String match. Then click on the Done button. And the keywords will appear on the component.
Now connect the Trigger Keywords component with the Start Bot Flow component.
Add components without dragging from Doc-menu
You can also add components without dragging the component from the Doc-menu and dropping it on the editor. From the next output of any component, drag the cursor and drop. And instantly a menu of the different components will appear. And from the menu, select a component and the component will appear on the editor connected with the mother component.

If you drag your cursor from the button output of any component and drop it on the editor, then the button component will appear on the editor connected with the mother component.
NB. The Button component is not present in the Doc-menu.
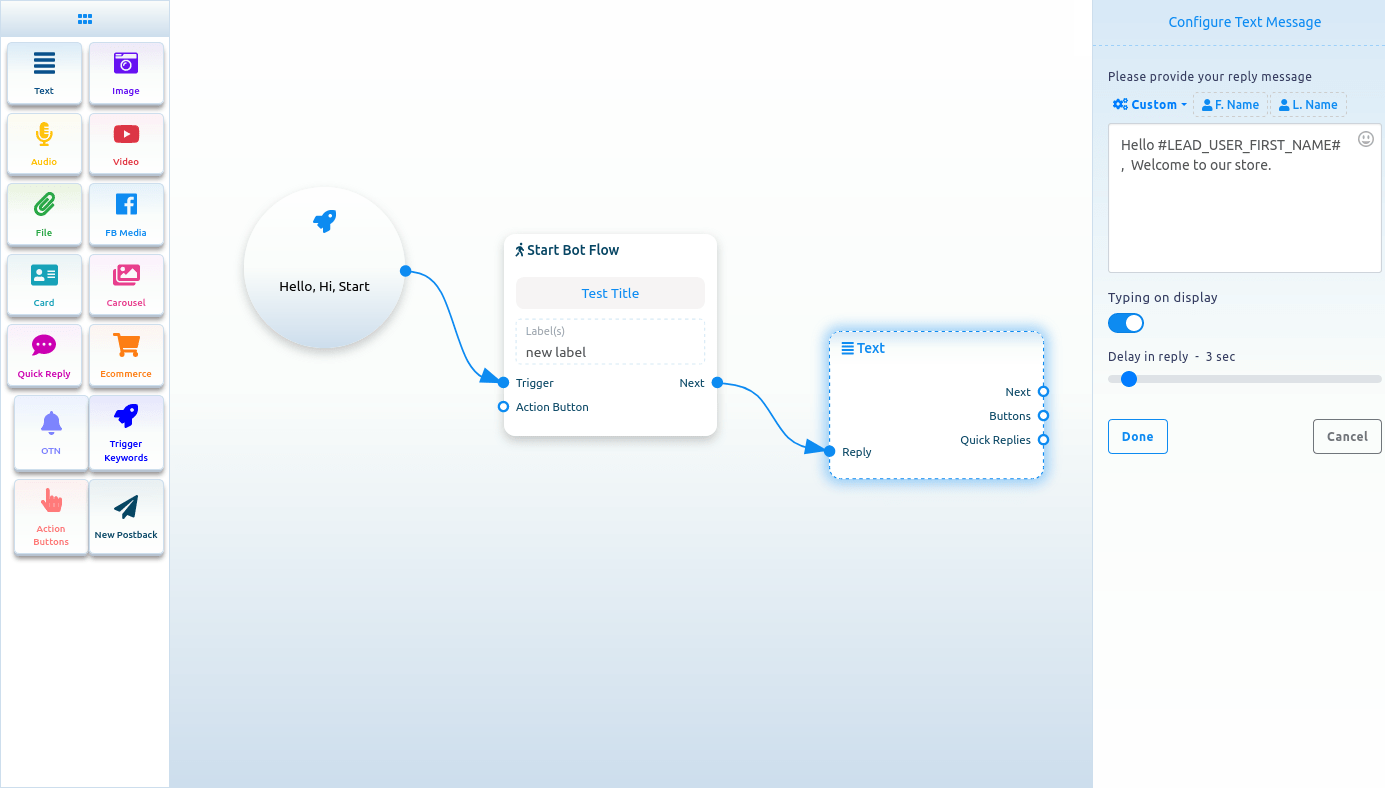
Text
If you want to build a bot with a text element, drag the Text Component and drop it on the editor. Now double-click on the component and a sidebar called Configure Text Message will appear with a text field. In the text field, you have to provide your reply message. You can include the first name or the last name of the user in the reply message.
You can also enable typing on display by turning on the radio button. Then you can select the delay time in reply in seconds.
Now click on the Done button and the information will appear on the component. Then connect the text component with the Start bot flow component.
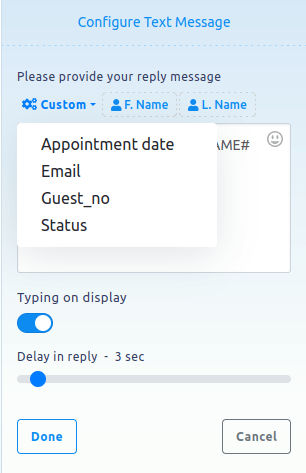
Include Custom variables in the reply message
Besides, you can include custom variables in the reply message. Click on the button called custom and a drop-down menu of different variables will appear. And from the drop-down menu, select a variable. The custom variable will be replaced by the actual value before sending it.
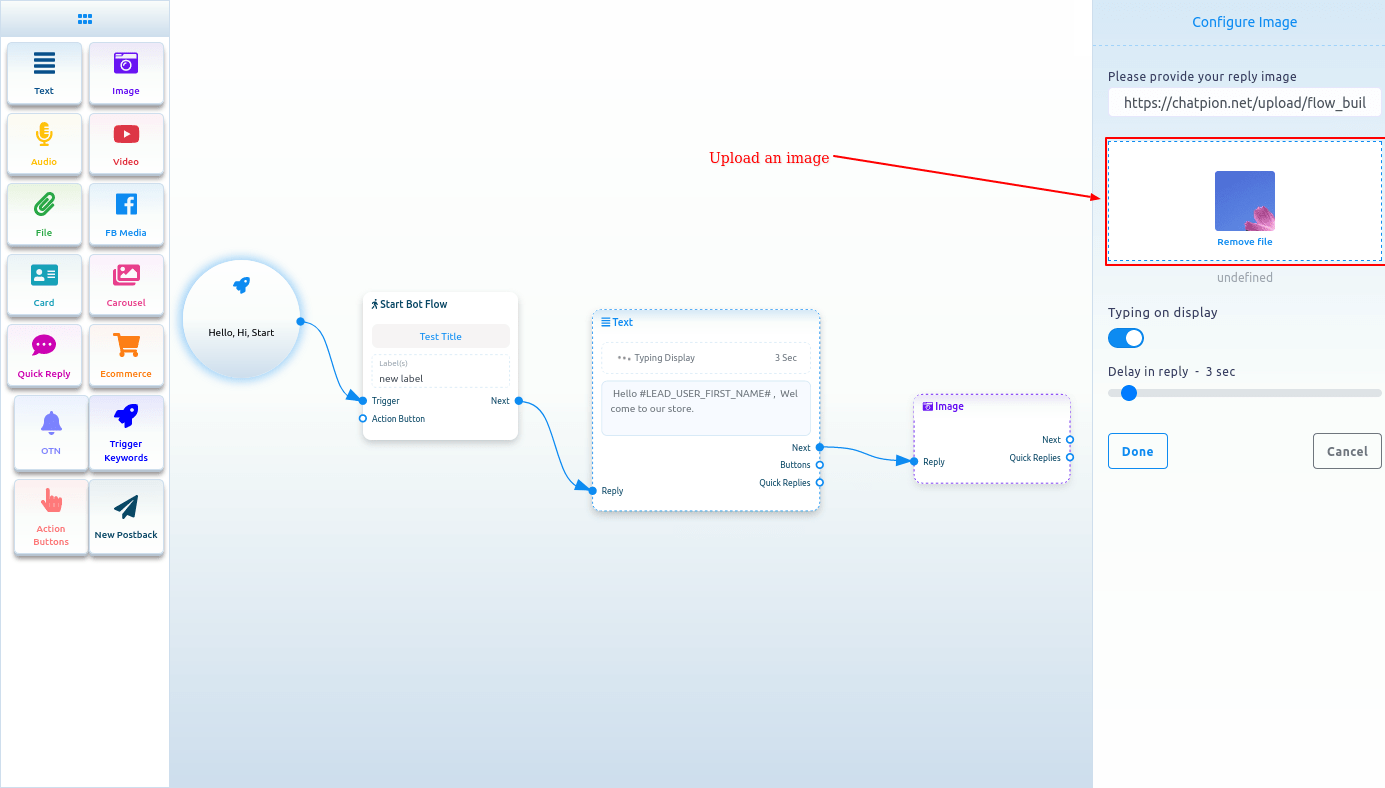
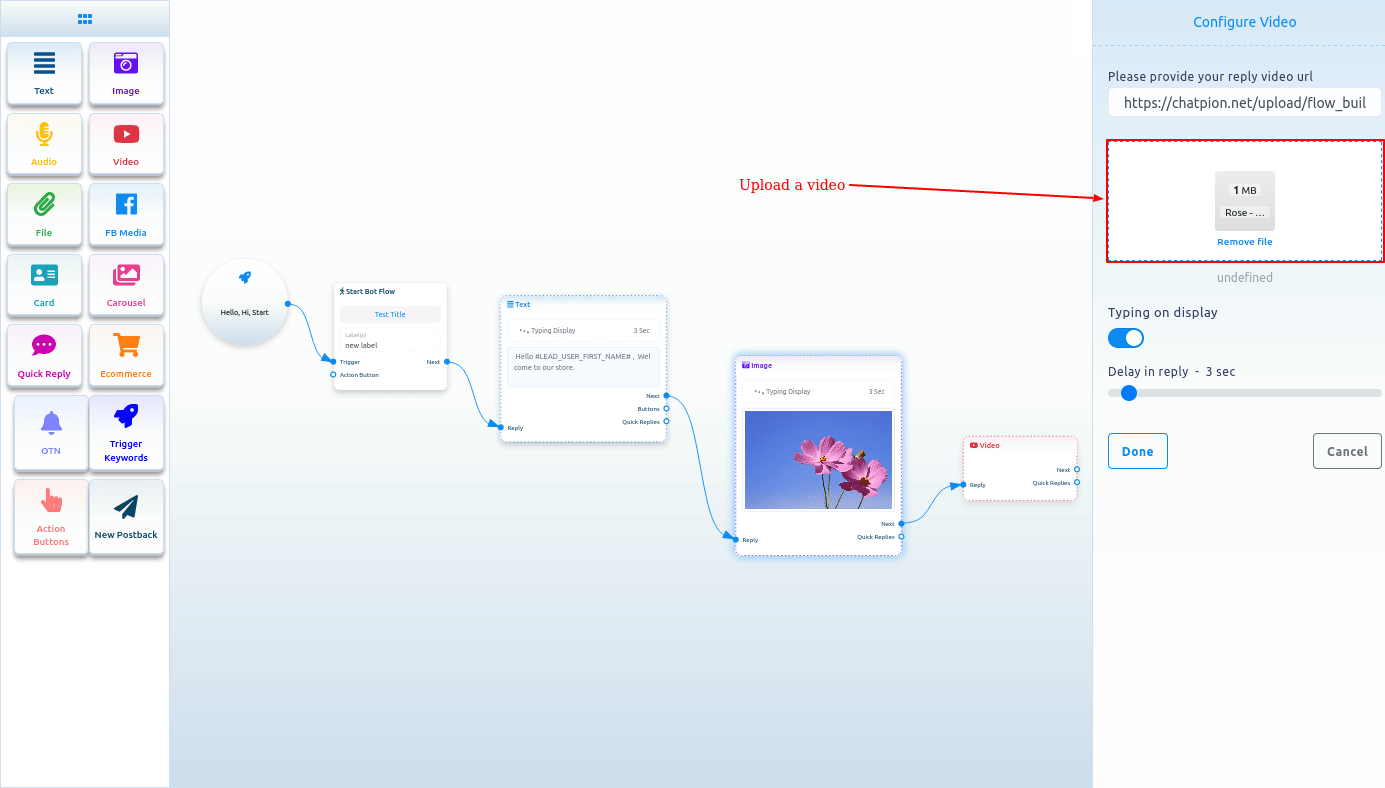
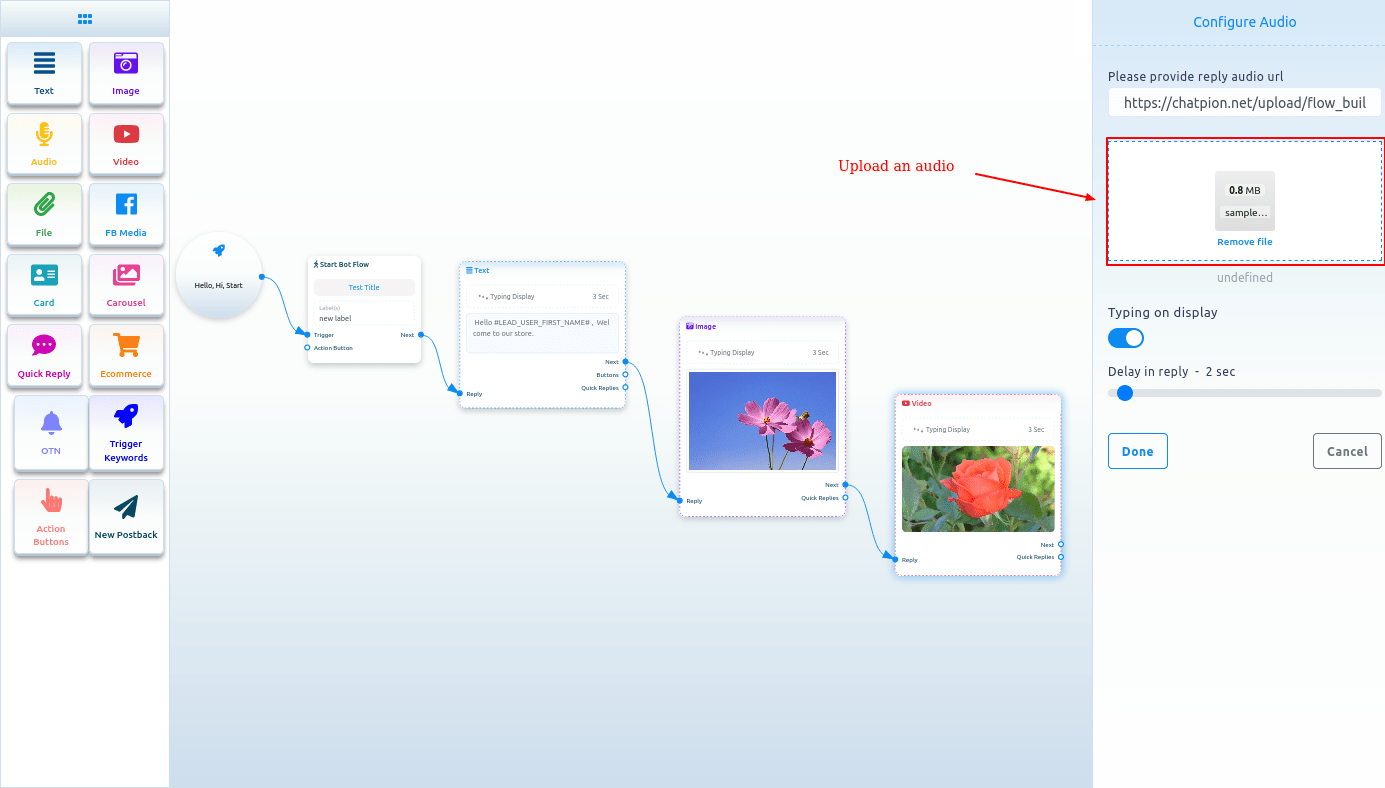
Image, Audio, Video, and File component
Likewise, you can add Image, Audio, Video, and File components. For these components, you have to upload an image, audio, video, and file respectively. Then you have to connect the components with other components.

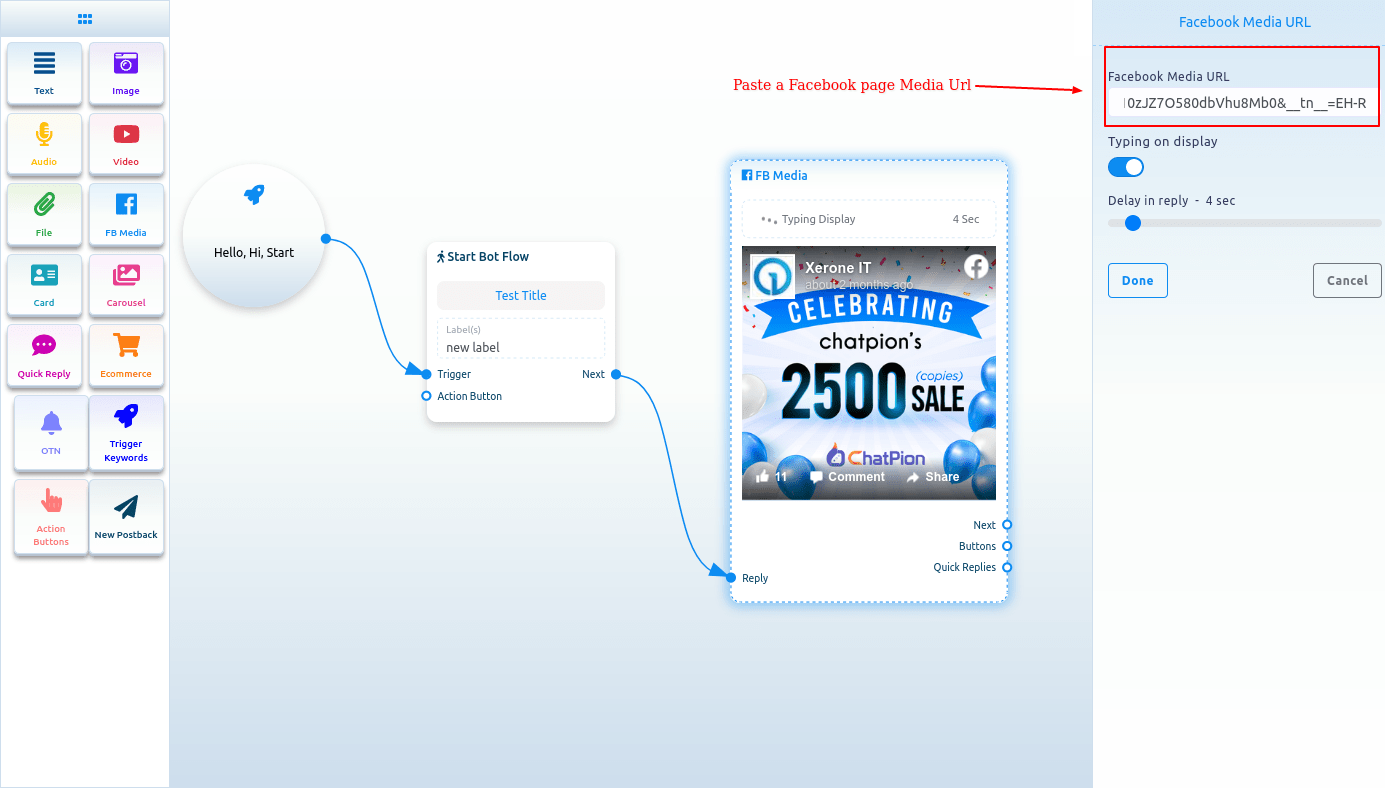
FB Media
To add FB Media component, drag the FB Media component from the Doc-menu and drop it on the editor. Now double-click on the FB Media component and the right sidebar called Facebook Media URL will appear. In the Facebook Media URL field, put your Facebook Page media URL.
You can enable typing on display and select time in seconds for the delay in reply. Now click on the done button and the Facebook page media URL will appear on the component.
Card
To add Card Component, drag the Card Component from the Doc-menu and place it on the editor. The Card component will appear with a button component. Well, now double-click on the Card component and a right sidebar called Configure Generic Template will appear. Now upload an image. After uploading an image, paste a link in the image click destination link field. When a user clicks on the image, the user will be redirected to the URL. Now write a title in the Title field and a subtitle in the Subtitle field.
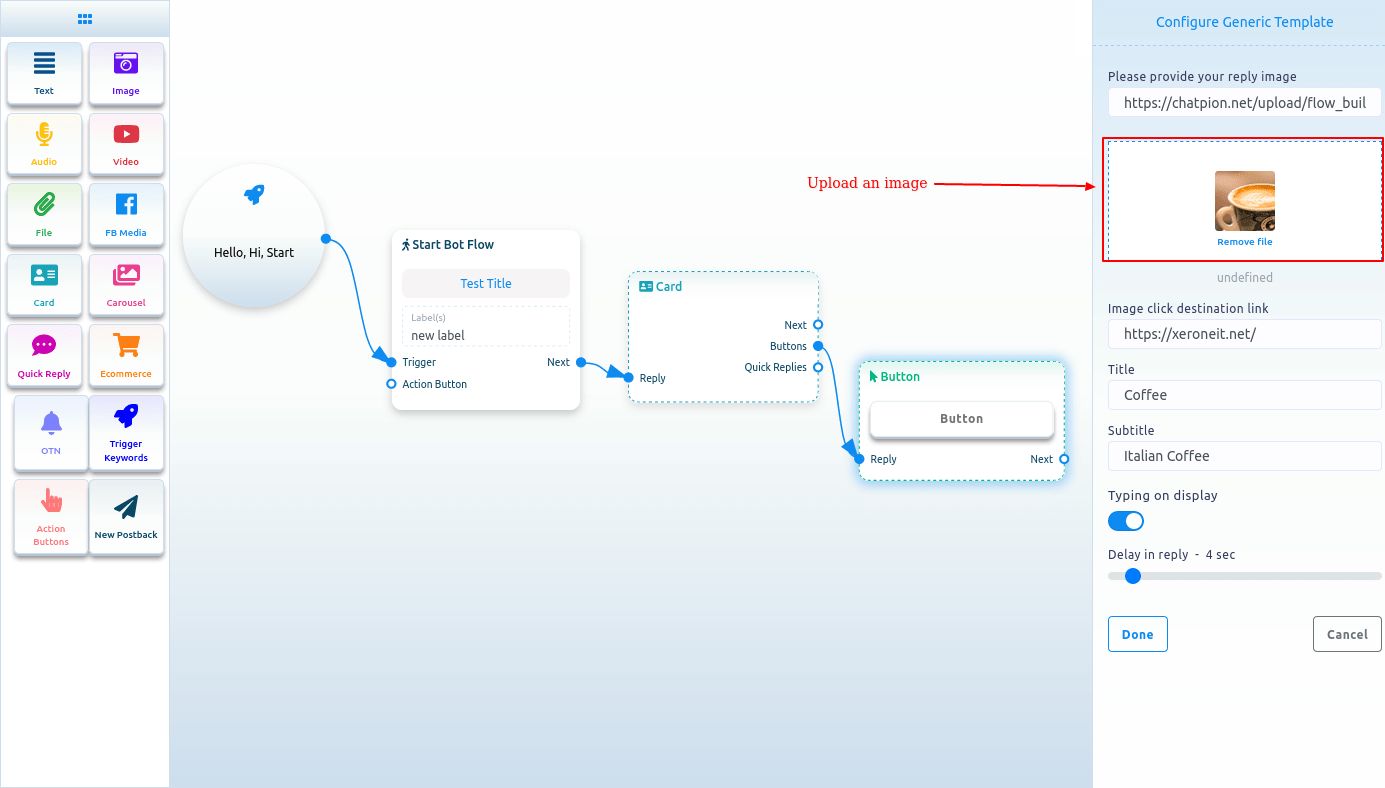
Then you have to configure the Button Component
Read the following section to know how to add and configure the Button Component.
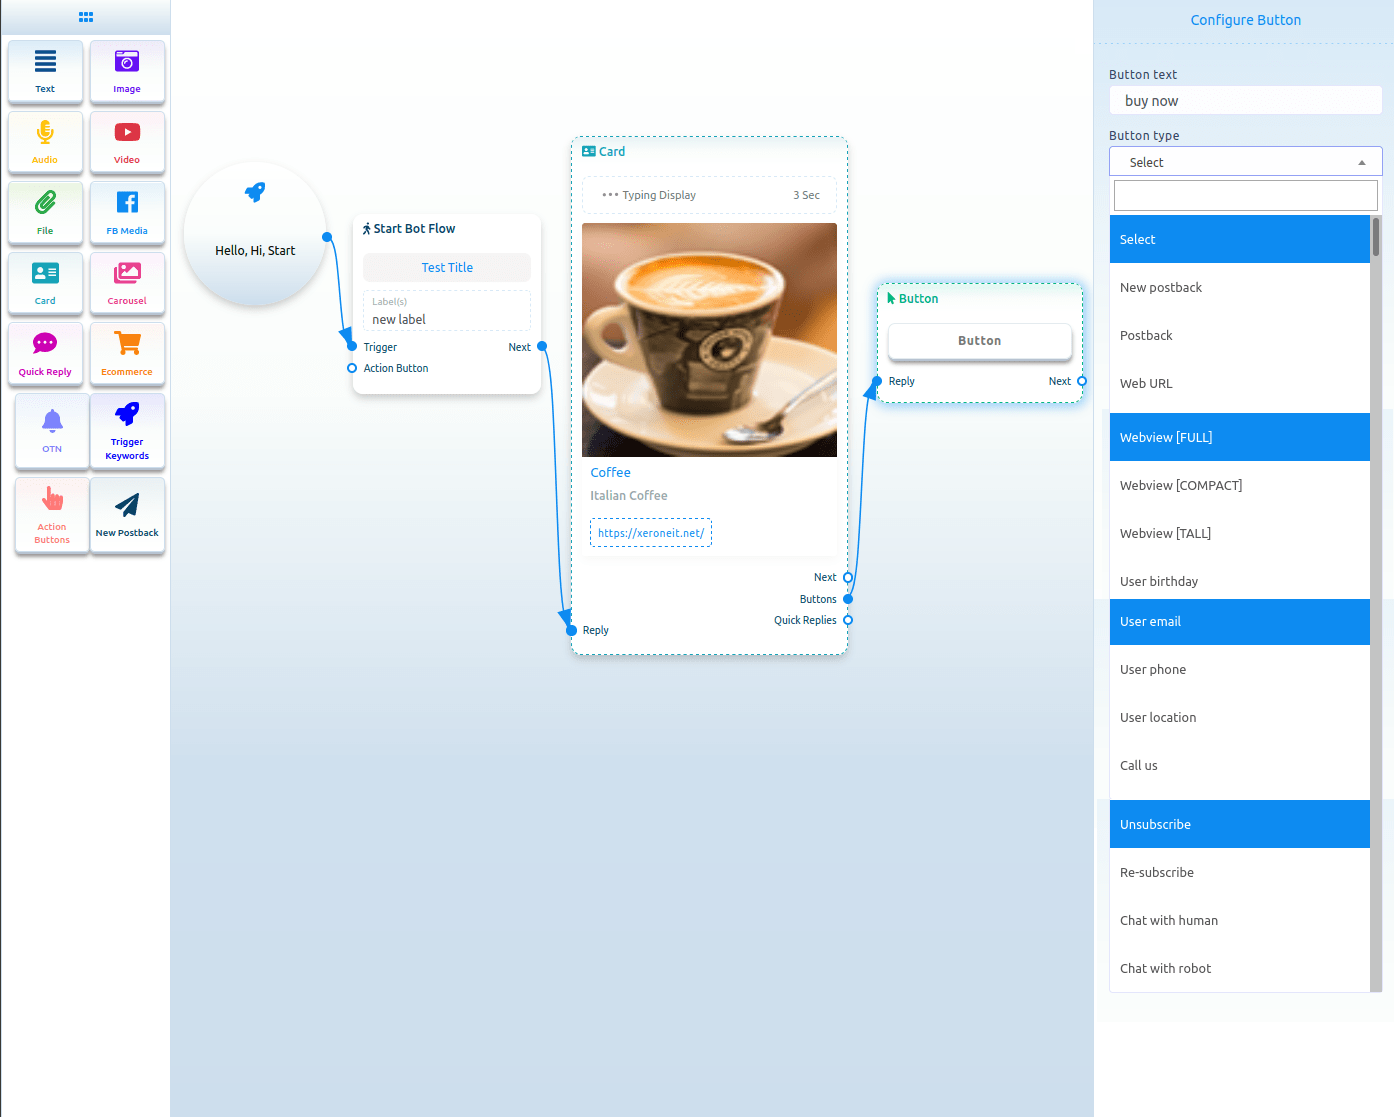
Button
To add Button component, drag your cursor from the button output of a component like the Text or Card component and drop. Instantly, the Button component will appear connected with the mother component.
And sometimes the button component automatically appear connected with other component, such as Card and Carousel component.
Now double-click on the button component and a right sidebar called configure button will appear. Now write a text in the button text field – the text will appear on the button. Then you have to select a button type from the button type field. Click on the button type field and a drop-down menu of different button types – New postback, postback, Weburl, Webview [full], Webview[compact], Webview[tall], User birthday, User email, User phone, User location, Call us, Unsubscribe, Re-subscribe, Chat with human and Chat with robot will appear.
Button types
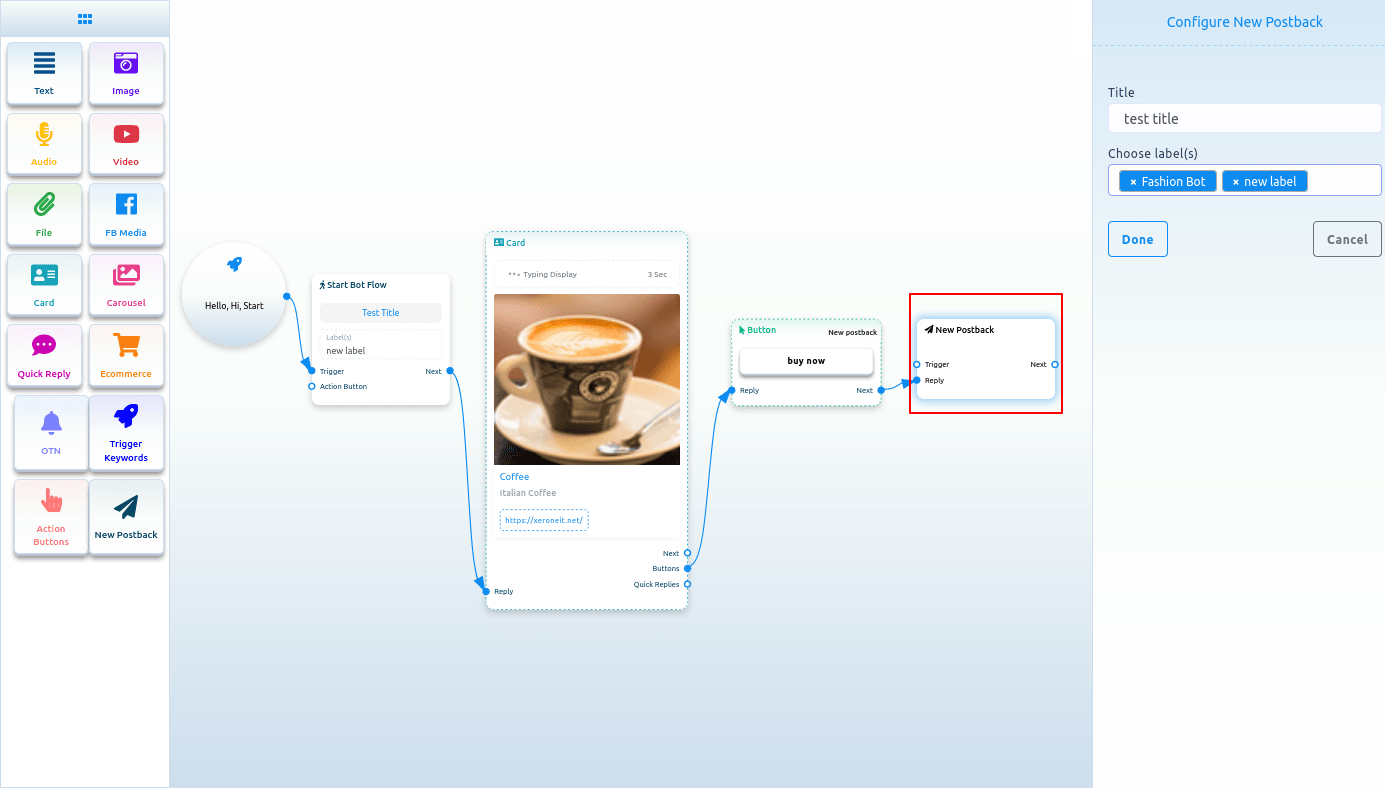
New postback
Select New postback on the button type and click on the done button.

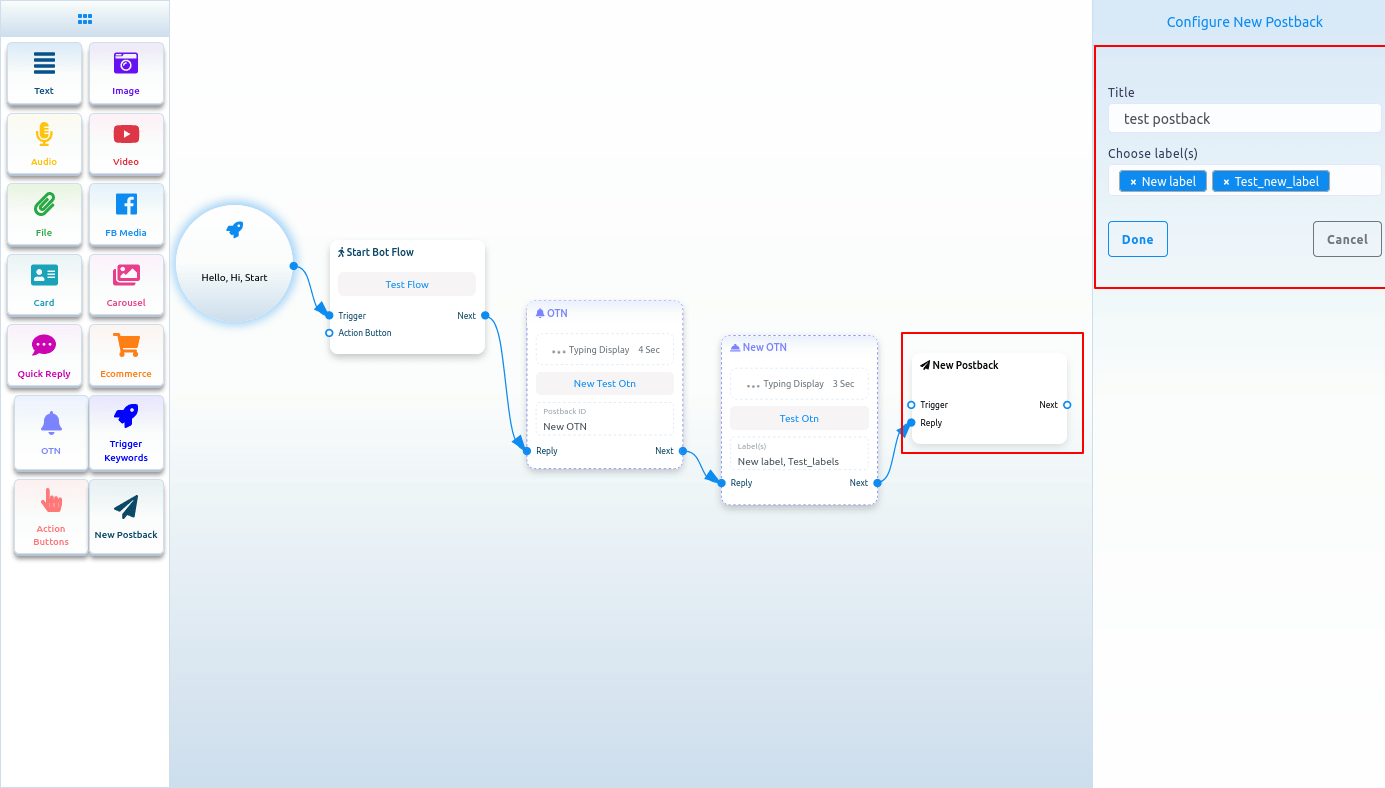
Configure New postback
And instantly, a new postback button will appear connected with the Button component. Now double-click on the New postback Component and the right sidebar called configure New postback will appear. Give a title for the New postback in the title field. And select labels from the Choose label field. Now click on the Done button.
Postback
If you select Postback as the button type, a field called Postback ID will appear. And from the Postback ID field, you have to select a postback id. Click on the postback id field and a drop-down menu of different postback id will appear. And from the drop-down menu, select a postback id. And click on the Done button. The postback id will appear on the Button Component.

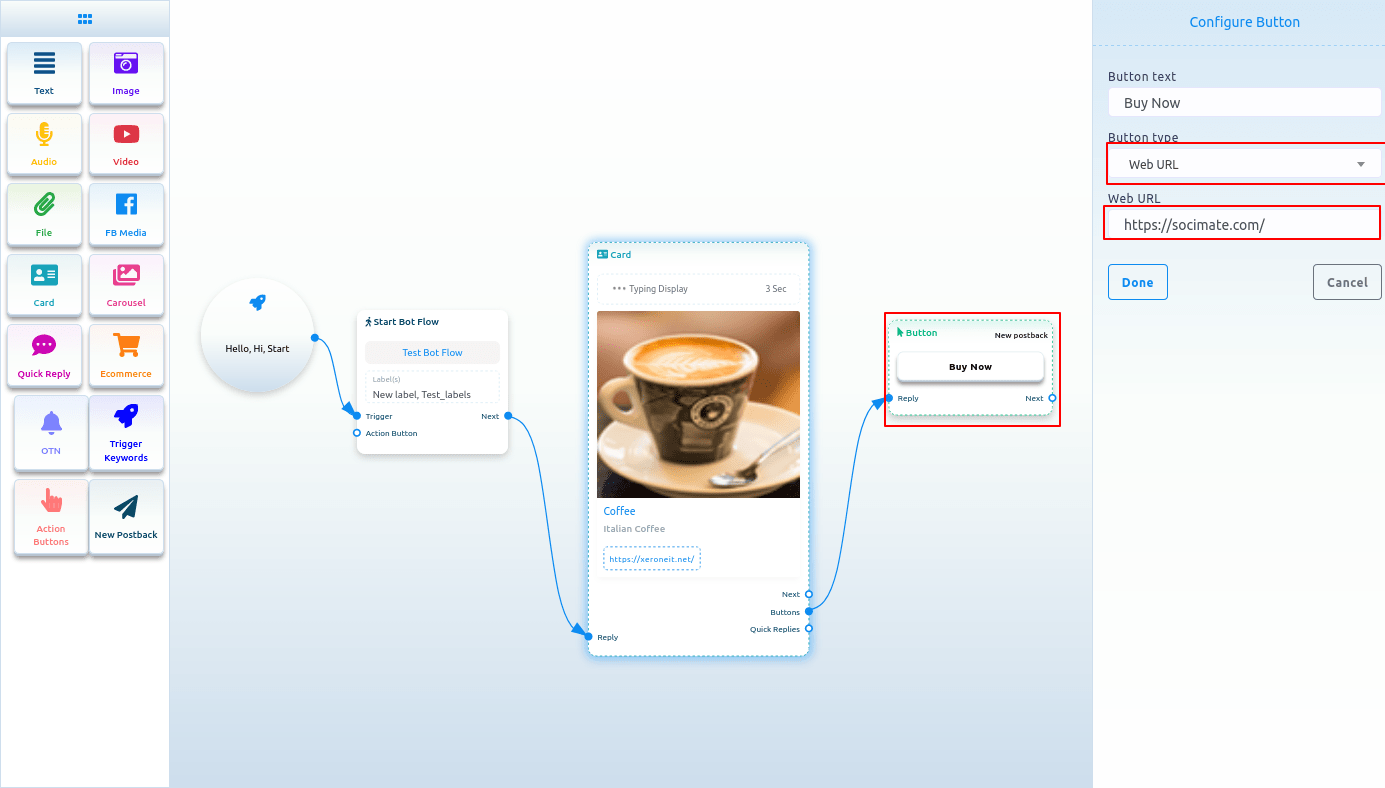
Web Url, Webview[full], Webview[tall], Webview[compact]:
If you select Web Url, Webview[full], Webview[tall] or Webview[compact], another field will appear. And in the field, you have to paste an URL. Now paste a URL and click on the done button. After that, the URL will appear on the Button component.
Select a button type
Form the button type field, you can select User email, User birthday, User phone or User location, Unsubscribe button, Re-subscribe button, Chat with human, Chat with robot. After selecting any from the button type, click on the done button. Instantly the button type will appear on the button.
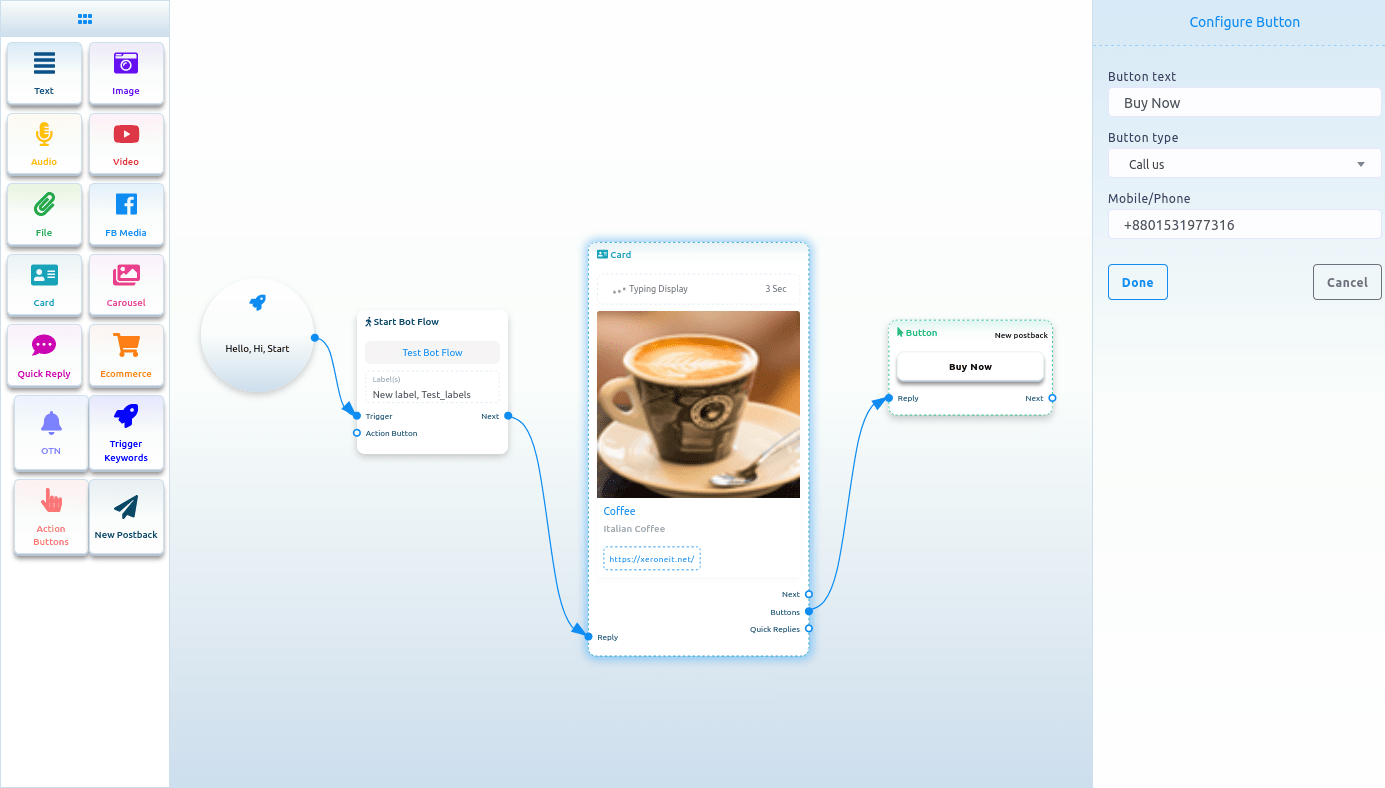
Call us
Select Call us button from the drop-down menu of different button types and instantly, another field called Mobile/Phone number will appear. Now you have to provide your phone number in the field. Then click on the done button.
 Carousel:
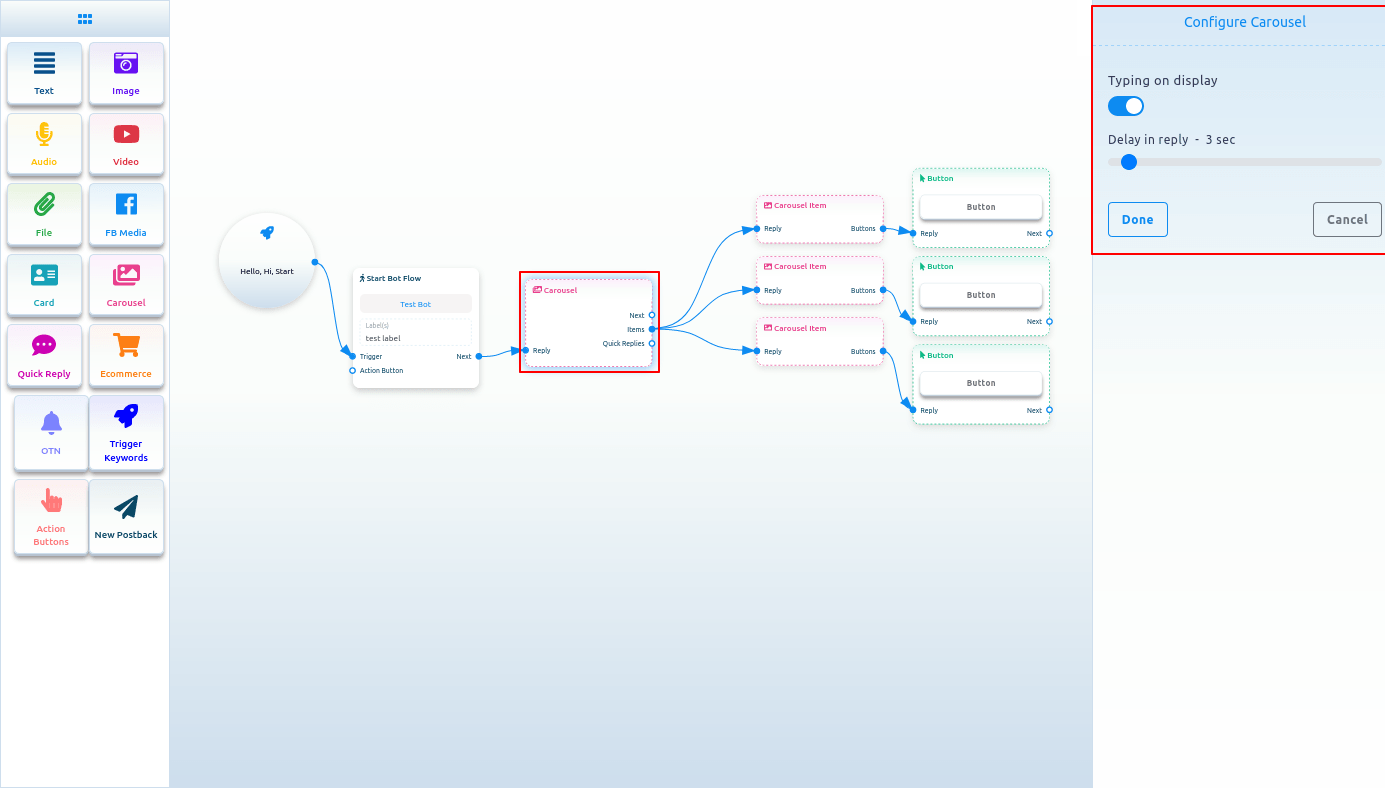
Carousel
To add a Carousel component, drag the Carousel component from the Doc-menu and drop it on the editor. Instantly, the Carousel component will appear with three carousel items connected with the Carousel component and three button components connected with the three carousel components.
Now double-click on the Carousel component and the right sidebar called configure Carousel will appear. In the sidebar, you can enable typing on display and select delay in reply time in seconds. Now click on the Done button.
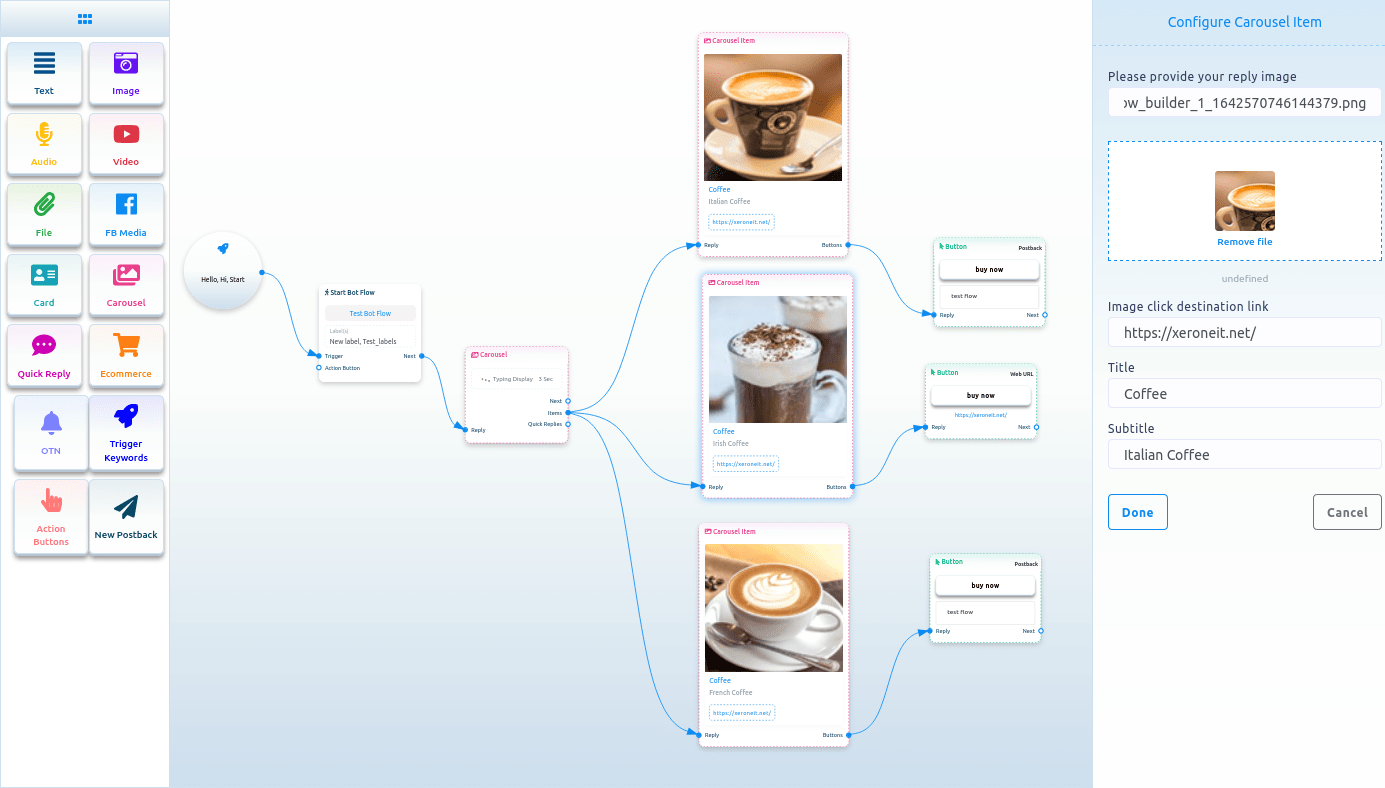
Carousel Item
Now come to the carousel Item component. Double-click on the carousel Item button and the right sidebar called Configure Carousel Item will appear with some fields.
Now upload an image. After uploading an image, paste a link in the image click destination link field. When a user clicks on the image, the user will be redirected to the URL. Now write a title in the title field and a subtitle in the subtitle field. Enable the typing on display and select delay time in seconds.
Likewise, you have to configure the other two carousel items.
Now you have to configure buttons. You already know how to configure buttons.
You can add other components with the button components if you want.
Now click on the save button or press ctrl + S and your bot will be saved.
Quick Reply
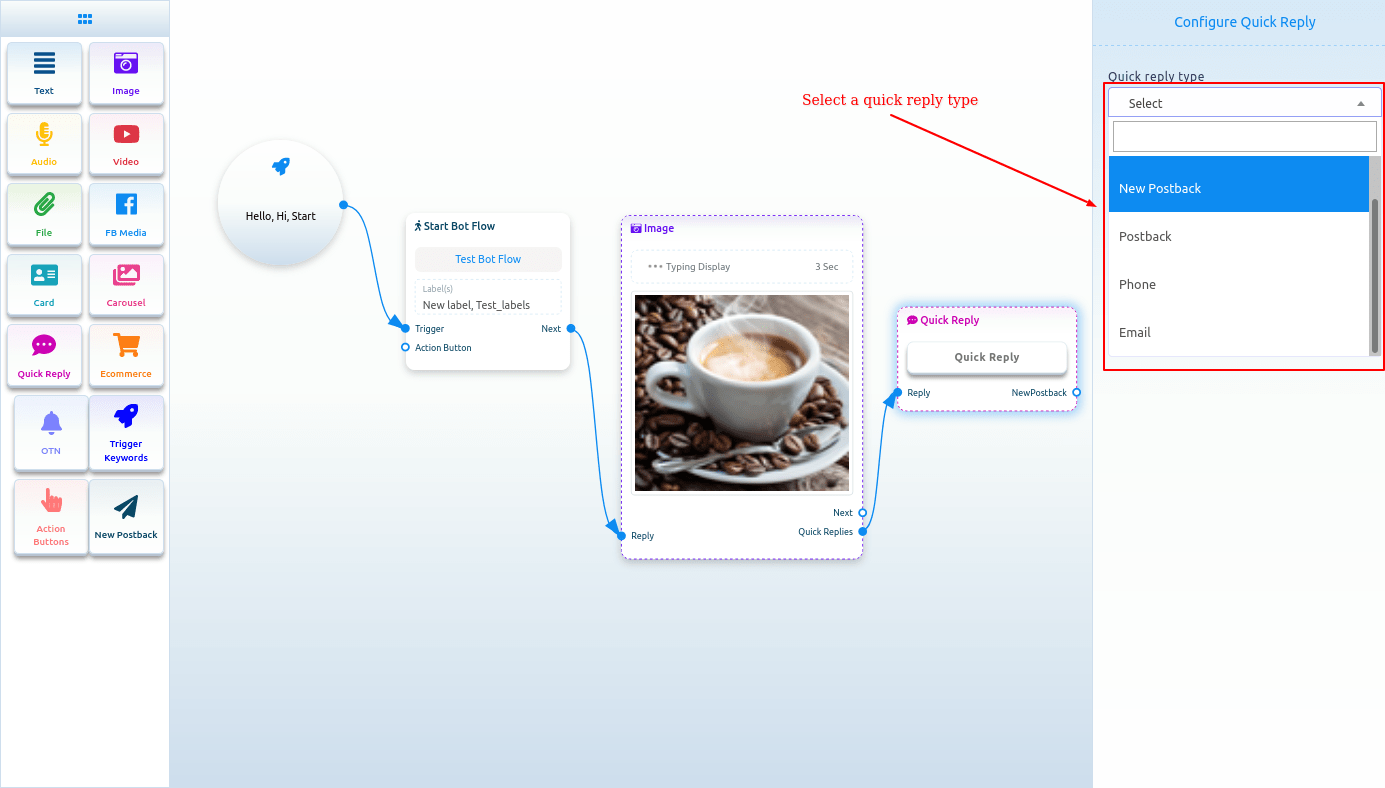
To add Quick reply component, drag the Quick reply component from the Doc-menu and drop it on the editor. Instantly, the Quick reply component will appear on the editor. You can also add a Quick reply component by dragging your cursor from the quick replies output of a component and dropping it on the editor.
Now double-click on the Quick Reply component and a right sidebar called configure Quick Reply will appear. Now in the quick reply type field, you have to select a quick reply type. Click on the quick reply type field and a drop-down menu of different types of quick replies – New postback, Postback, Phone, and Email – will appear.
New postback as quick reply type
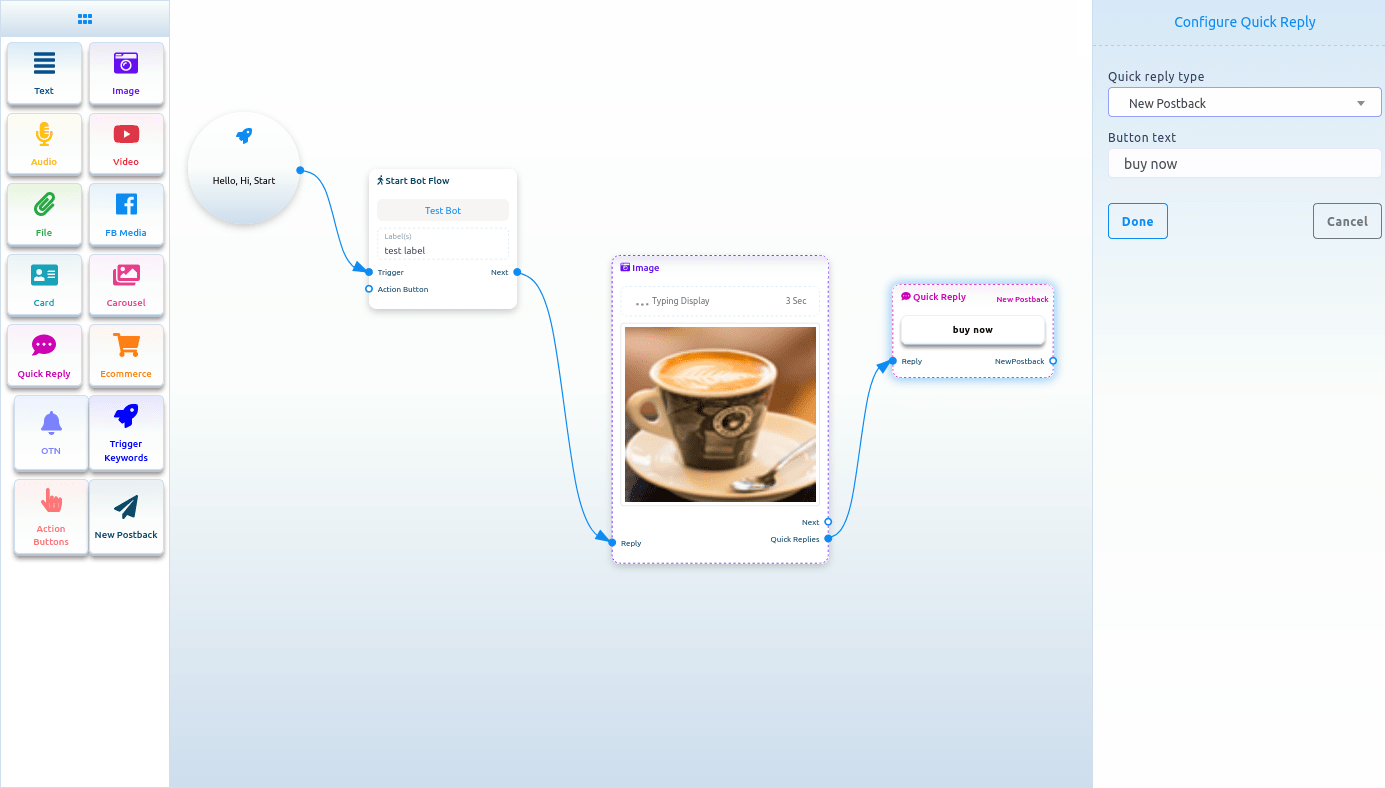
Select new postback as the quick reply type, and instantly a field called button text will appear. Now you have to provide a text for the button in the button text field. Then Click on the done button.
 quick_reply_new_postback_component_connected.png
And instantly, a new postback component will appear connected with the quick reply component.
Now double click on the new postback element and the right sidebar called configure new postback will appear. Give a title for the New postback in the title field. And select label from the Choose label field. Now click on the done button.
After that, you have to add another component with the next output of the New postback component.
Postback as a quick reply
If you select postback as the quick reply type, two fields – button text and postback id will appear. In the button text field, you have to write a text for the button. And from the postback id field, you have to select a postback. Click on the postback id field and a drop-down menu of different postback id will appear. And from the drop-down menu, select a postback id. And click on the Done button. And the postback id will appear on the Quick reply component
Phone as quick reply
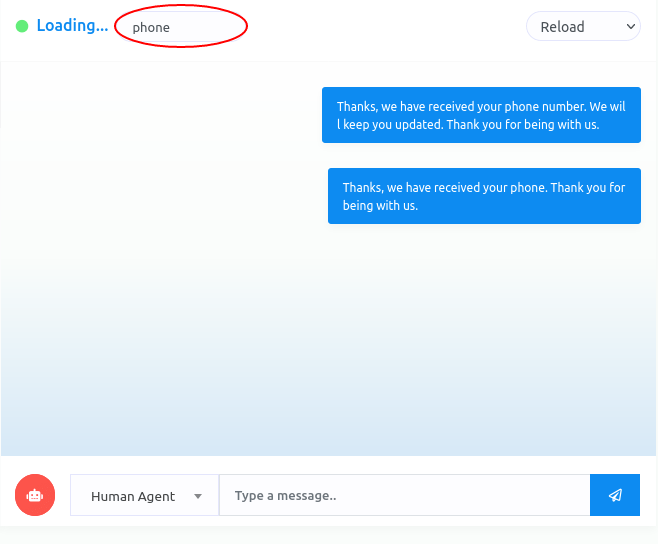
Just select phone as the quick reply type in the quick reply type field and click on the done button. In this case, the quick reply will collect your phone number from your Facebook Profile and show in the messenger. When a user clicks on the phone number, the system will receive the phone number. And the user will get a message that the system have received your phone number.
Email as quick reply
Just select Email as the quick reply type in the quick reply type field and click on the done button. In this case, the quick reply will collect your Email address from your Facebook Profile and show in the messenger. When a user click on the phone number, the system will receive the email address. And the user will get a message that the system have received your Email address.
Ecommerce
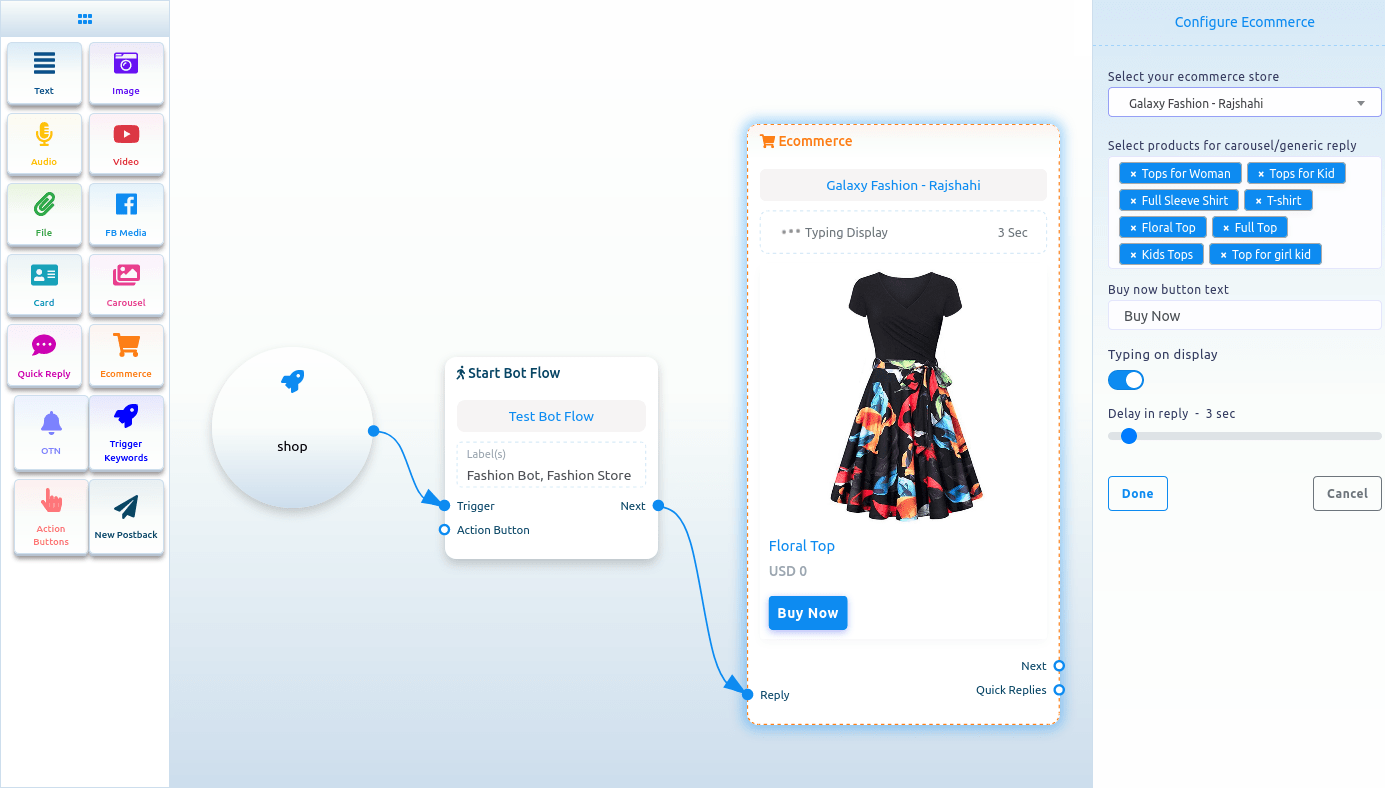
To add Ecommerce component, drag the Ecommerce component from the Doc-menu and drop it on the editor. Instantly, the Ecommerce component will appear on the editor.
Now double-click on the Ecommerce component and a right sidebar called configure Ecommerce with some fields will appear. First, you have to select an Ecommerce store. Click on the select your Ecommerce store field and a drop-down menu of different predefined stores will appear. Well, to configure Ecommerce component, first you have to create stores.
After you have selected a store, you have to select products for carousel/ generic reply. Just as click on the field, a drop-down menu of different products will appear. Now select products from the drop-down menu. Of course, you can select multiple products. Then you have to write text for the buy now button. Also, you can enable typing on display and select delay time in seconds. Now click on the done button.
Then you have to connect the Ecommerce component with other component.
The products you have selected will appear as carousel/generic template in the messenger. And by clicking on the buy now button, the user will be able to buy the product.
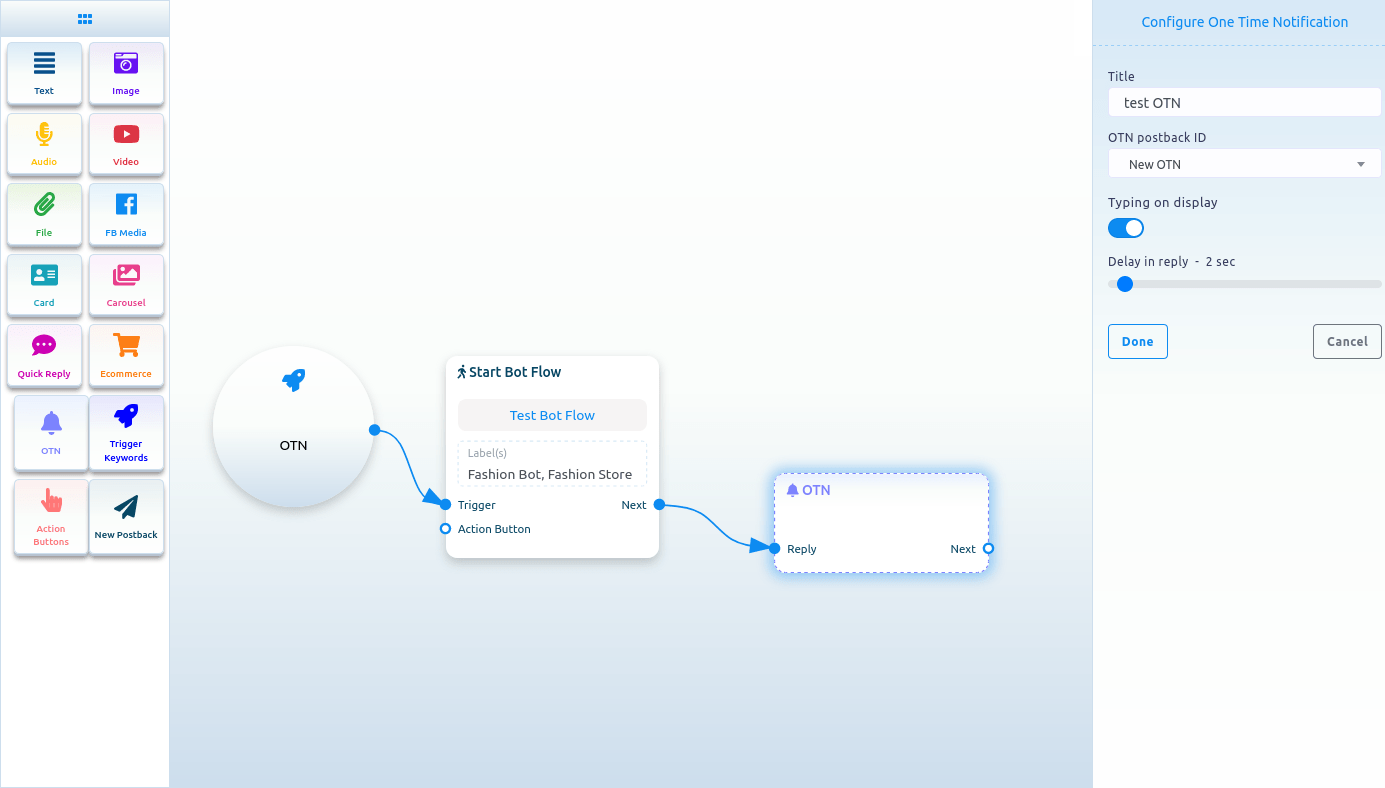
OTN
To add OTN component, drag the OTN component from the doc-menu and drop on the editor. Instantly, the OTN component will appear on the editor.
Now double-click on the OTN component and a right sidebar called configure OTN with two fields will appear.
First, you have to write a title for the OTN component in the title field. Then you have to select a predefined OTN postback from the OTN postback id field.
Also, you can enable typing on display and select delay time in seconds.
Then click on the Done button.

Create OTN postback
If you don’t have any predefined OTN postback, you have to create an OTN postback first. To create OTN postback, select New OTN from the drop-down menu of the OTN postback ID field. And click on the Done button.
Now click on the New OTN component and a right sidebar called Configure New OTN will appear with some fields. Give a template name in the template name fields and choose labels in the labels field. You can enable typing on display and select a delay time in reply in seconds. Then click on the done button. And the information will appear on the New OTN template.
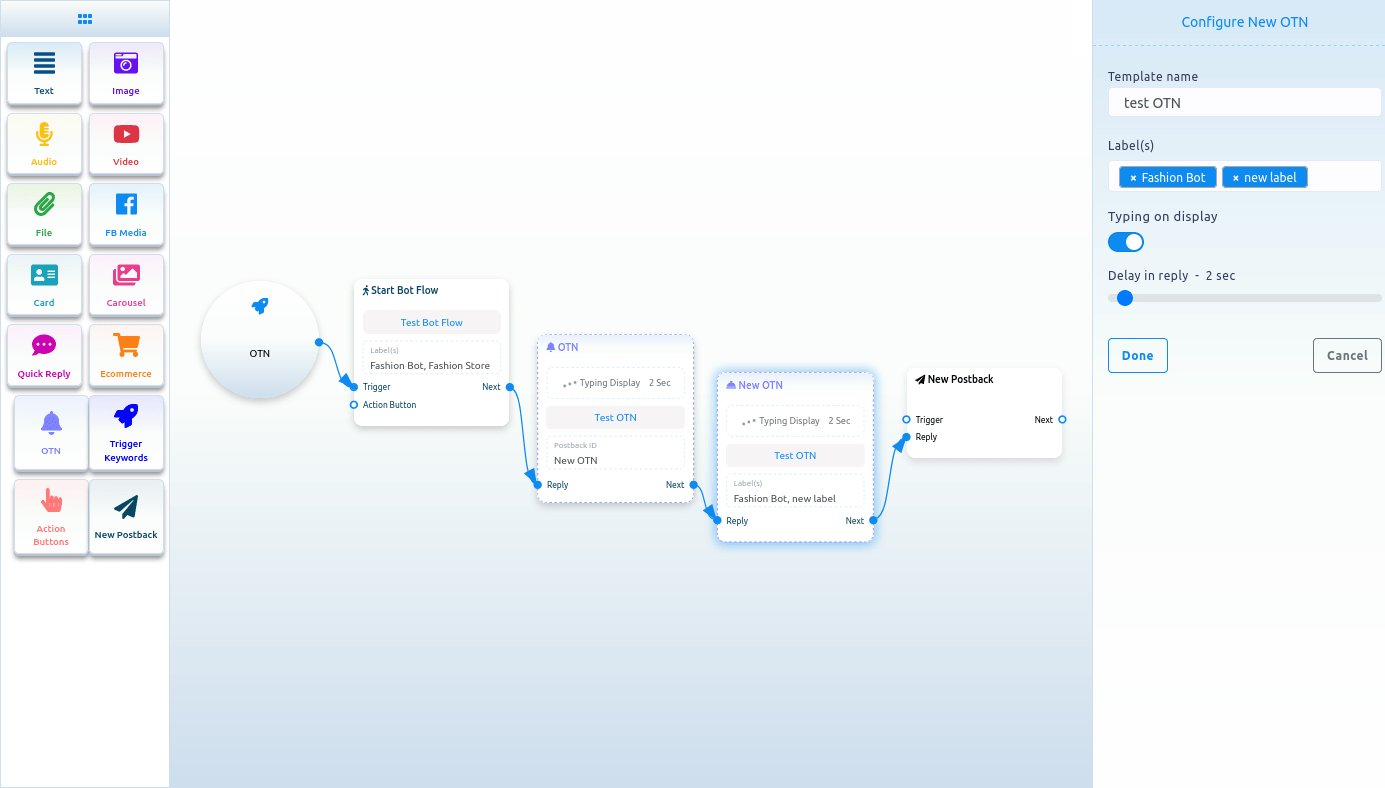
Now click on the New postback Component and a right sidebar called configure new postback will appear with some fields. Give a title in the title field and choose labels in the Choose labels field. Now click on the done button. Now you have to connect a component with the new postback component. After that, click on the Save button and your bot with OTN will be saved.
Action buttons
To add Action Buttons component, drag the Action Button component from the Doc-menu and drop it on the editor. Instantly, the Action Buttons component will appear on the editor.
Now double-click on the Action Button component, and a right sidebar called Configure Action Button with a field called Action Button will appear. From the field, you have to select an Action button. Click on the Action Button field and drop-down menu of different Action Buttons – Get started template, No match template, Un-subscribe template, Re-subscribe template, Email quick reply template, Location quick reply template, Brithday quick reply template, Chat with human template, and Chat with robot template – will appear. Now you have to select an action button template from the drop-down menu. Then click on the done button. Instantly, the name of Action button template will appear on the Action button component.
Now you have to connect the action button component with the start bot flow component.