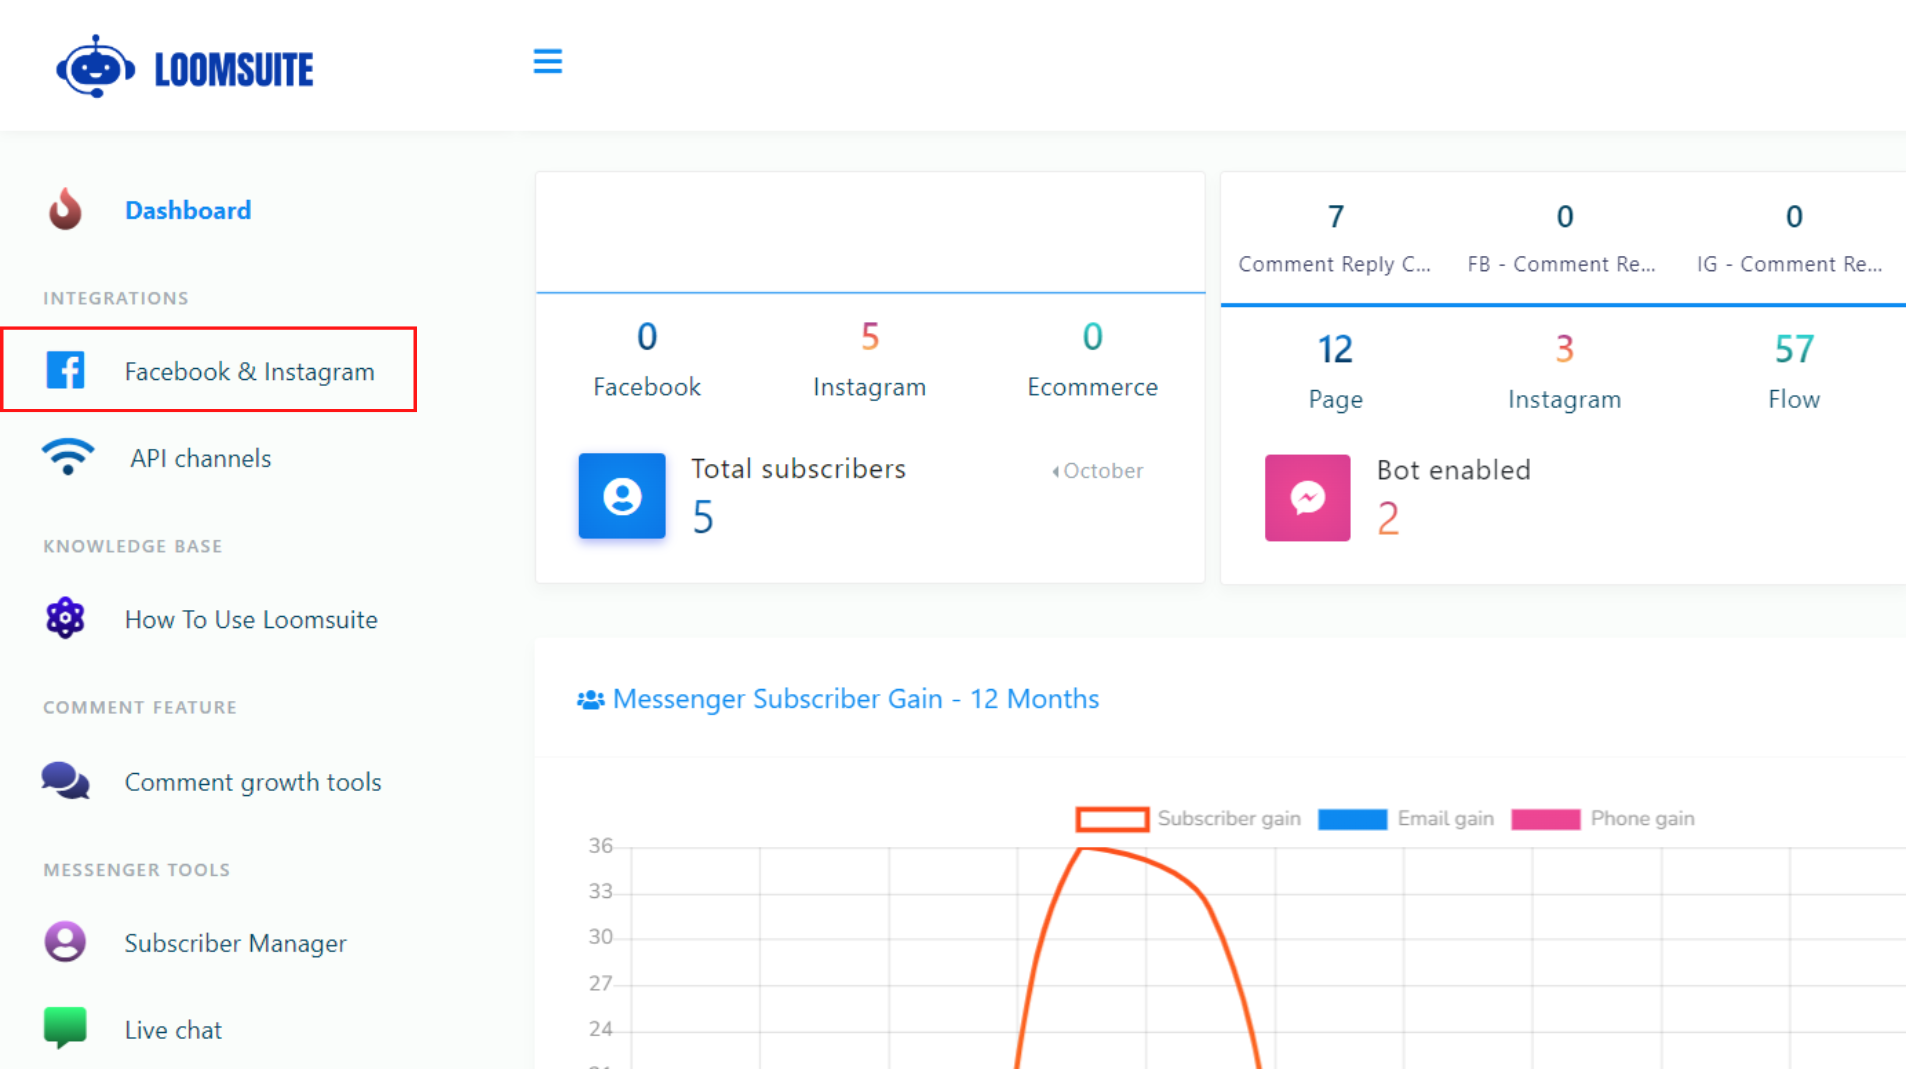
To import Facebook and Instagram accounts, first, go to the dashboard of Loomsuite. At the left sidebar of the dashboard, you will see a menu called Facebook and Instagram. Click on the menu.


How to set up Trigger keywords on your Instagram Account with flow builder
In this blog, I will show you how to set up trigger keywords for your Instagram account with Loomsuite Flow Builder. Please follow the instructional blog step by step to create the story reply properly.
To build the story reply, First, go to the dashboard of the Loomsuite. Now click on the Bot manager option at the left sidebar of the dashboard.
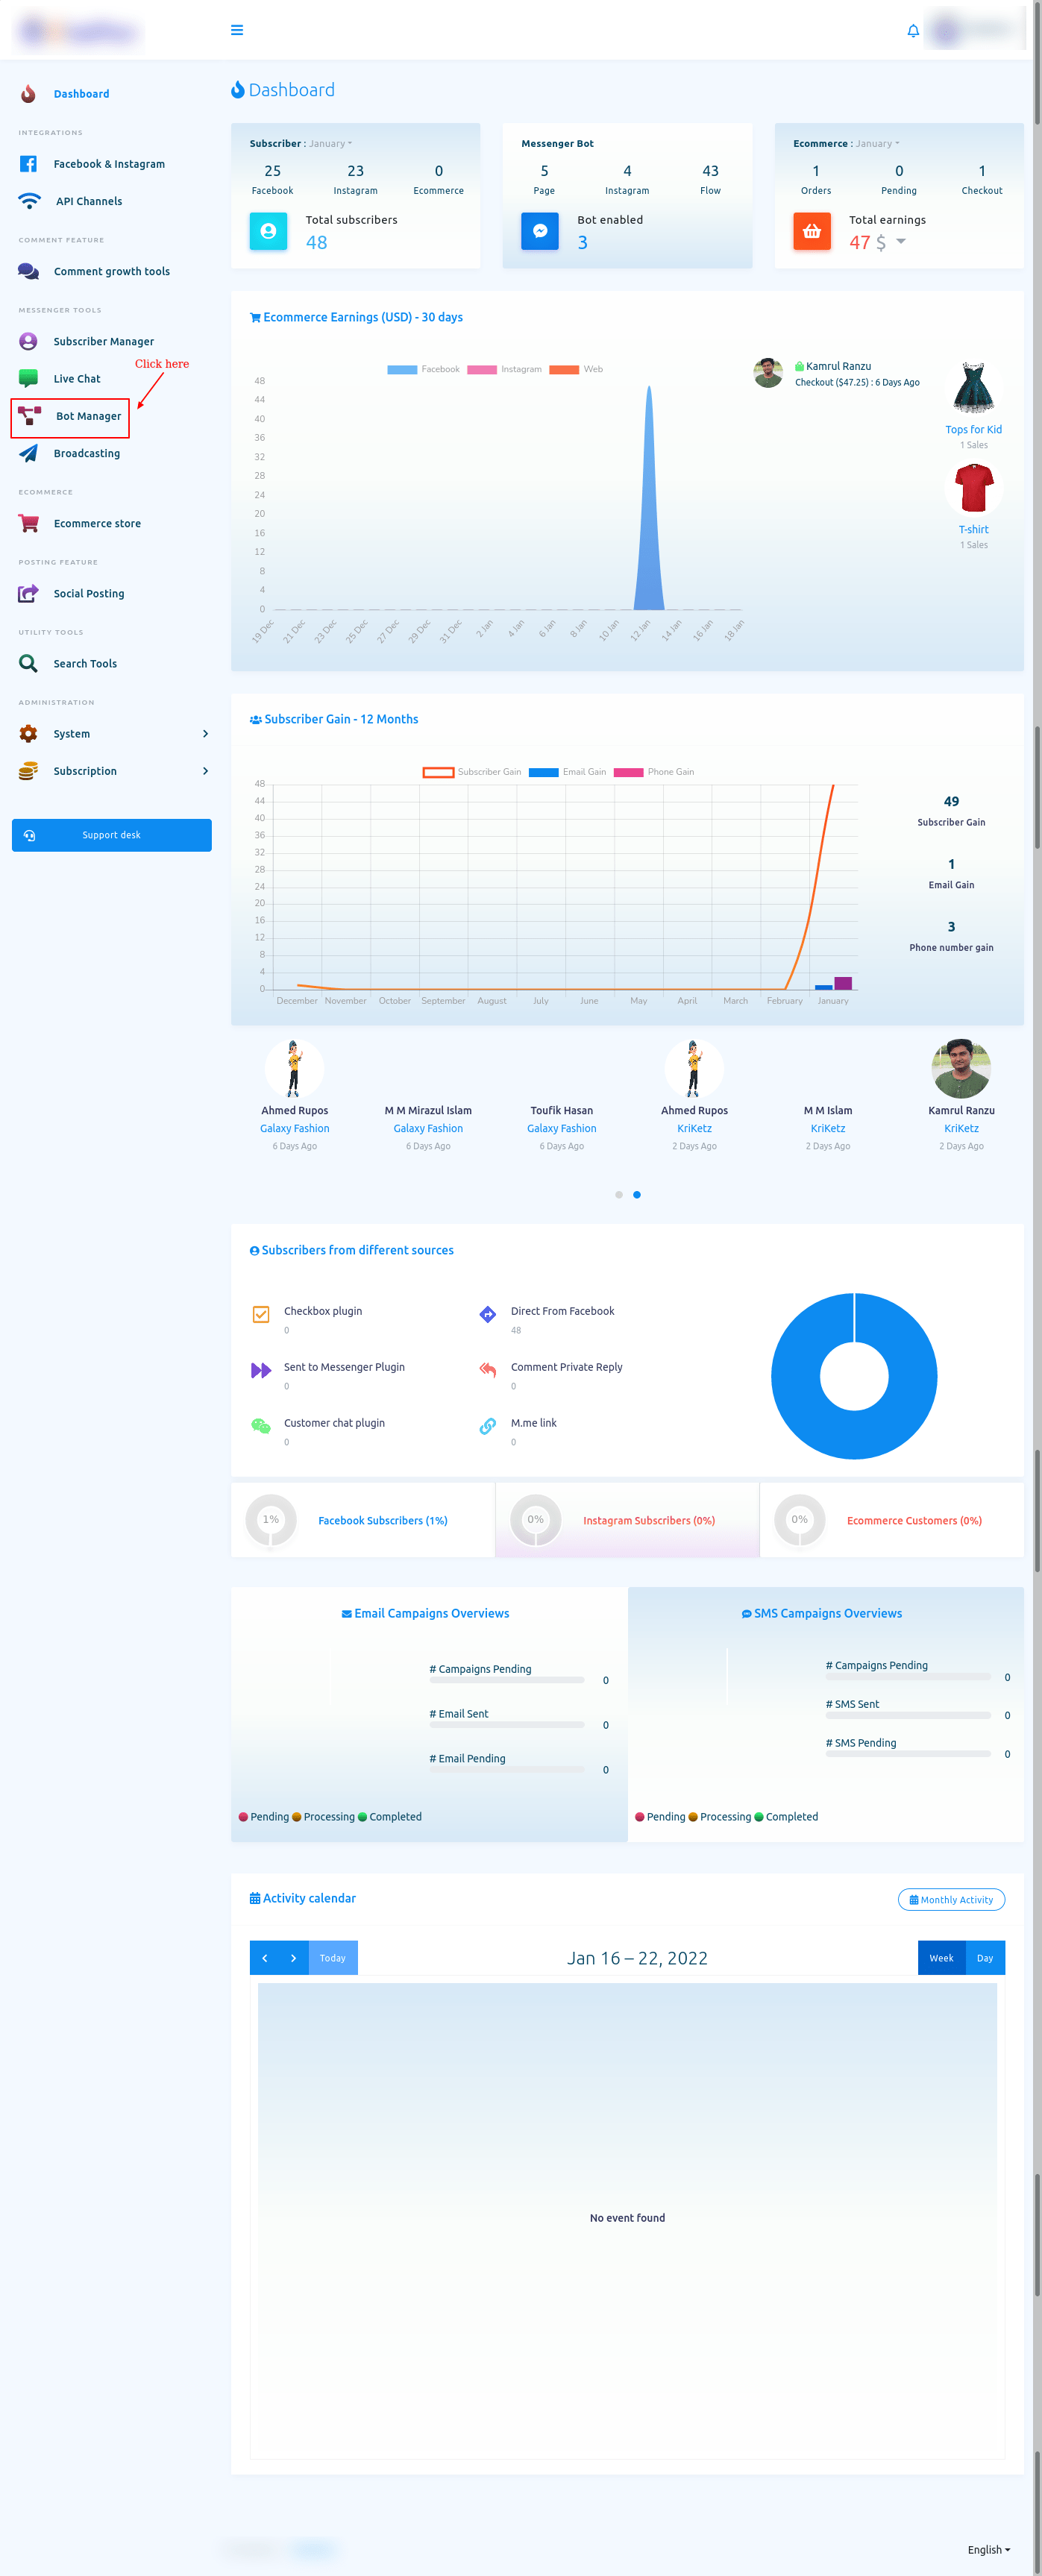
Bot Manager
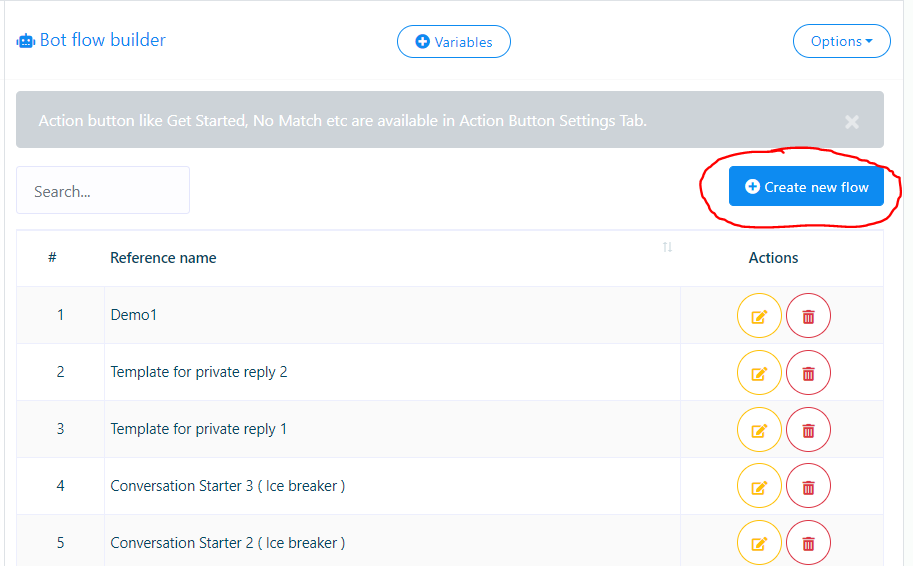
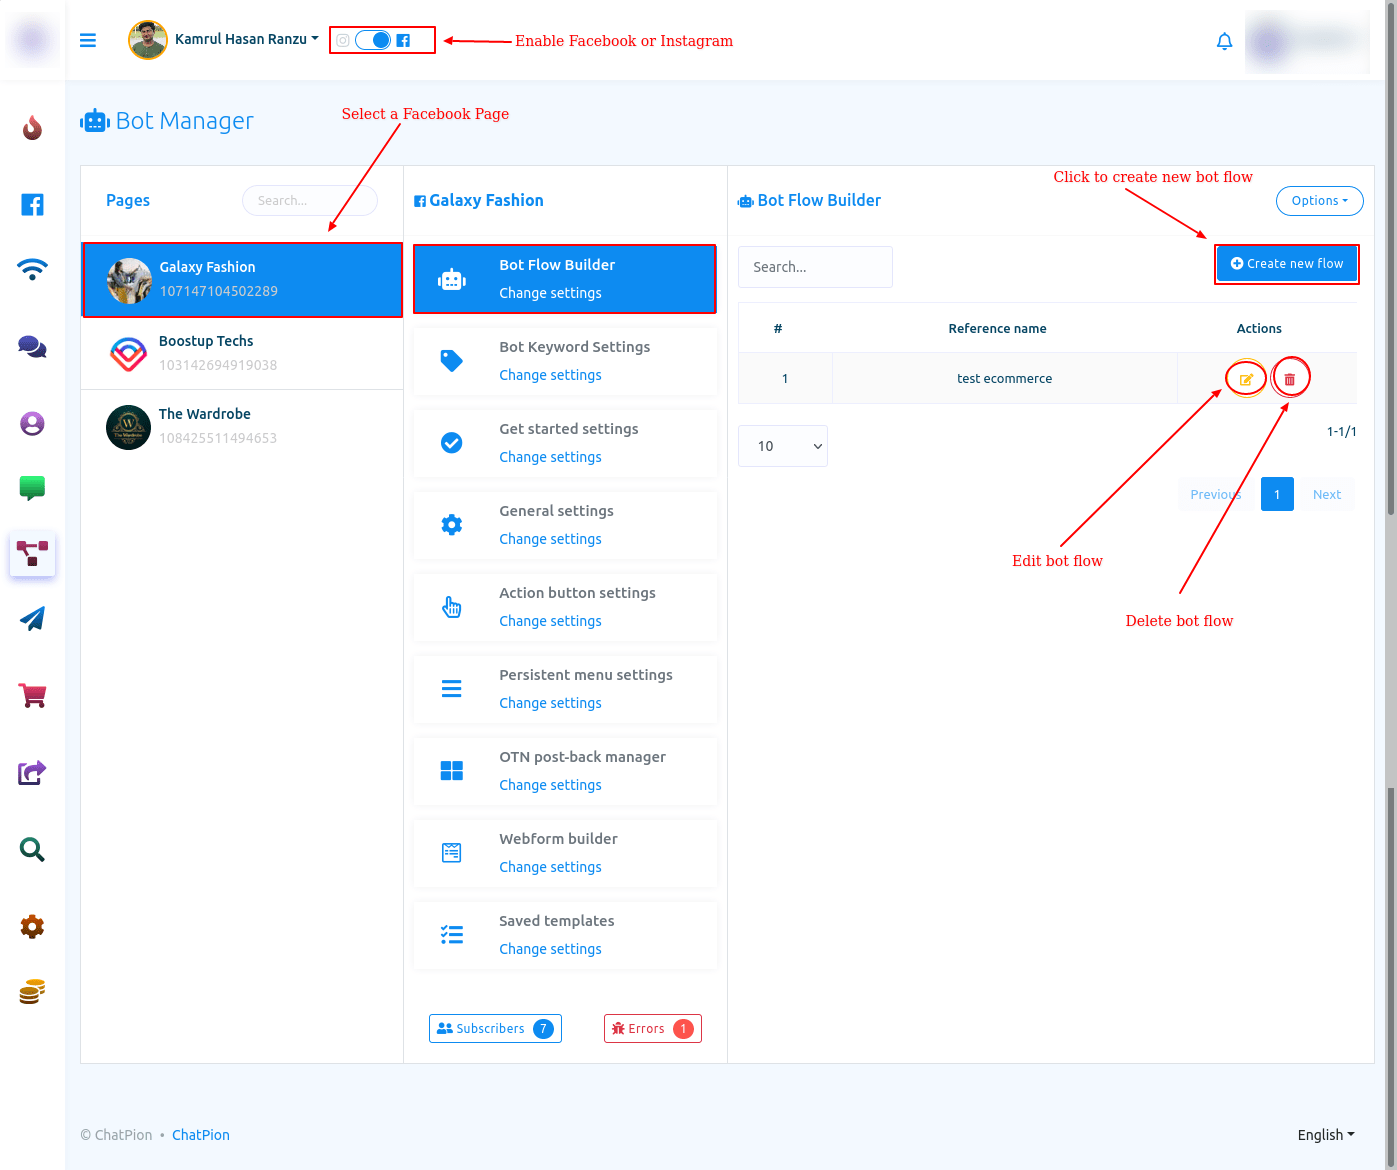
The Bot Manager page will appear. At the top of the page, you will see the profile of your Facebook account that you have previously connected to your Instagram account.

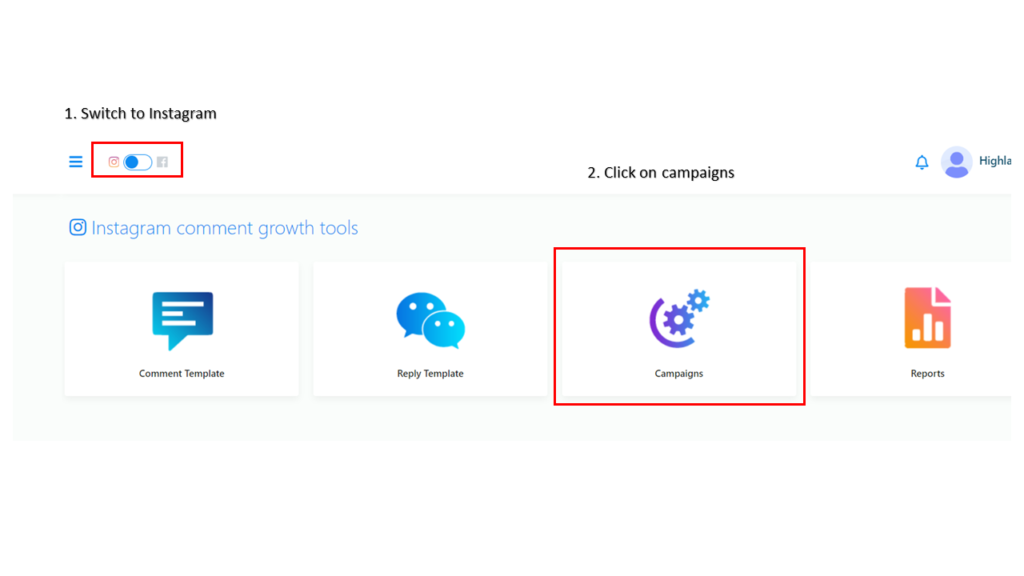
Switch the radio button to Instagram.
Click on Create New Flow to create the flow using the flow builder.
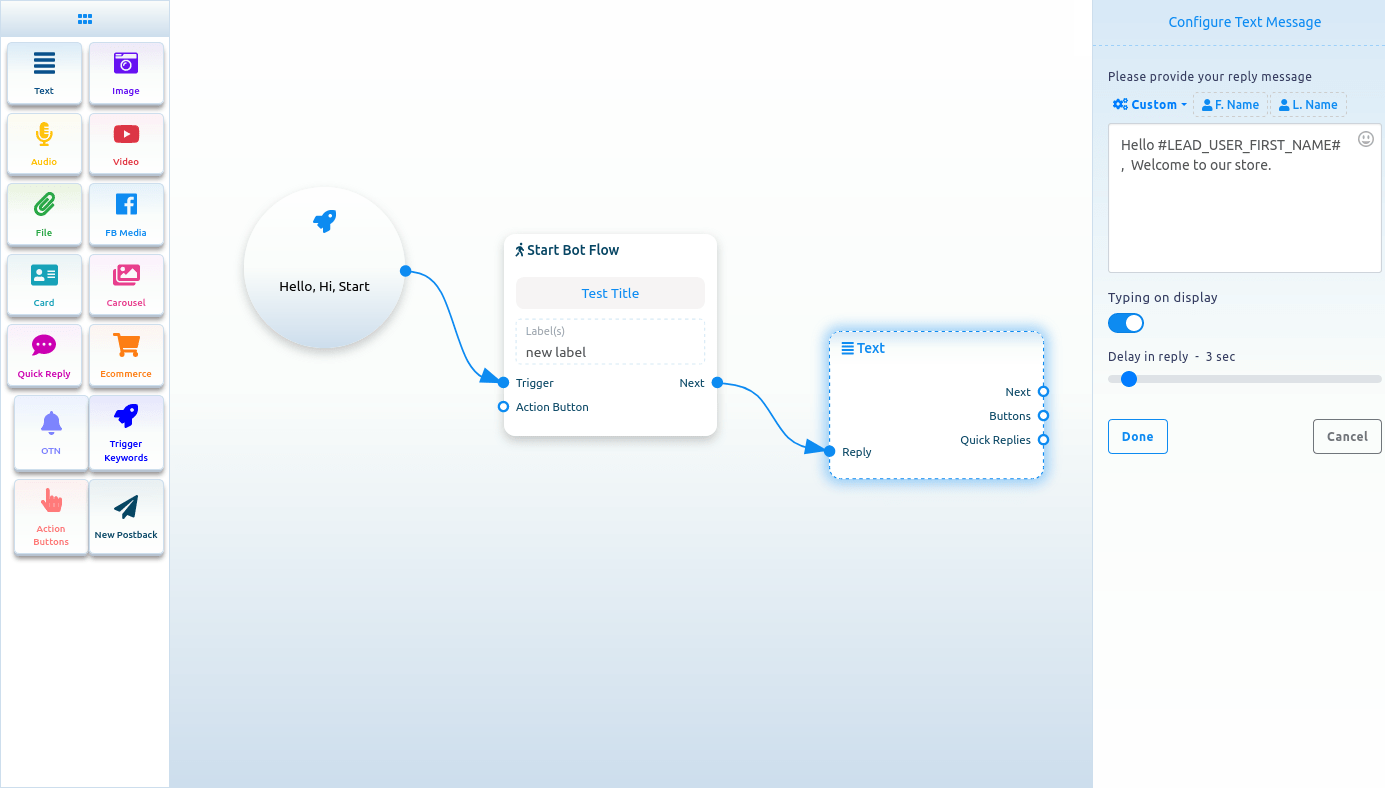
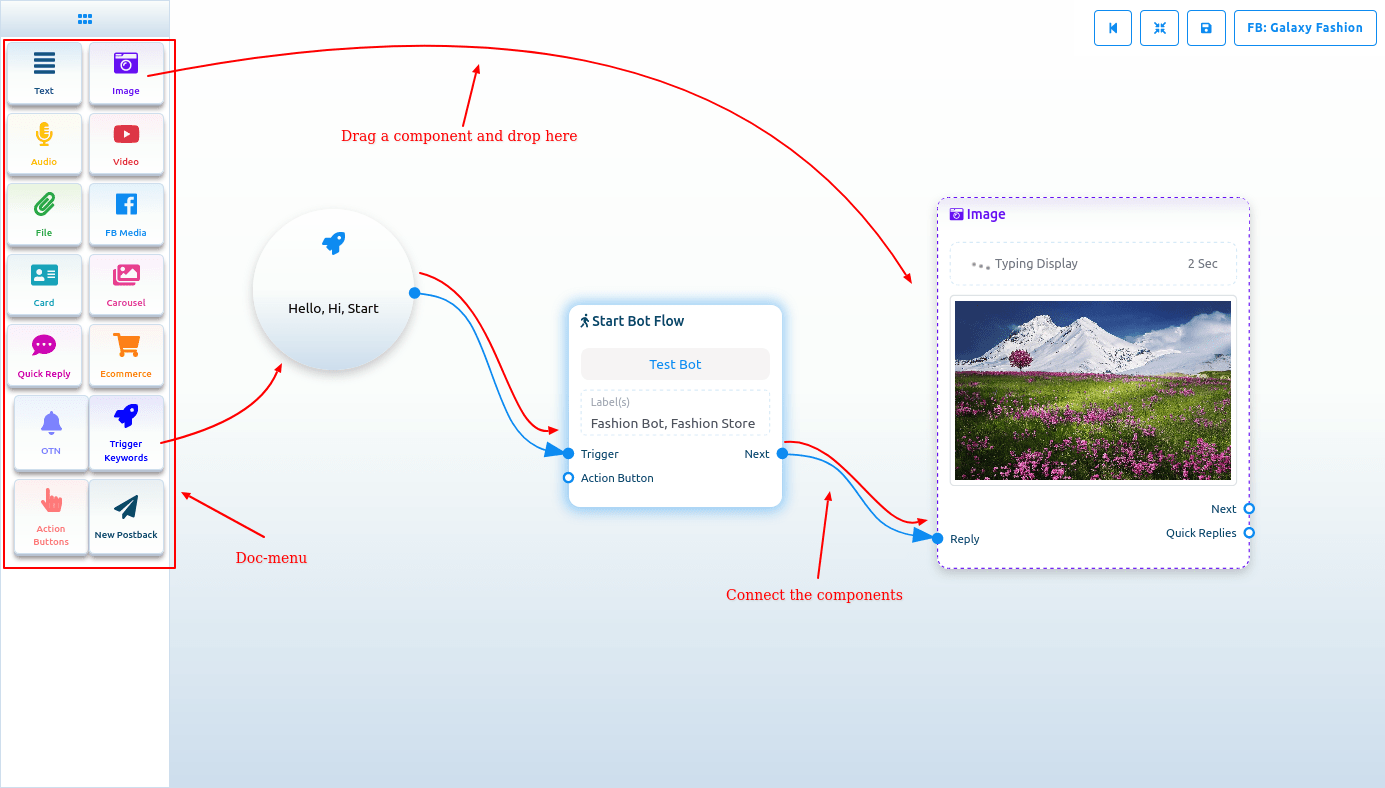
Visual Flow Builder Editor
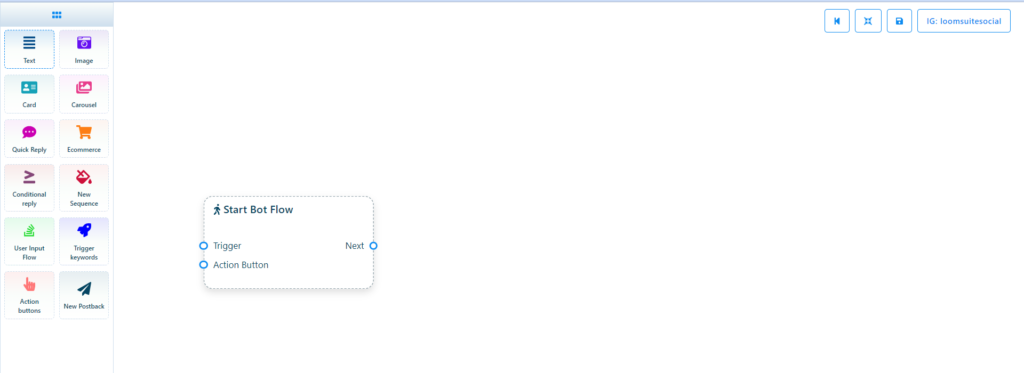
Start bot flow
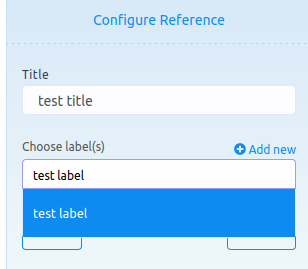
On the Editor, you will see an element called start bot flow. This component is essential to building the bot. Double-click on the Start bot Flow element and the Right Sidebar called Configure Reference will appear with two fields – Title and Choose Labels. In the title field, give a title for the bot.
And in the Choose labels field, you have to select labels from a drop-down menu of different fields. You can select multiple labels in the Choose labels field. Now click on the Done button and the information will be added to the element.
You can also add a new label
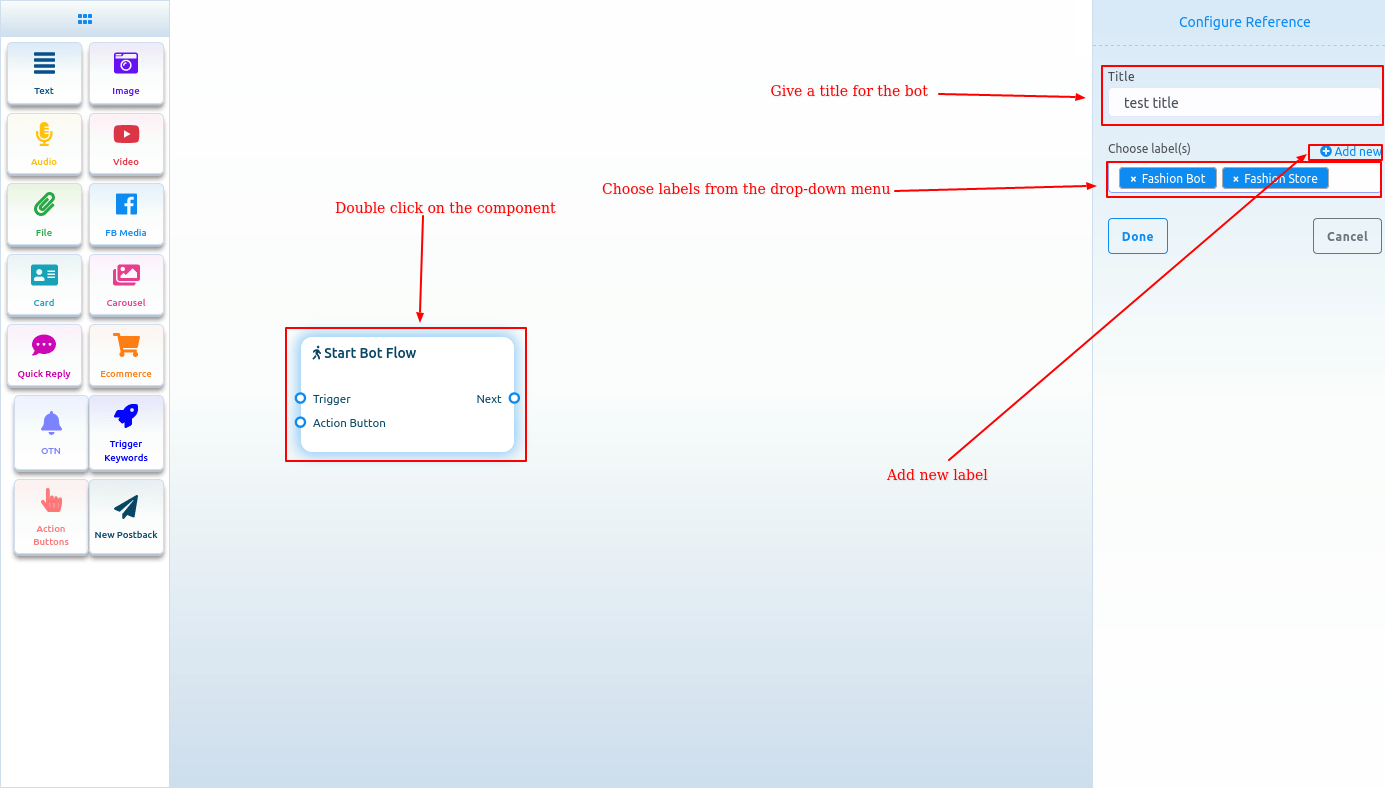
Add new label
And from the Choose labels field, you can add a new label. Just write down the name of the label and press enter.
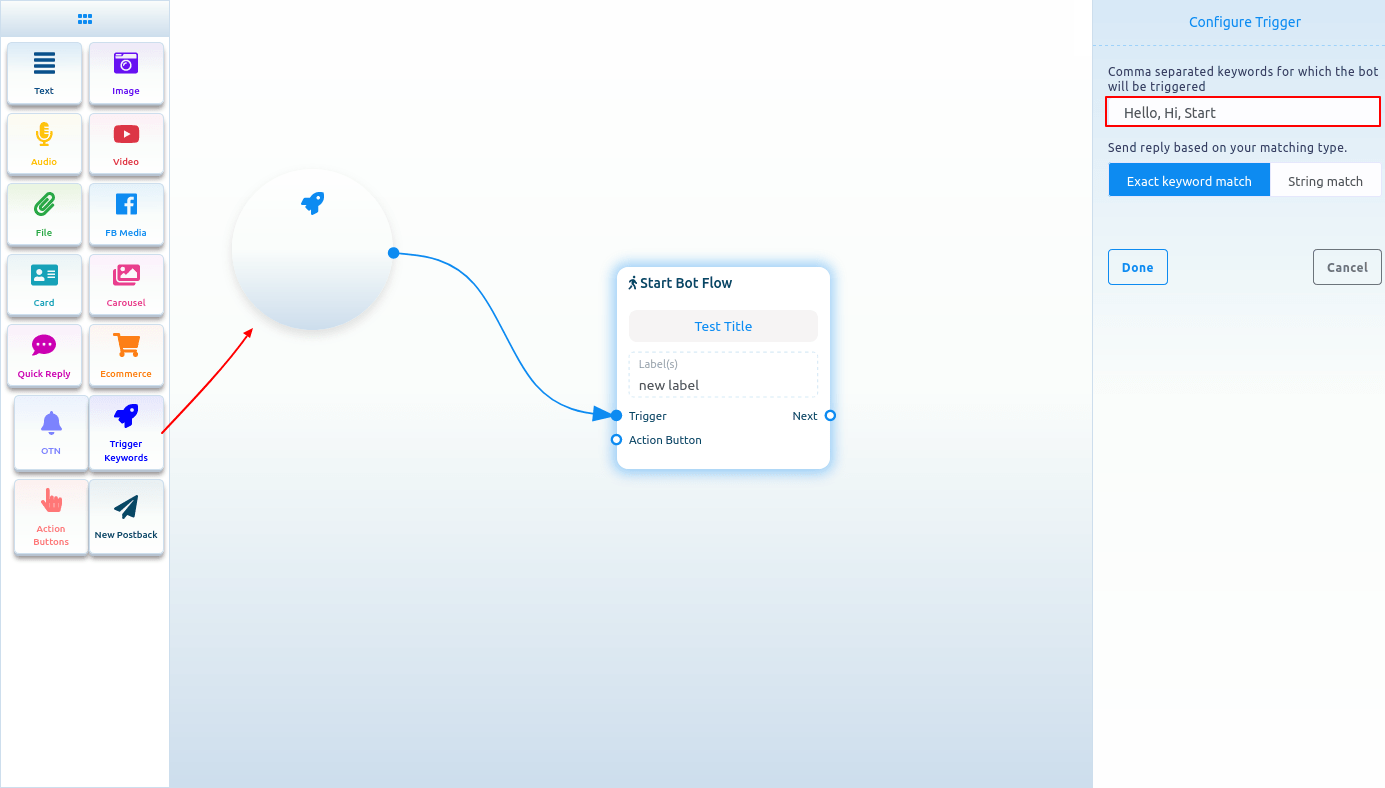
Trigger keywords
Now drag the trigger keywords element and drop it on the editor. Now double-click on the component and a sidebar called configure Trigger will appear. In the field, you have to provide comma-separated keywords. When a user writes one of the keywords, the bot will start. Also, you can select a matching type – Exact keyword match and String match. Then click on the Done button. And the keywords will appear on the component.
Now connect the Trigger Keywords component with the Start Bot Flow component.
NOTE- use keywords like sales1, autosales, and the likes to avoid the trigger of the flow if you use keywords that can be typed and sent by your followers.
Add components without dragging from Doc-menu
You can also add components without dragging the component from the Doc-menu and dropping it on the editor. From the next output of any component, drag the cursor and drop. And instantly a menu of the different components will appear. And from the menu, select a component and the component will appear on the editor connected with the mother component.

If you drag your cursor from the button output of any component and drop it on the editor, then the button component will appear on the editor connected with the mother component.
Text
If you want to build a bot with a text element, drag the Text Component and drop it on the editor. Now double-click on the component and a sidebar called Configure Text Message will appear with a text field. In the text field, you have to provide your reply message.
Now click on the Done button and the information will appear on the component.
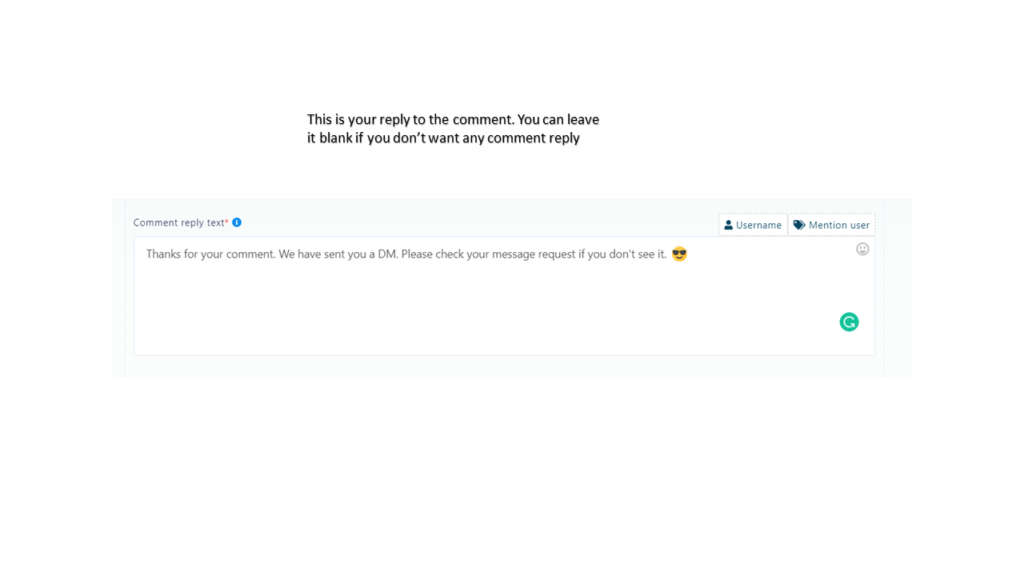
The auto comment reply tool is a fantastic feature of Loomsuite. And you can easily use the feature. Just read the article and follow the commands, and “Comment growth tools” will be set to work instantly.
Once the feature starts working, it will continue without your supervision until you stop it. The feature will take full responsibility for interacting and dealing with your valuable clients via the Facebook page and Instagram accounts.


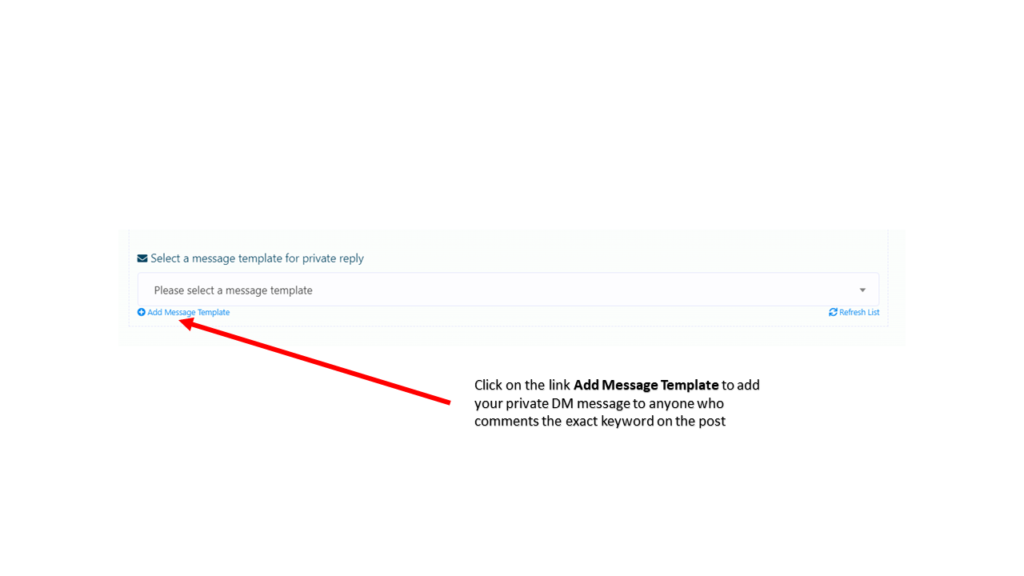
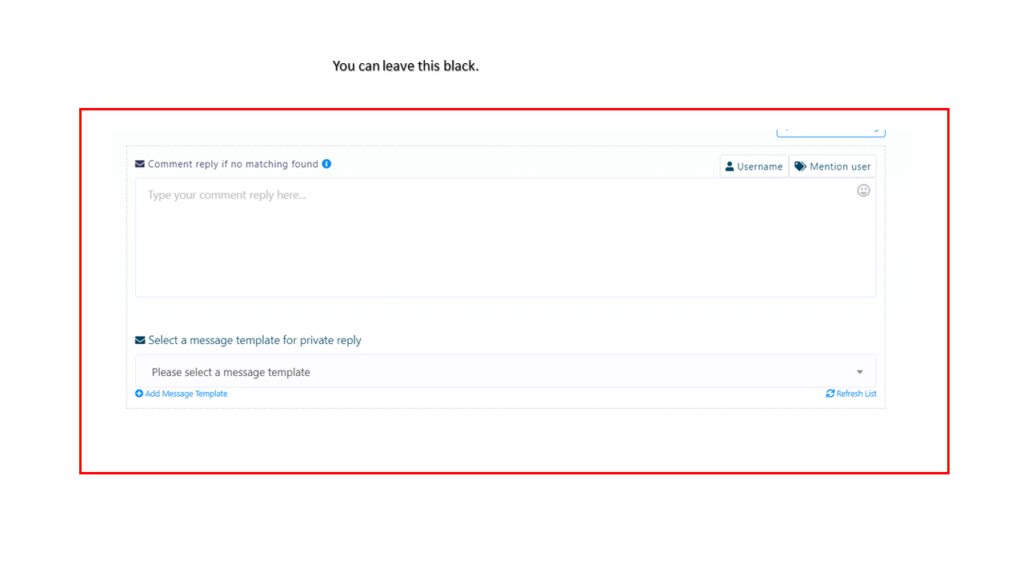
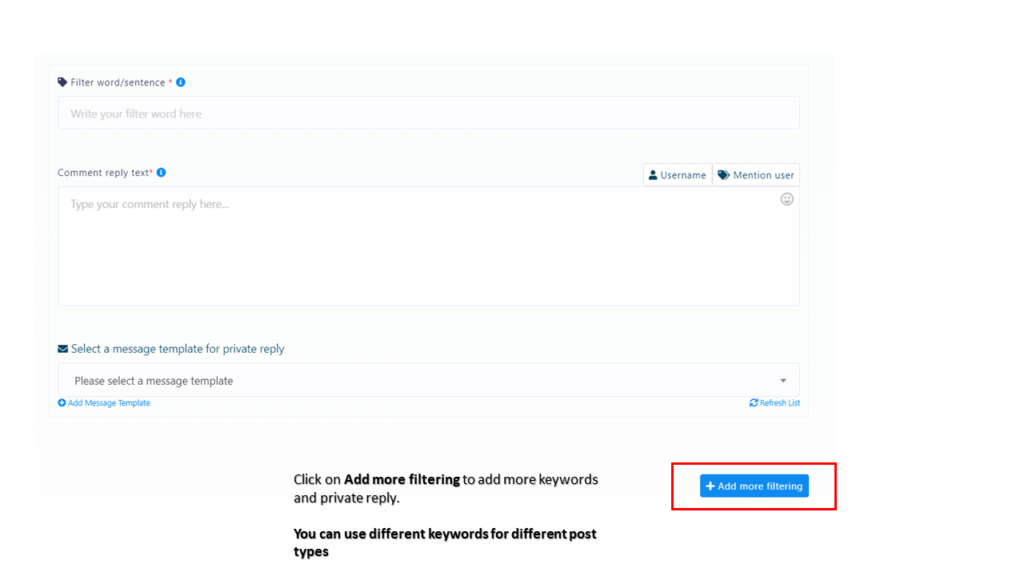
You can add more auto comment reply keywords by clicking on the Add more filtering button.
Use different for different post types—i.e different keywords for each of these post types, carousel, single image post, and reels.

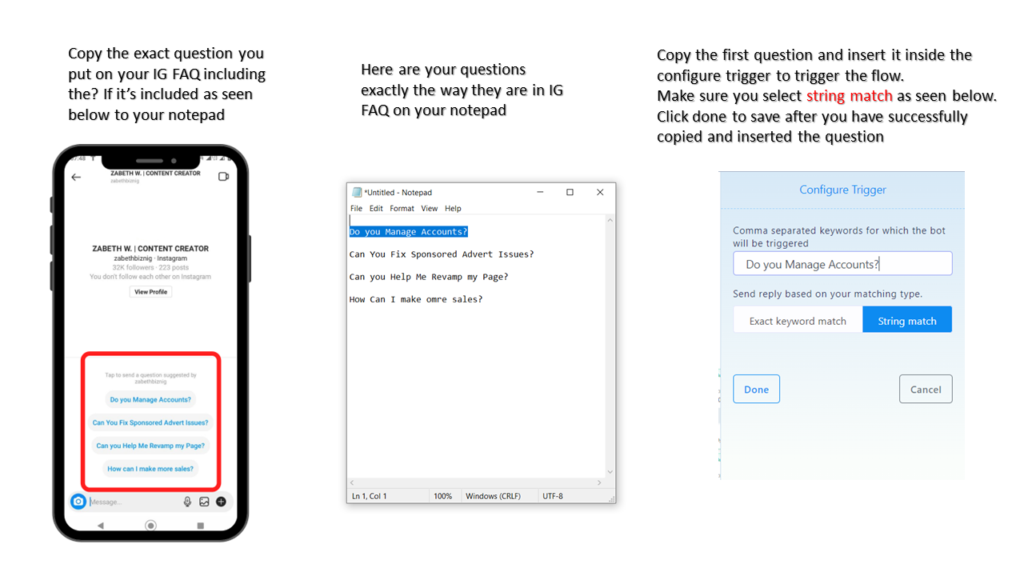
To set up your conversation starter on Loomsuite, you will need to first of all set up your frequent ask questions on your Instagram account using your mobile app.
To do that, just follow the instructions in the images below


How to set up the conversation reply with flow builder on Loomsuite
Please follow the instructional blog step by step to create the conversation reply inside Loomsuite.
From the main dashboard of Lommsuite
Bot Manager => switch to Instagram => select your Instagram account => Bot flow builder => click to edit the Conversation Starter 1 ( Ice breaker )

The flow builder will open on a new tap.
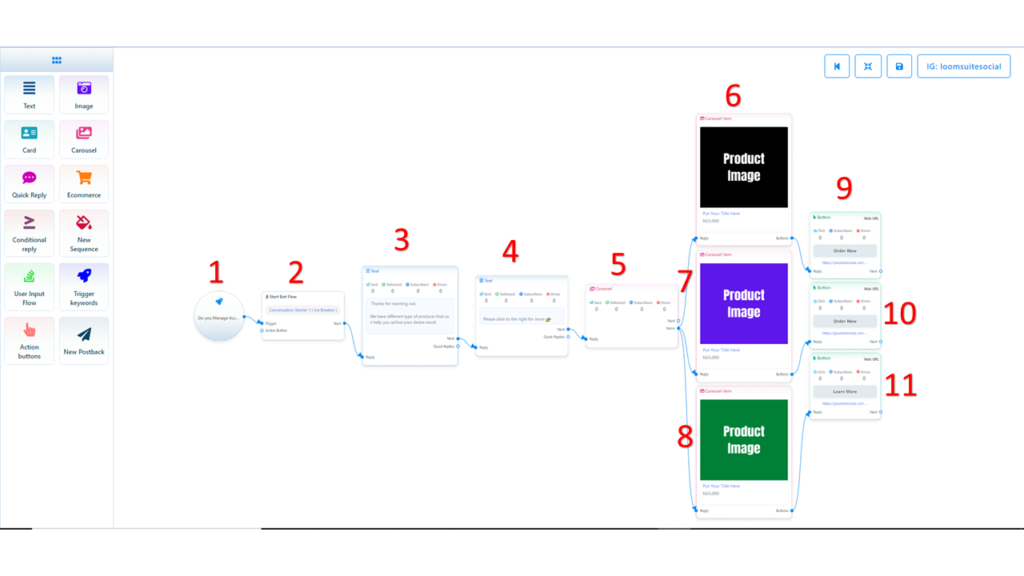
You will have to edit the flow to fix your product marketing.
Double-click on element 1 to edit.
This flow is a little different from what you have seen before but it’s also easy to edit. It comes with carousel images, you can decide to delete any of those images. Just place your cursor on any of the images and right-click to delete.
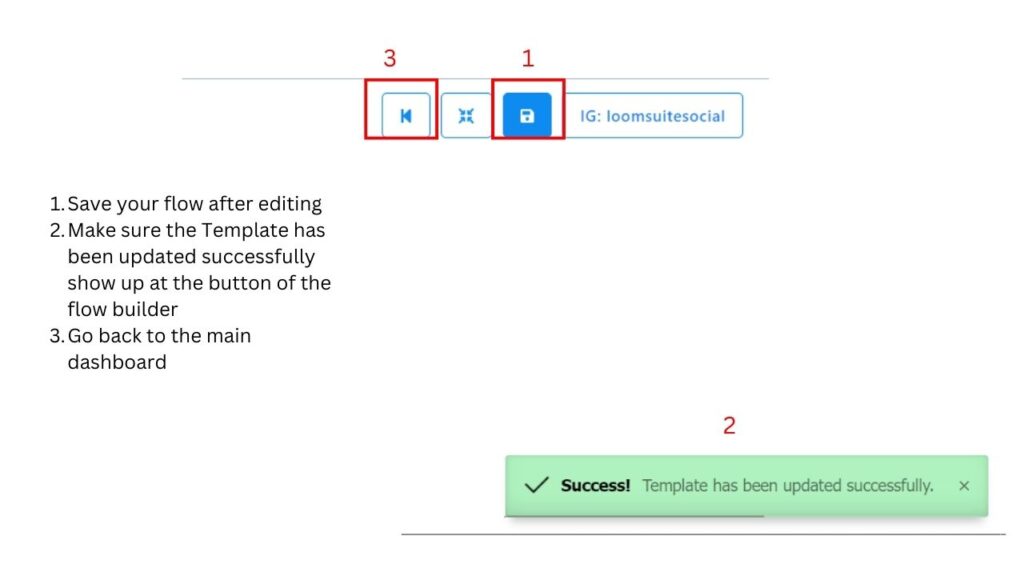
Edit the flow to whatever you want and save it after you are done.
Repeat this for the other two conversation starters. Conversation Starter 2 Icebreaker and Conversation Starter 3


Loomsuite, a chatbot-building platform, and multichannel marketing software, has recently presented a feature called Live Chat. On the Live Chat interface, you can see the recent conversations between your users and your Facebook page or Instagram account. Of course, on the Live Chat, you can directly converse via your Facebook page or Instagram account with the users. In one word, you can do everything that you can do on Facebook or Instagram messenger. As well, you can accomplish some other tasks such as creating labels, assigning labels to users, and setting sequence messages.
Moreover, you can subscribe and unsubscribe a user at any time. Likewise, you can pause and resume bot replies for a specific user.
In this article, I will talk about how to perfectly use the feature, Live Chat.
Using Live Chat is as easy as using Facebook and Instagram messenger. That is, using Live Chat is super simple and straightforward.
Let’s see how to use Live Chat
First, go to the dashboard of ChatPion. You will see the live chat menu at the left sidebar of the dashboard. Just click on the Live Chat option.
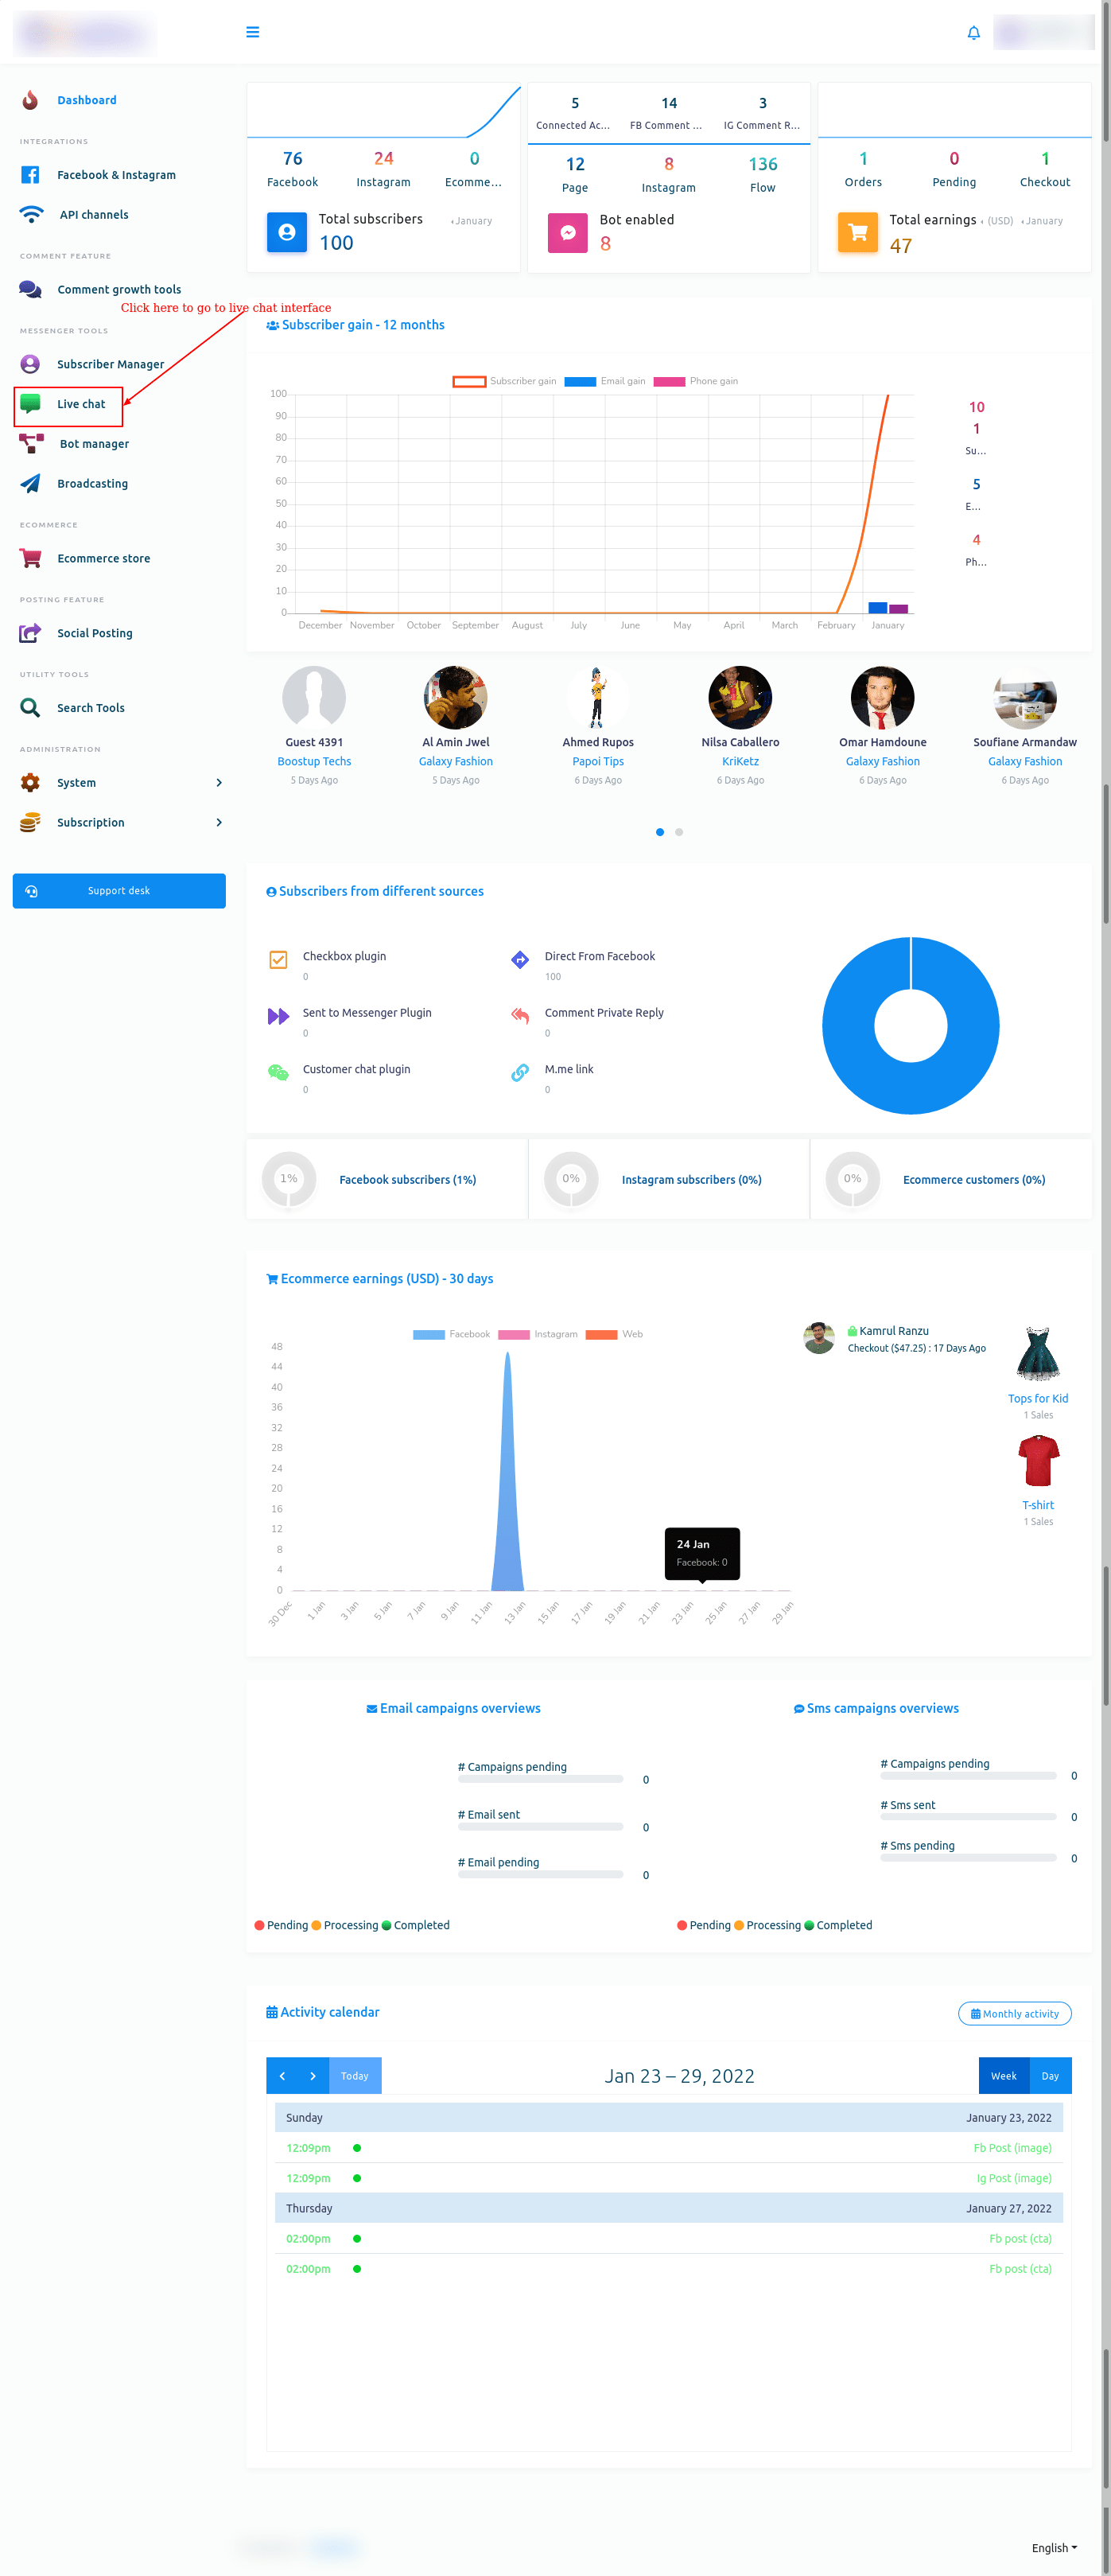
Instantly, the interface of the live chat will appear.
Live Chat interface is divided into three sections– subscribers list, messaging window, and actions.
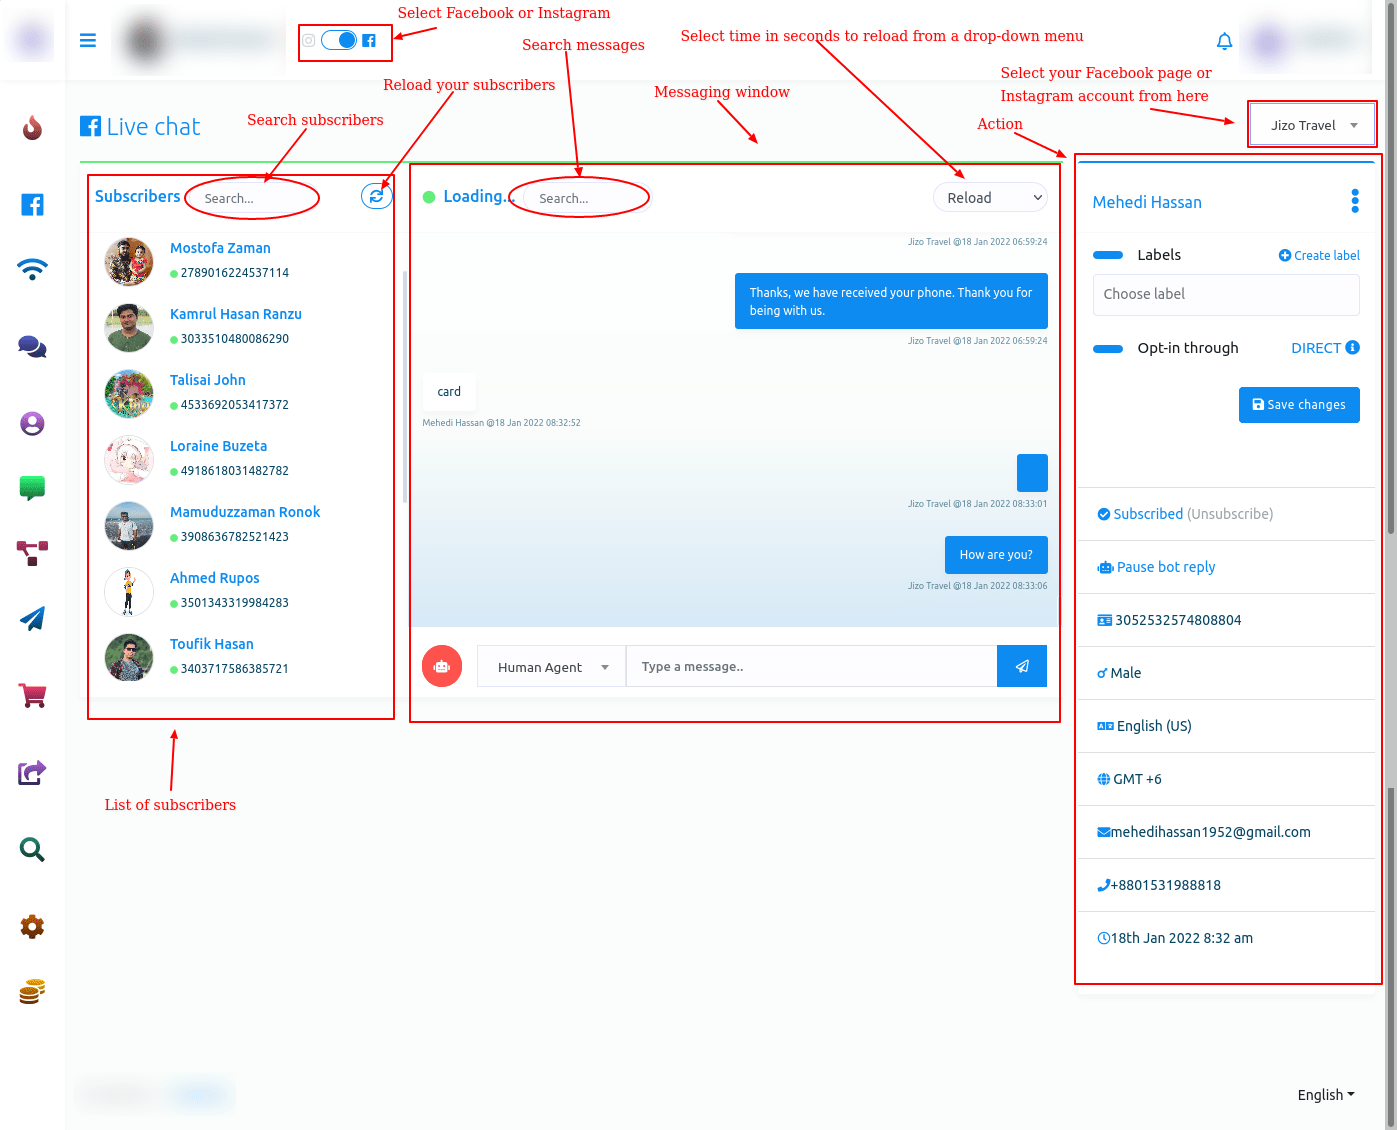
Subscribers’ list
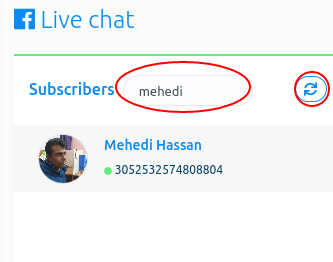
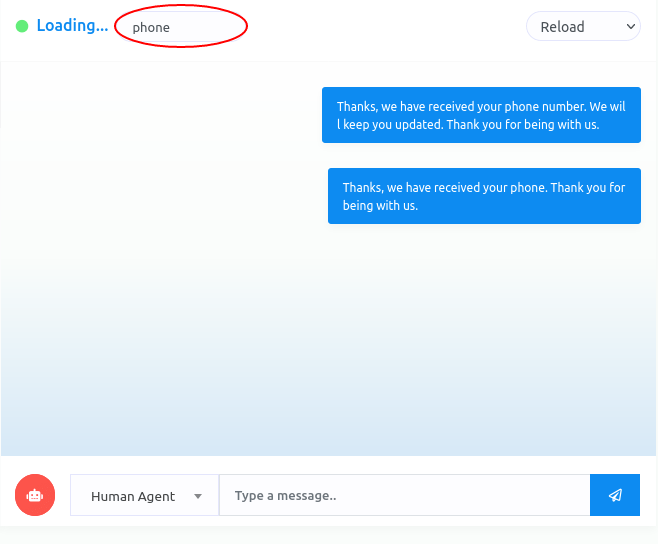
In the subscribers’ list section, you can see the list of subscribers who you have conversed with recently. Also, you can search for a subscriber on the search bar. And by clicking on the reload button, you can reload the Live Chat, though the live chat reloads automatically at times.
Messaging window
The messaging window is for directly chatting with users.
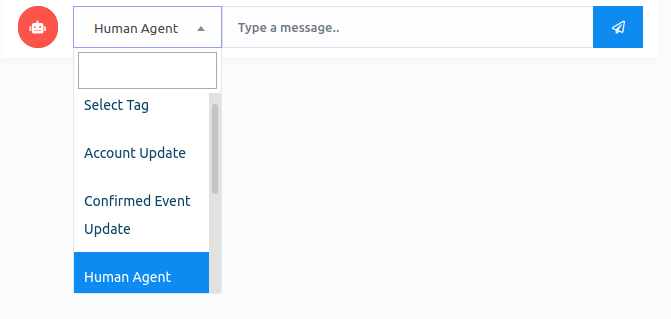
In the message tag field, you have to select a message tag. Click on the message tag field and instantly will appear a drop-down menu of different message tags such as Human agent, Account update, Confirmed Event, Post purchase Update, Non-promotional(NP registered only). If you select the human agent message tag, you have to reply to the message from users within 24 hours, otherwise, you will get an error. In this case, you have to use other message tags. If you want to know the usage of message tags, read the article by Facebook for developers.
Moreover, you can also search messages on the search bar in the messaging window.
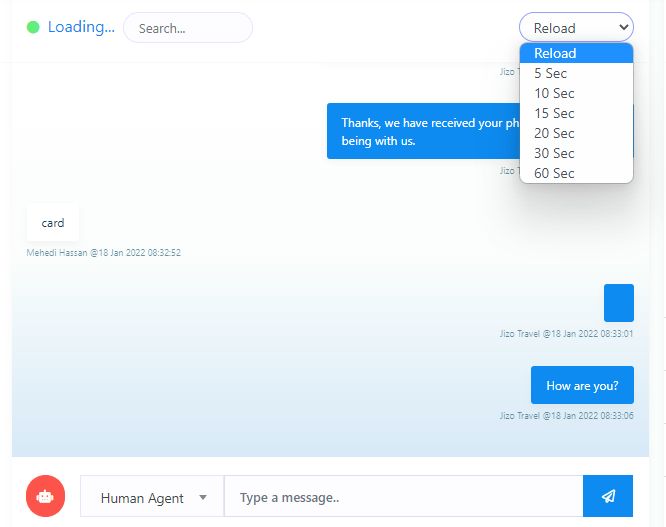
Also, you can select a time for automatic reloading by clicking on the reload button. Click on the reload button, and a dropdown menu of different times will appear. Now just select a time. After that, the live chat will reload automatically between the time you have selected.
Actions
In the action sections, you can accomplish some tasks. Moreover, you can see the primary data of users.
Select Labels
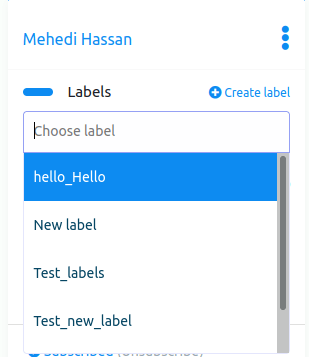
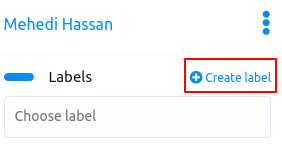
First, you will see a form called a label. From the label field, you can assign a label to a specific user. Click on the label form and instantly appear a drop-down menu of different labels you have created before. Then you have to select a label to assign the label to a subscriber list. The selected labels will appear on the label form. Well, you can select as many labels as you want for a specific user. True, you can remove labels one after another by clicking on the cross icon next to the label name. Of course, you can remove all the labels by clicking on the cross icon in the field.

Create Labels
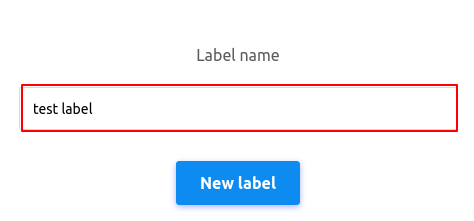
Moreover, you can create a new label from here. Click on the create label button and a modal form with one field will appear. Write the name of the new label in the field and click on the new label button, and the label will be created and selected in the field automatically.
After you have selected labels in the Labels field, click on the save changes button to save the changes.
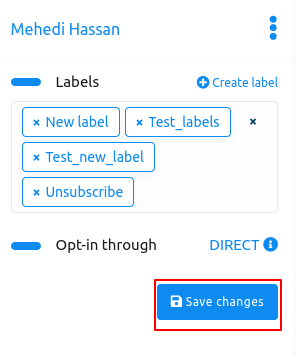
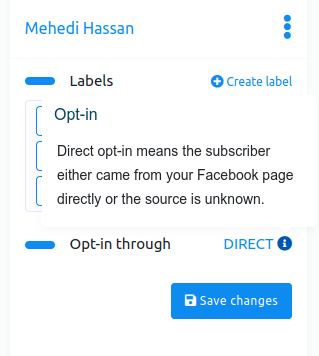
Opt-in through
Well, in the opt-in through option, you can see whether the subscriber has come directly through the Facebook page or the source is unknown. If you see the word Direct beside the opt-in through, you know that the user has come through the Facebook page or the Instagram account directly.
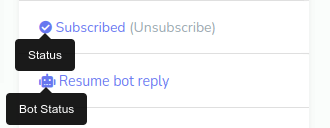
Status
By clicking on the status button, you can unsubscribe and resubscribe a user. And by clicking on the bot status button, you can pause and resume the bot reply.
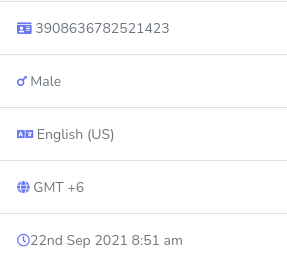
Primary Information
You can see the primary information of the subscribers– subscriber ID, gender, language, time, and date.
Conclution
If a bot forwards a subscriber to a human agent, you can directly chat with the user from the Live Chat without opening the messenger. And on the live chat, any employee can chat with the users without being moderate on the Facebook page or the owner of the Instagram account.
In one word, using Live Chat, you or your employee can easily see the latest conversations and chat with them directly without going to Facebook and Instagram messenger.

Subscriber Manager
With the subscriber manager feature of Loomsuite, you can see all of your subscribers. And you can scan subscriber lists and enable auto scan and search subscribers. Moreover, you can migrate page conversations as subscribers, download search results, assign labels to selected subscribers, and delete subscribers.Besides, you can create New labels on the page.
First, go to the dashboard of the ChatPion. At the left sidebar of the dashboard, you will see a menu called subscriber manager. Click on the subscriber manager menu.
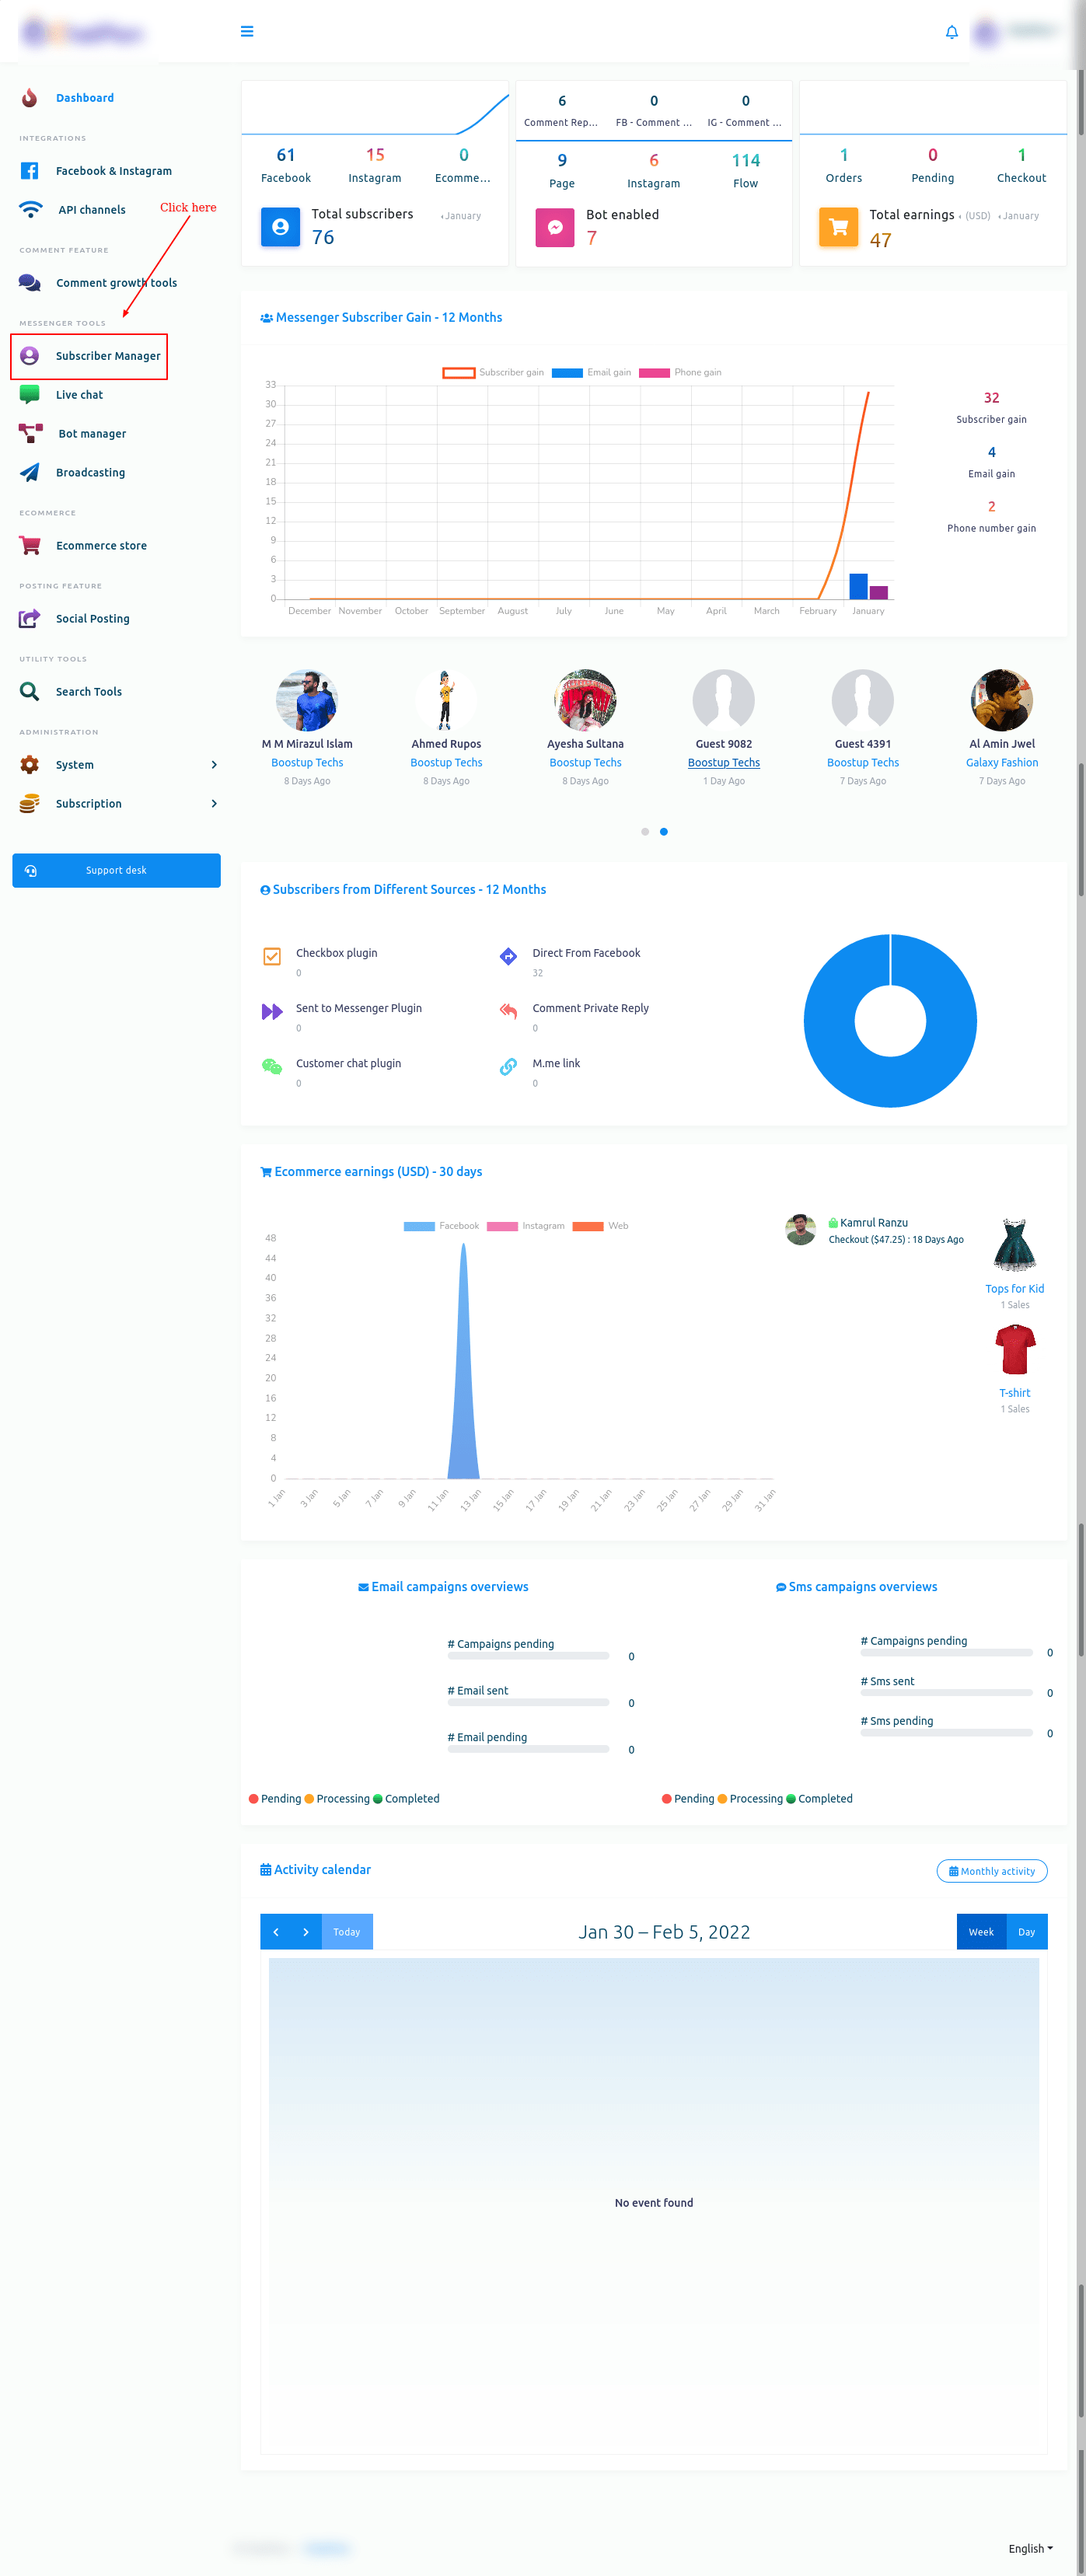
Subscriber manager
Instantly, a page called Subscriber manager will appear.
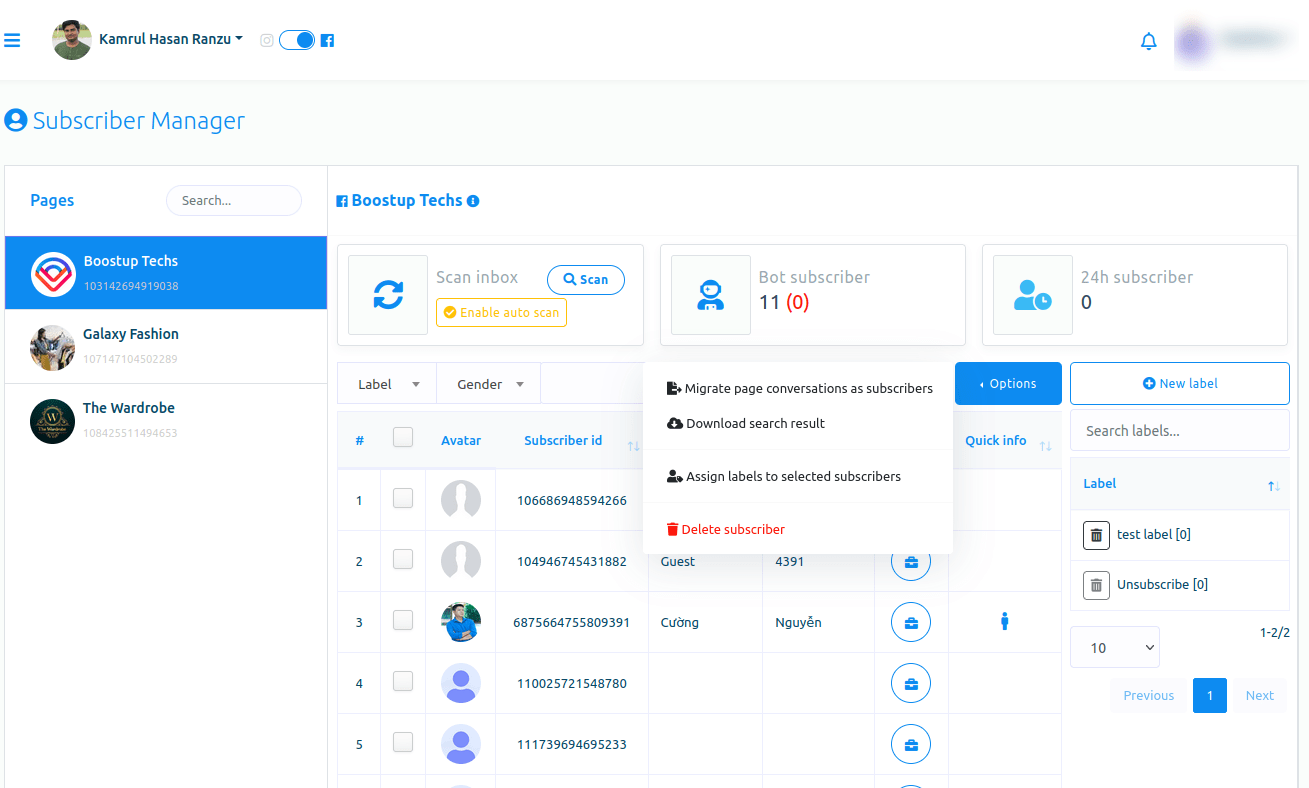
Using the Subscriber manager feature of ChatPion is very easy. Just look at the page, and you will understand everything.

How to build bot with flow builder
In this blog, I will show you how to create Facebook Messenger bot and Instagram DM bot with Loomsuite Flow Builder. Please follow the instructional blog step by step to create an interactive Facebook Messenger bot or Instagram DM bot.
To build a bot, First, go to the dashboard of the Loomsuite. Now click on the Bot manager option at the left sidebar of the dashboard.
Bot Manager
And instantly, the Bot Manager page will appear. At the top of the page, you will see the profile of your Facebook account. If you have imported one more Facebook Profile, you can change the Facebook profile.
To build a bot on the Facebook page, select the radio button to Facebook. On the other hand, to build a bot on Instagram, select the radio button to Instagram.
Visual Flow Builder Editor
Well, to build a bot, click on the “Create New Flow” button. And instantly, the editor of the Flow Builder will appear. The editor is divided into two parts – Doc-menu and editor. On the Doc-menu, all the components are gathered together. To build a bot, you have to drag components from the Doc-menu and drop them on the editor. Then you have to configure the components and connect them to each other. On the Doc-menu, there are 14 components.
Start bot flow
On the Editor, you will see an element called start bot flow. This component is essential to building the bot. Double-click on the Start bot Flow element and the Right Sidebar called Configure Reference will appear with two fields – Title and Choose Labels. In the title field, give a title for the bot.
And in the Choose labels field, you have to select labels from a drop-down menu of different fields. You can select multiple labels in the Choose labels field. Now click on the Done button and the information will be added to the element.
Add new label
And from the Choose labels field, you can add a new label. Just write down the name of the label and press enter.
Trigger keywords
Now drag the trigger keywords element and drop it on the editor. Now double-click on the component and a sidebar called configure Trigger will appear. In the field, you have to provide comma-separated keywords. When a user writes one of the keywords, the bot will start. Also, you can select a matching type – Exact keyword match and String match. Then click on the Done button. And the keywords will appear on the component.
Now connect the Trigger Keywords component with the Start Bot Flow component.
Add components without dragging from Doc-menu
You can also add components without dragging the component from the Doc-menu and dropping it on the editor. From the next output of any component, drag the cursor and drop. And instantly a menu of the different components will appear. And from the menu, select a component and the component will appear on the editor connected with the mother component.
If you drag your cursor from the button output of any component and drop it on the editor, then the button component will appear on the editor connected with the mother component.
NB. The Button component is not present in the Doc-menu.
Text
If you want to build a bot with a text element, drag the Text Component and drop it on the editor. Now double-click on the component and a sidebar called Configure Text Message will appear with a text field. In the text field, you have to provide your reply message. You can include the first name or the last name of the user in the reply message.
You can also enable typing on display by turning on the radio button. Then you can select the delay time in reply in seconds.
Now click on the Done button and the information will appear on the component. Then connect the text component with the Start bot flow component.
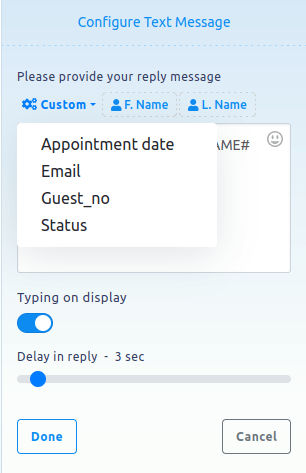
Include Custom variables in the reply message
Besides, you can include custom variables in the reply message. Click on the button called custom and a drop-down menu of different variables will appear. And from the drop-down menu, select a variable. The custom variable will be replaced by the actual value before sending it.
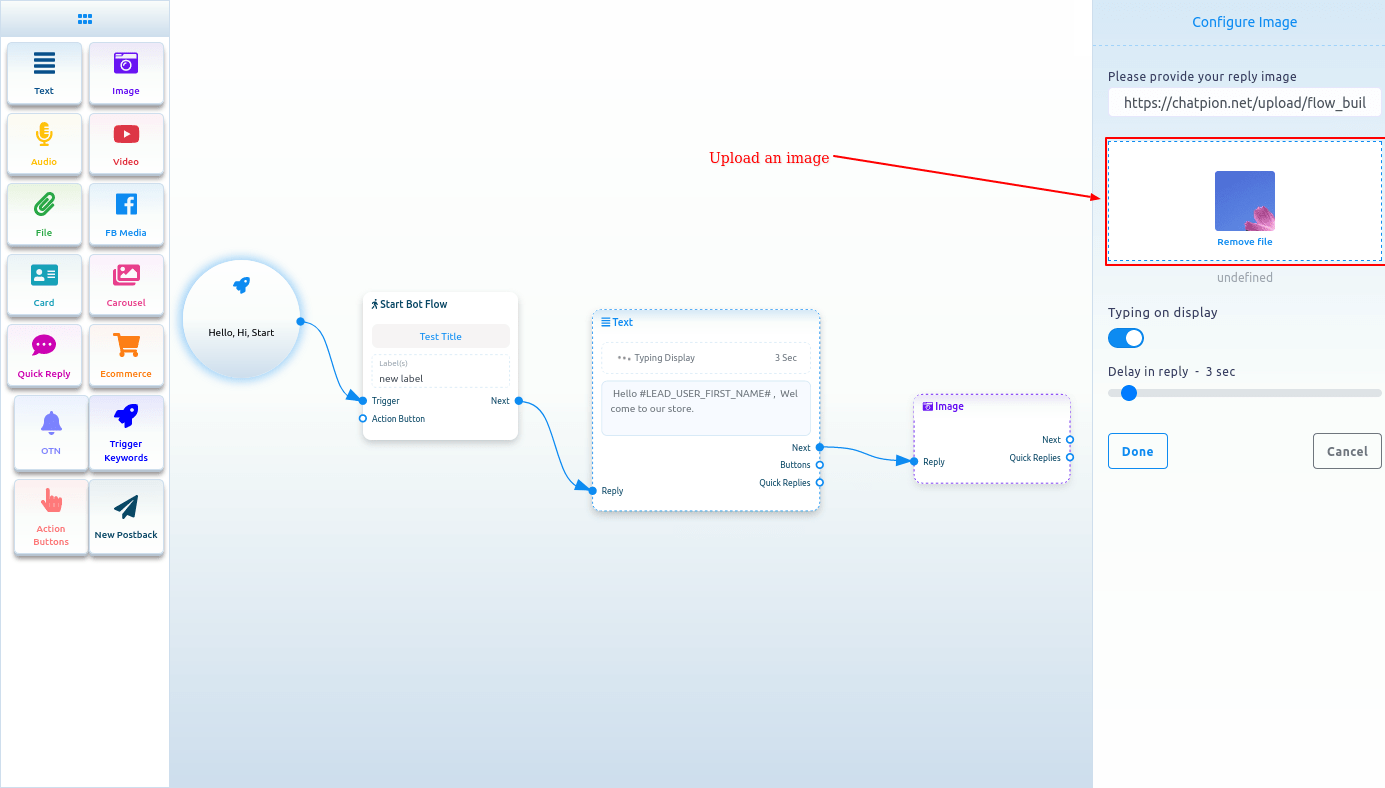
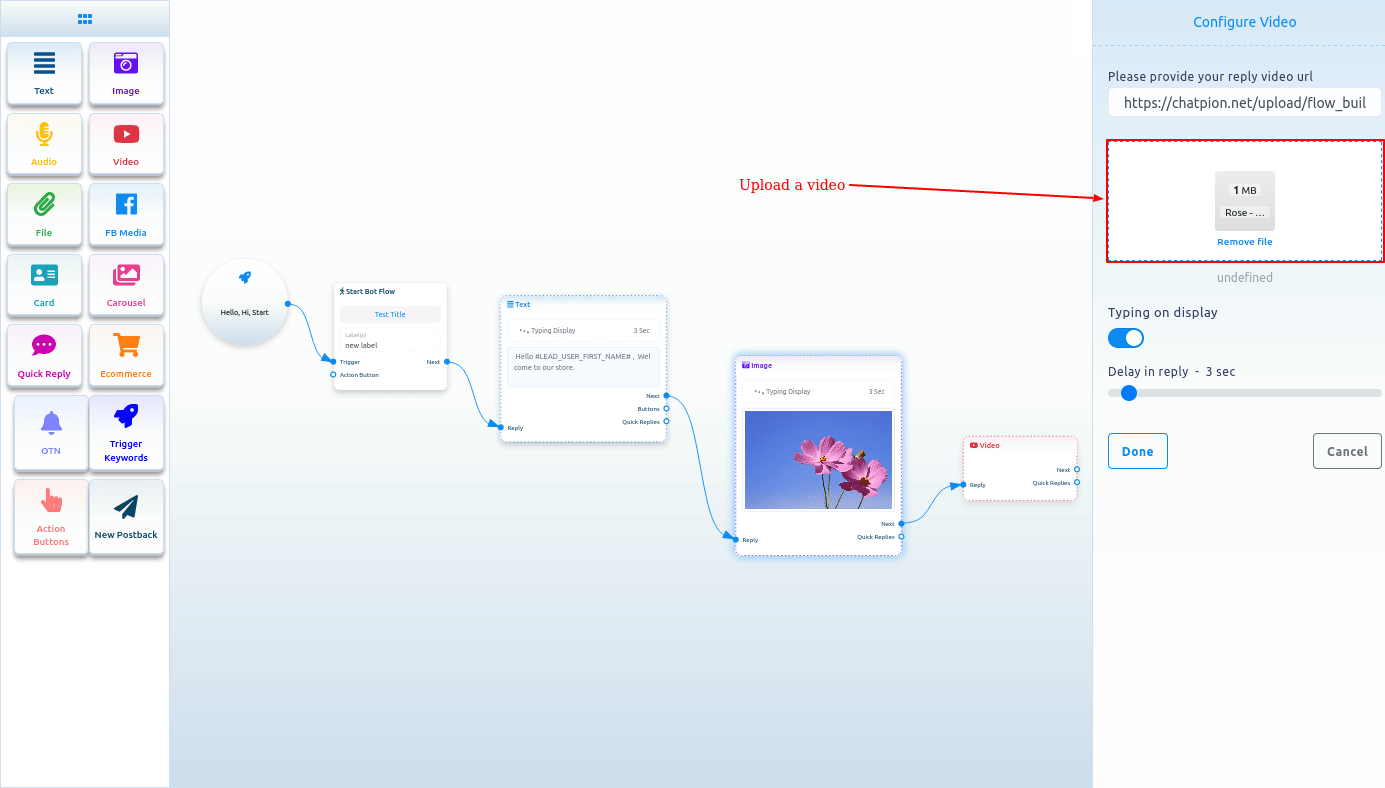
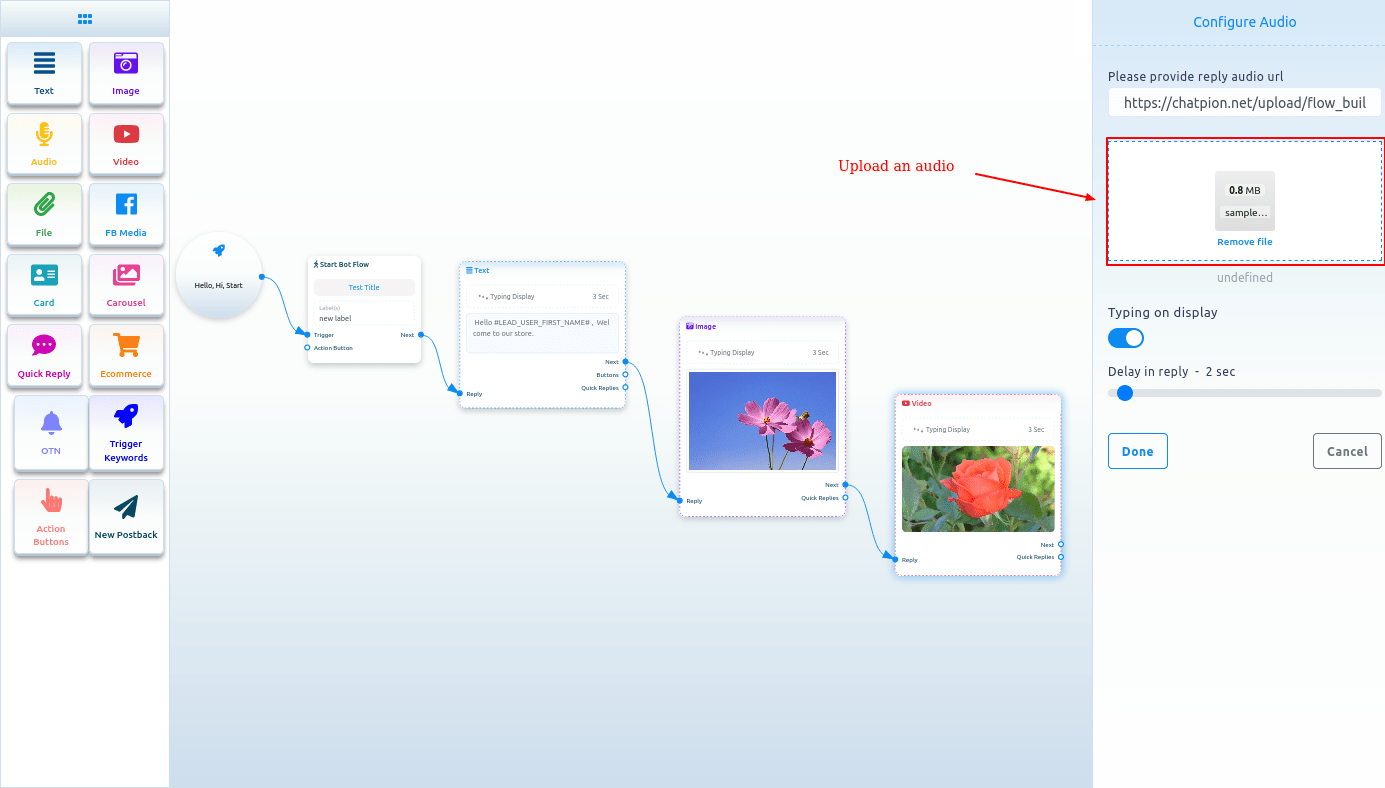
Image, Audio, Video, and File component
Likewise, you can add Image, Audio, Video, and File components. For these components, you have to upload an image, audio, video, and file respectively. Then you have to connect the components with other components.

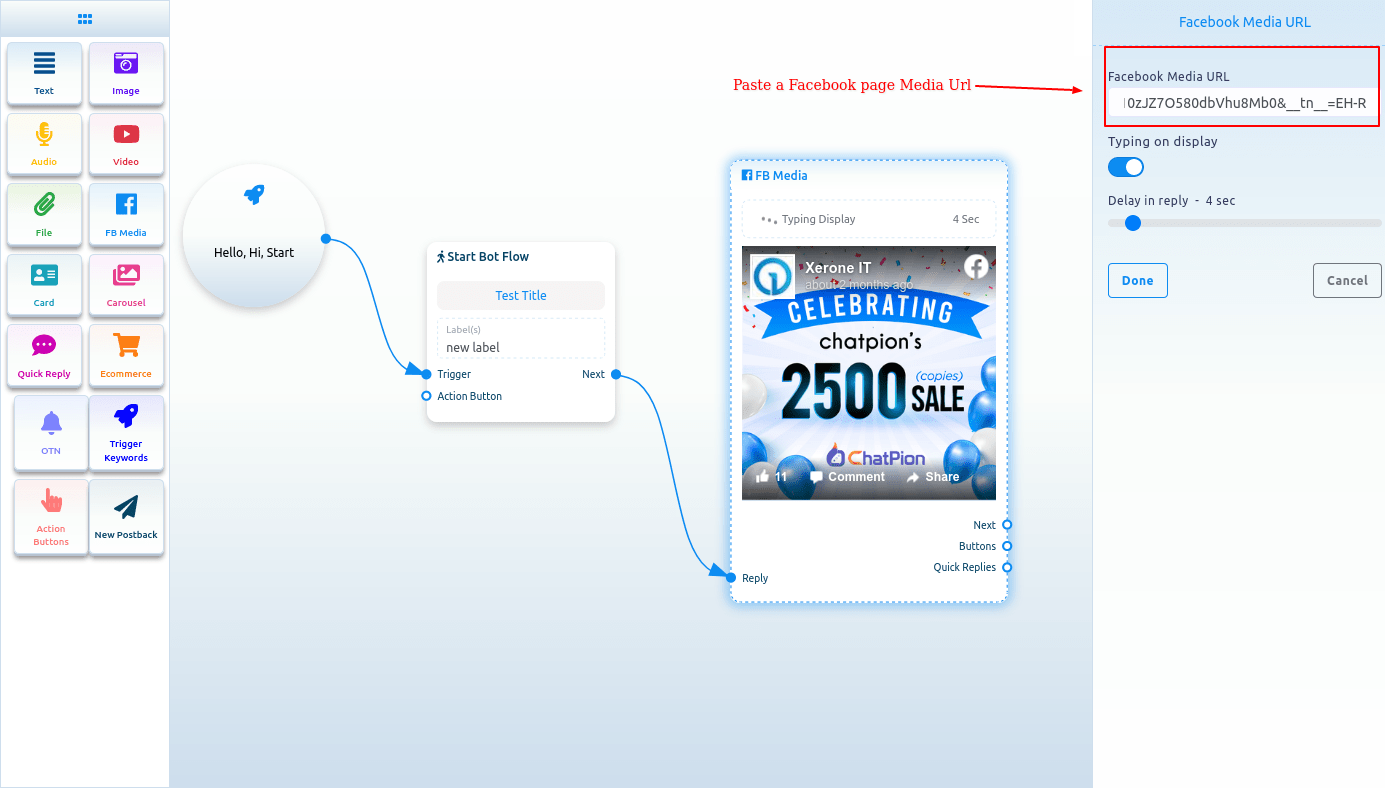
FB Media
To add FB Media component, drag the FB Media component from the Doc-menu and drop it on the editor. Now double-click on the FB Media component and the right sidebar called Facebook Media URL will appear. In the Facebook Media URL field, put your Facebook Page media URL.
You can enable typing on display and select time in seconds for the delay in reply. Now click on the done button and the Facebook page media URL will appear on the component.
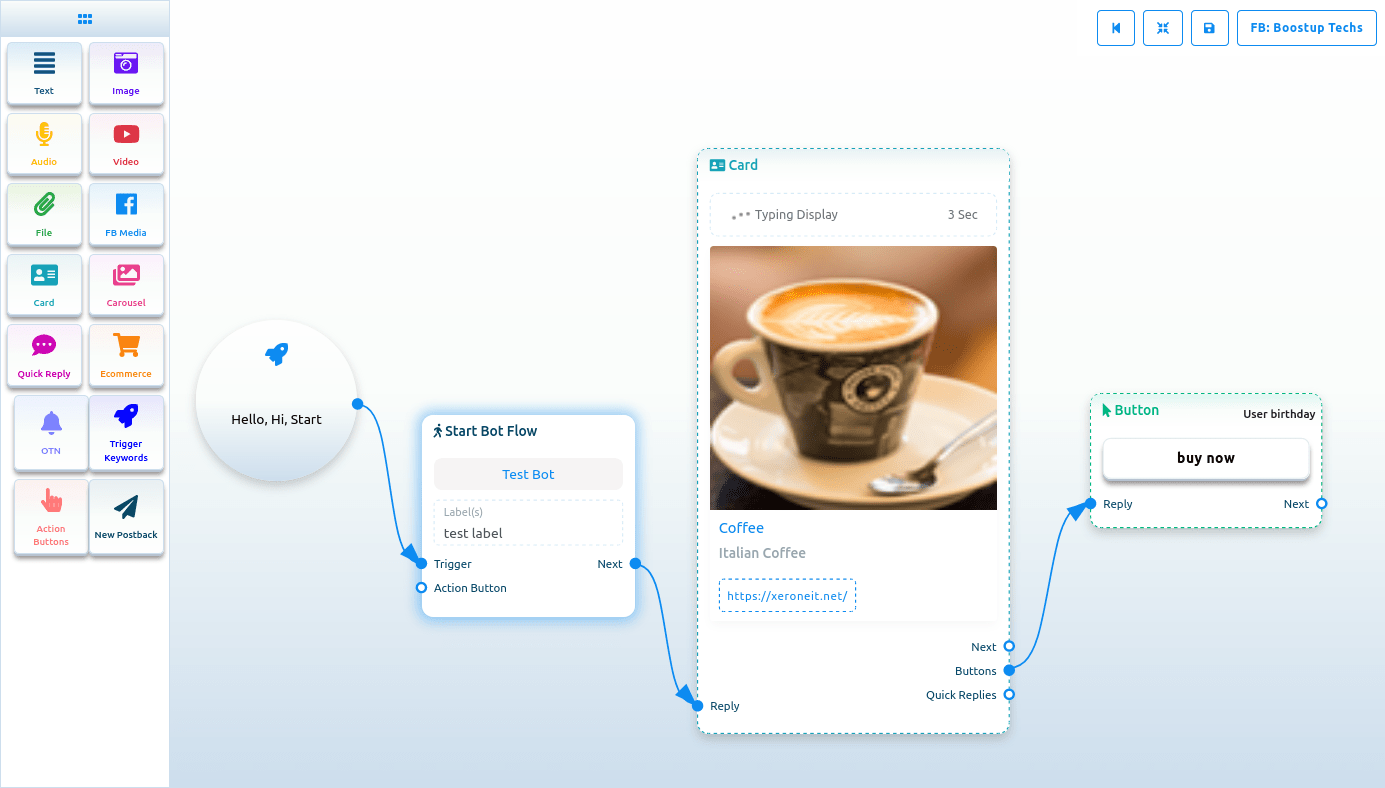
Card
To add Card Component, drag the Card Component from the Doc-menu and place it on the editor. The Card component will appear with a button component. Well, now double-click on the Card component and a right sidebar called Configure Generic Template will appear. Now upload an image. After uploading an image, paste a link in the image click destination link field. When a user clicks on the image, the user will be redirected to the URL. Now write a title in the Title field and a subtitle in the Subtitle field.
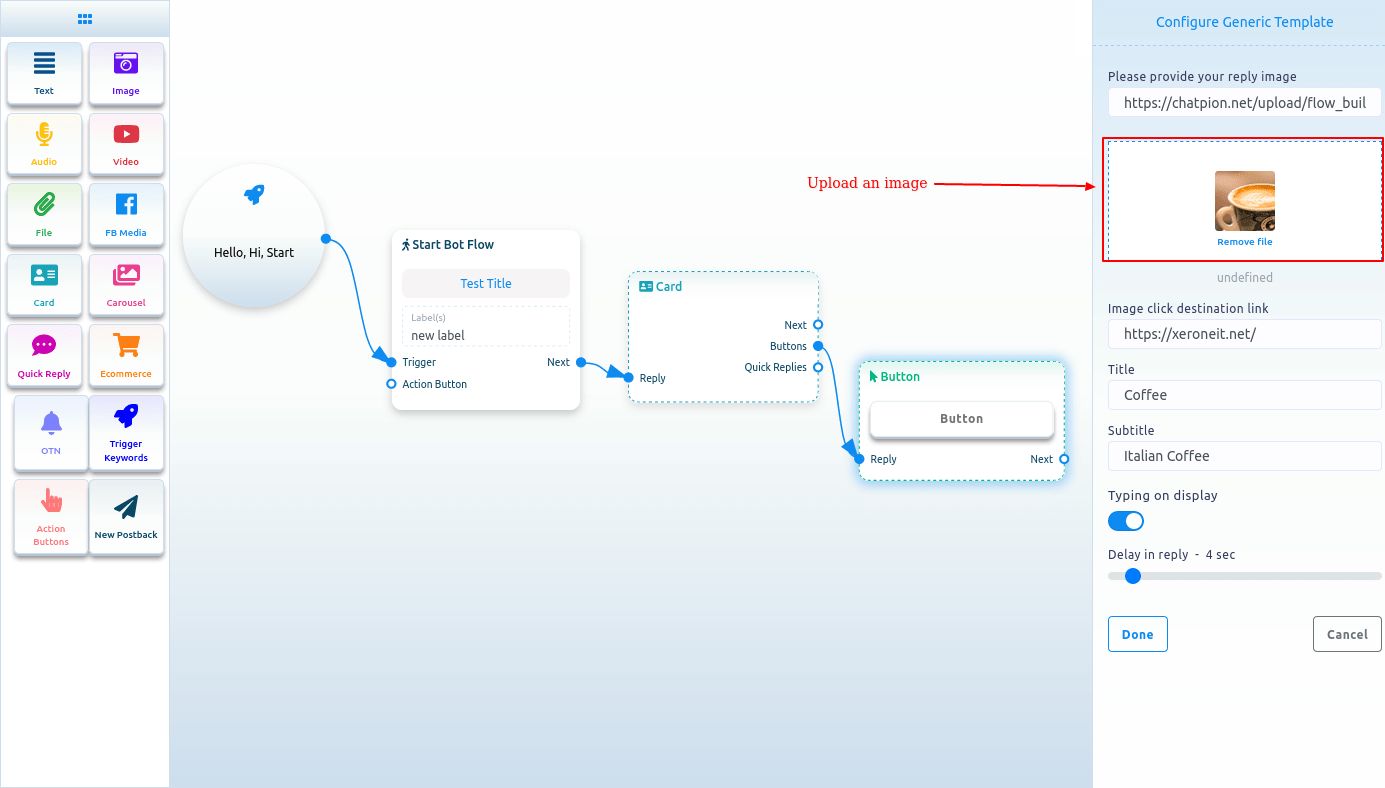
Then you have to configure the Button Component
Read the following section to know how to add and configure the Button Component.
Button
To add Button component, drag your cursor from the button output of a component like the Text or Card component and drop. Instantly, the Button component will appear connected with the mother component.
And sometimes the button component automatically appear connected with other component, such as Card and Carousel component.
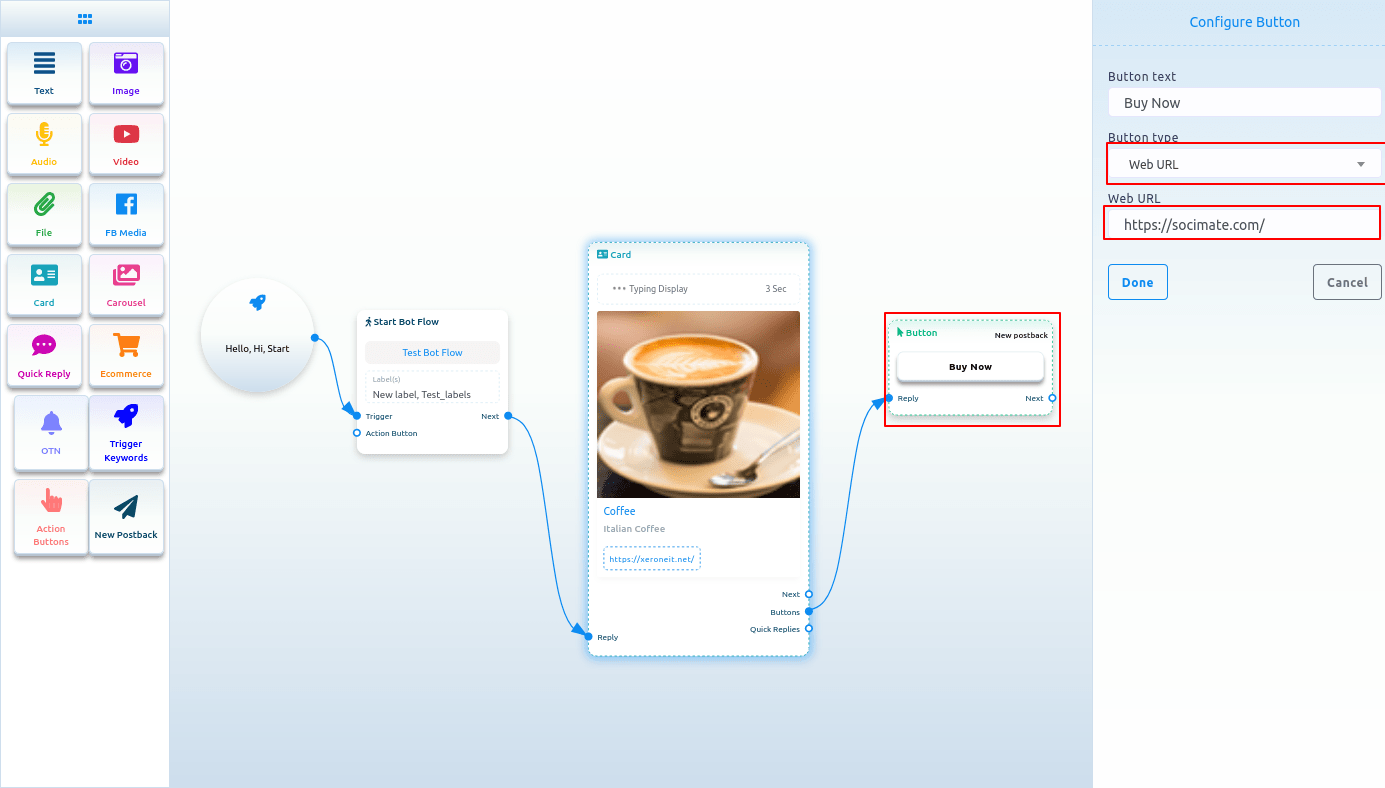
Now double-click on the button component and a right sidebar called configure button will appear. Now write a text in the button text field – the text will appear on the button. Then you have to select a button type from the button type field. Click on the button type field and a drop-down menu of different button types – New postback, postback, Weburl, Webview [full], Webview[compact], Webview[tall], User birthday, User email, User phone, User location, Call us, Unsubscribe, Re-subscribe, Chat with human and Chat with robot will appear.
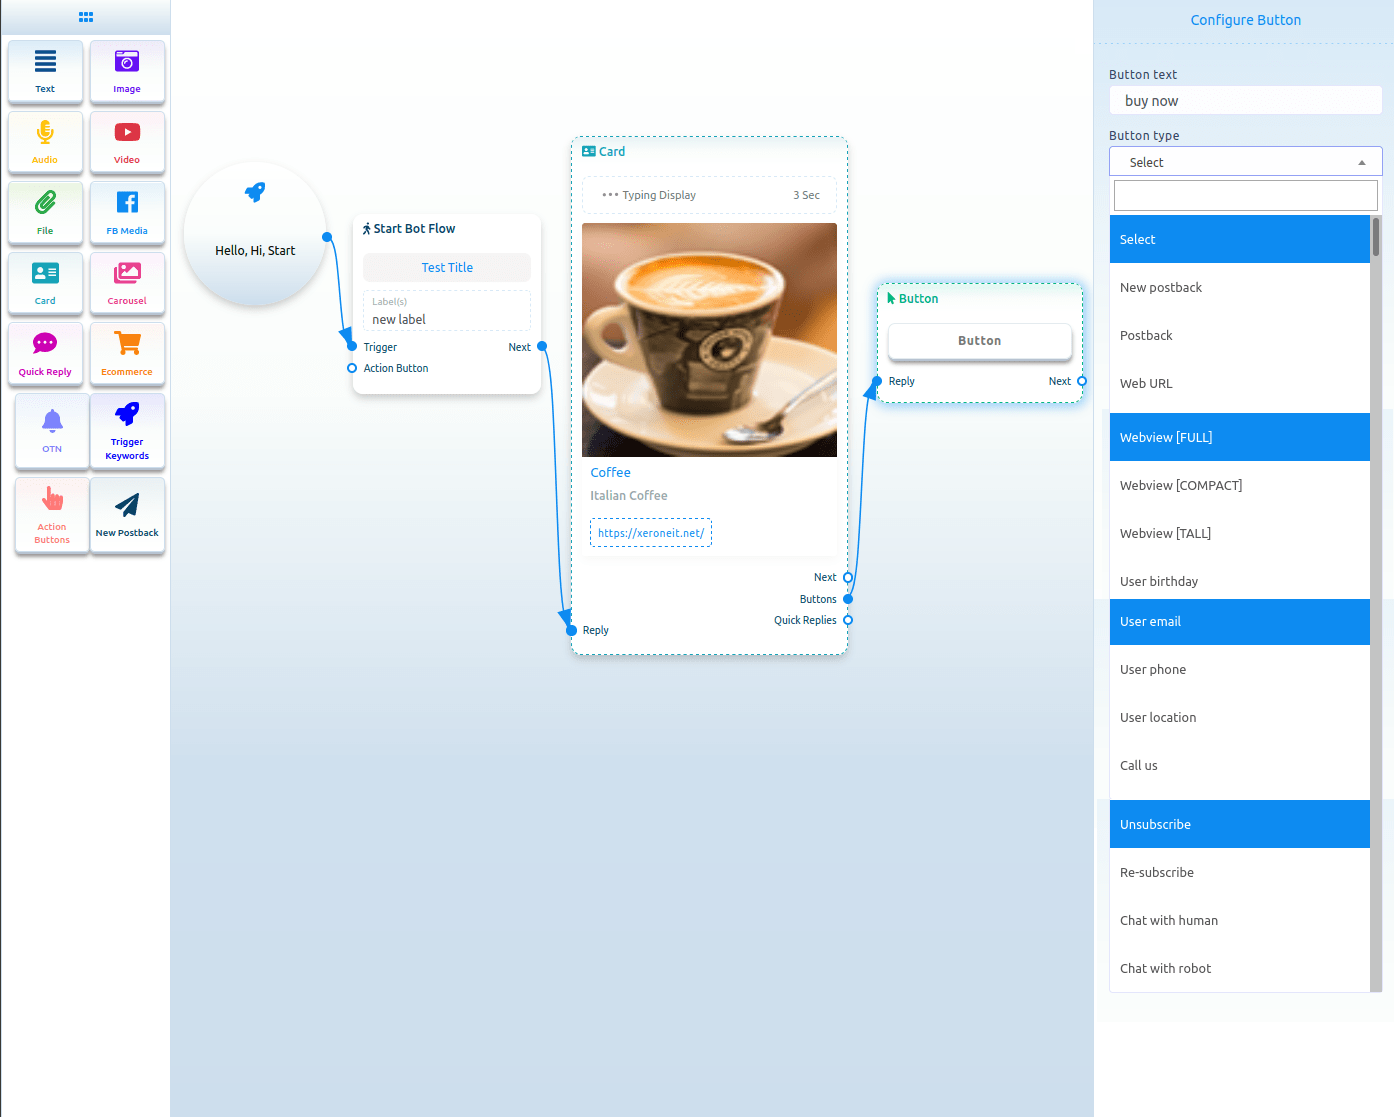
Button types
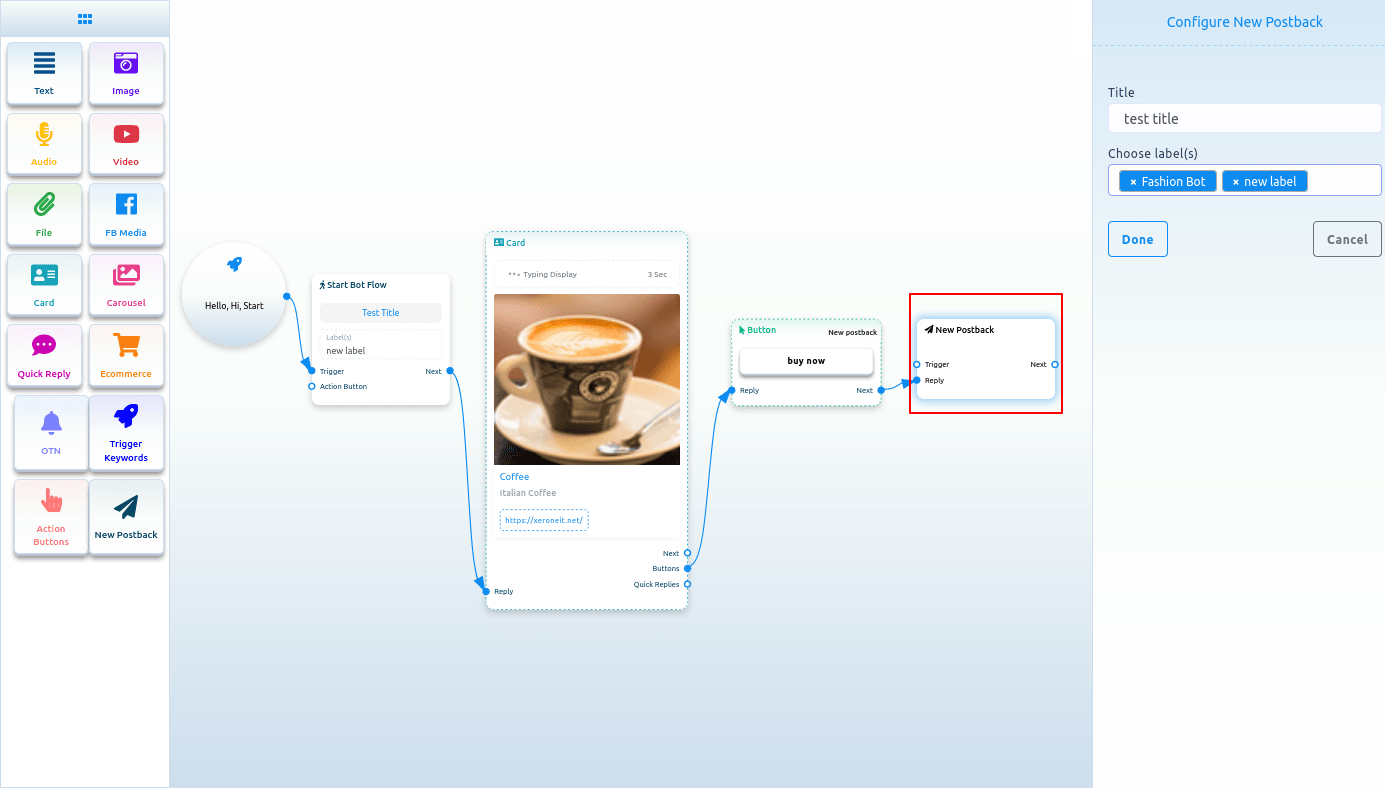
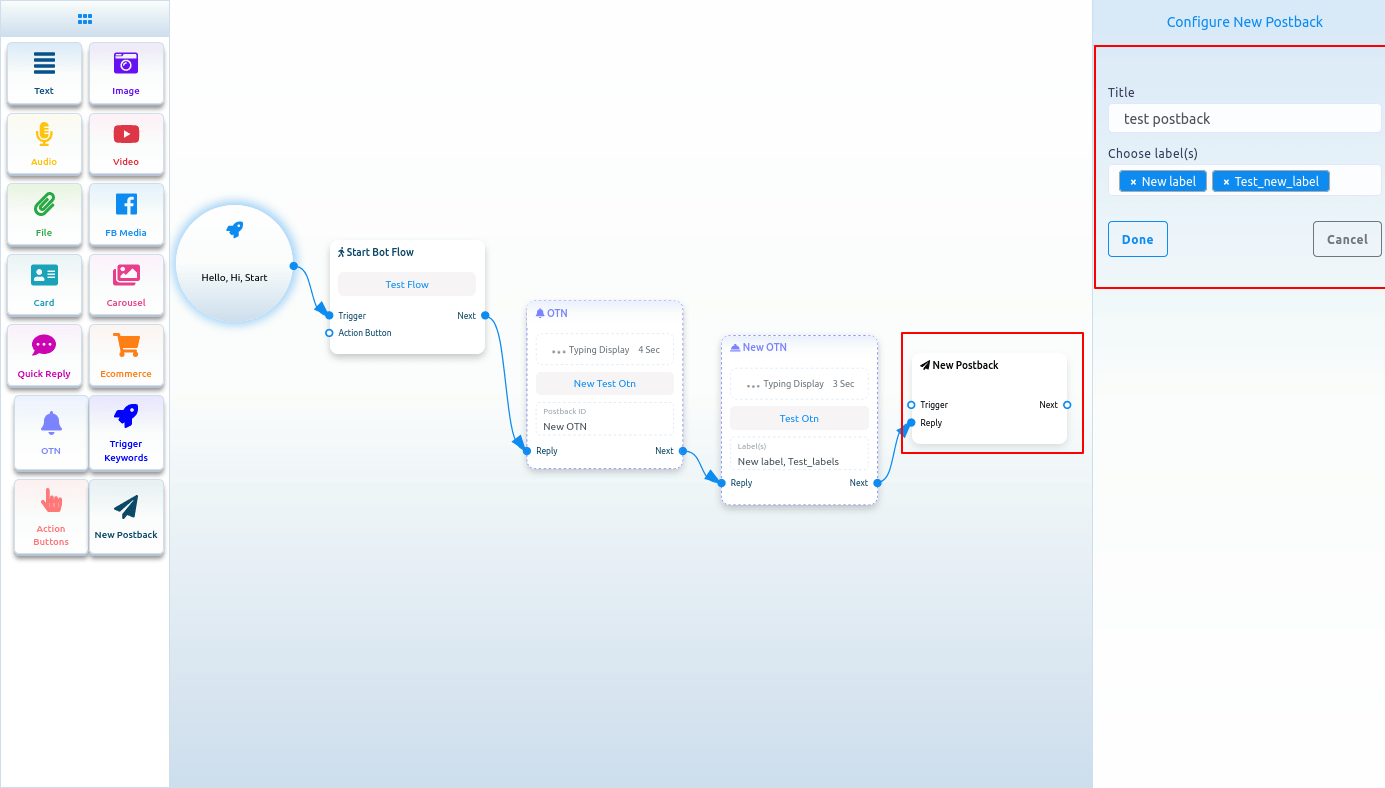
New postback
Select New postback on the button type and click on the done button.

Configure New postback
And instantly, a new postback button will appear connected with the Button component. Now double-click on the New postback Component and the right sidebar called configure New postback will appear. Give a title for the New postback in the title field. And select labels from the Choose label field. Now click on the Done button.
Postback
If you select Postback as the button type, a field called Postback ID will appear. And from the Postback ID field, you have to select a postback id. Click on the postback id field and a drop-down menu of different postback id will appear. And from the drop-down menu, select a postback id. And click on the Done button. The postback id will appear on the Button Component.

Web Url, Webview[full], Webview[tall], Webview[compact]:
If you select Web Url, Webview[full], Webview[tall] or Webview[compact], another field will appear. And in the field, you have to paste an URL. Now paste a URL and click on the done button. After that, the URL will appear on the Button component.
Select a button type
Form the button type field, you can select User email, User birthday, User phone or User location, Unsubscribe button, Resubscribe button, Chat with human, Chat with robot. After selecting any from the button type, click on the done button. Instantly the button type will appear on the button.
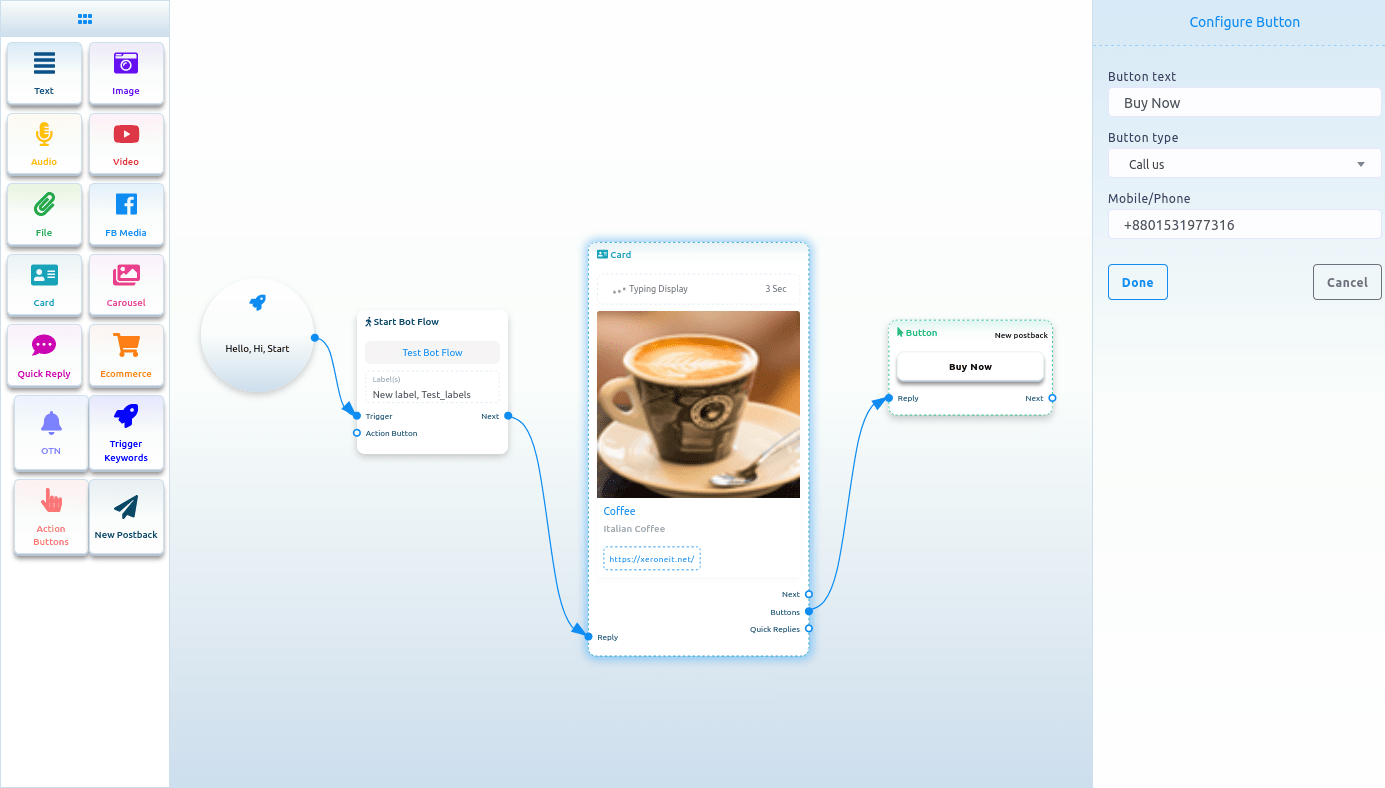
Call us
Select Call us button from the drop-down menu of different button types and instantly, another field called Mobile/Phone number will appear. Now you have to provide your phone number in the field. Then click on the done button.
 Carousel:
Carousel
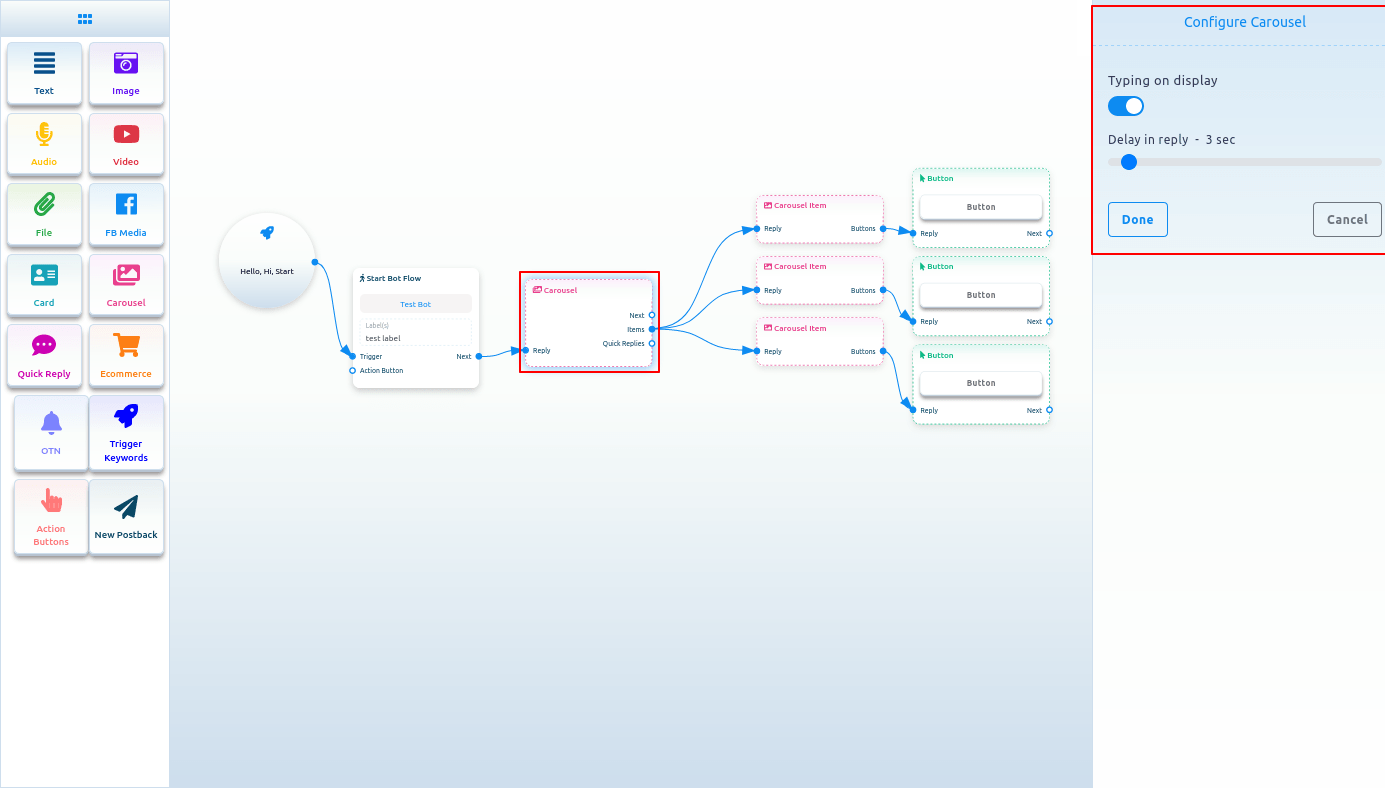
To add a Carousel component, drag the Carousel component from the Doc-menu and drop it on the editor. Instantly, the Carousel component will appear with three carousel items connected with the Carousel component and three button components connected with the three carousel components.
Now double-click on the Carousel component and the right sidebar called configure Carousel will appear. In the sidebar, you can enable typing on display and select delay in reply time in seconds. Now click on the Done button.
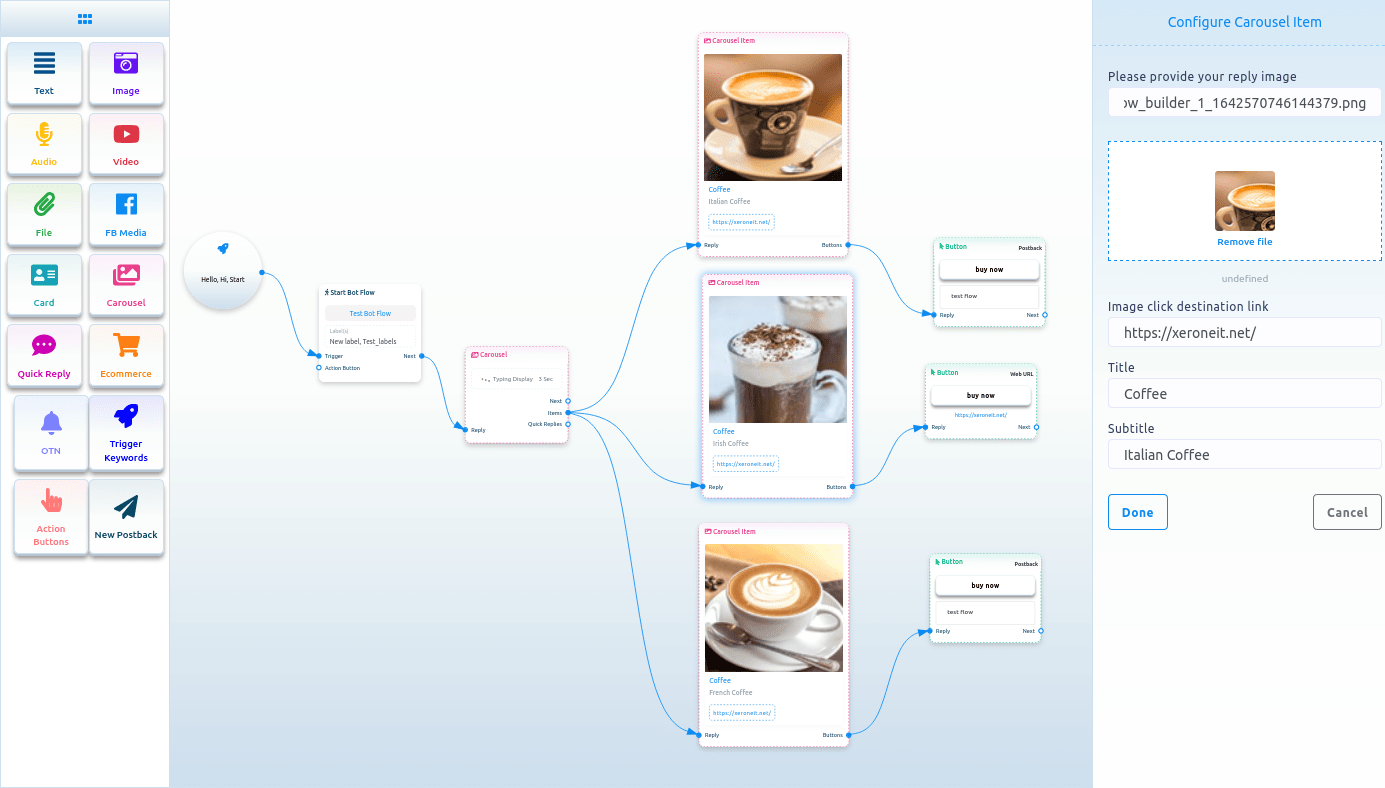
Carousel Item
Now come to the carousel Item component. Double-click on the carousel Item button and the right sidebar called Configure Carousel Item will appear with some fields.
Now upload an image. After uploading an image, paste a link in the image click destination link field. When a user clicks on the image, the user will be redirected to the URL. Now write a title in the title field and a subtitle in the subtitle field. Enable the typing on display and select delay time in seconds.
Likewise, you have to configure the other two carousel items.
Now you have to configure buttons. You already know how to configure buttons.
You can add other components with the button components if you want.
Now click on the save button or press ctrl + S and your bot will be saved.
Quick Reply
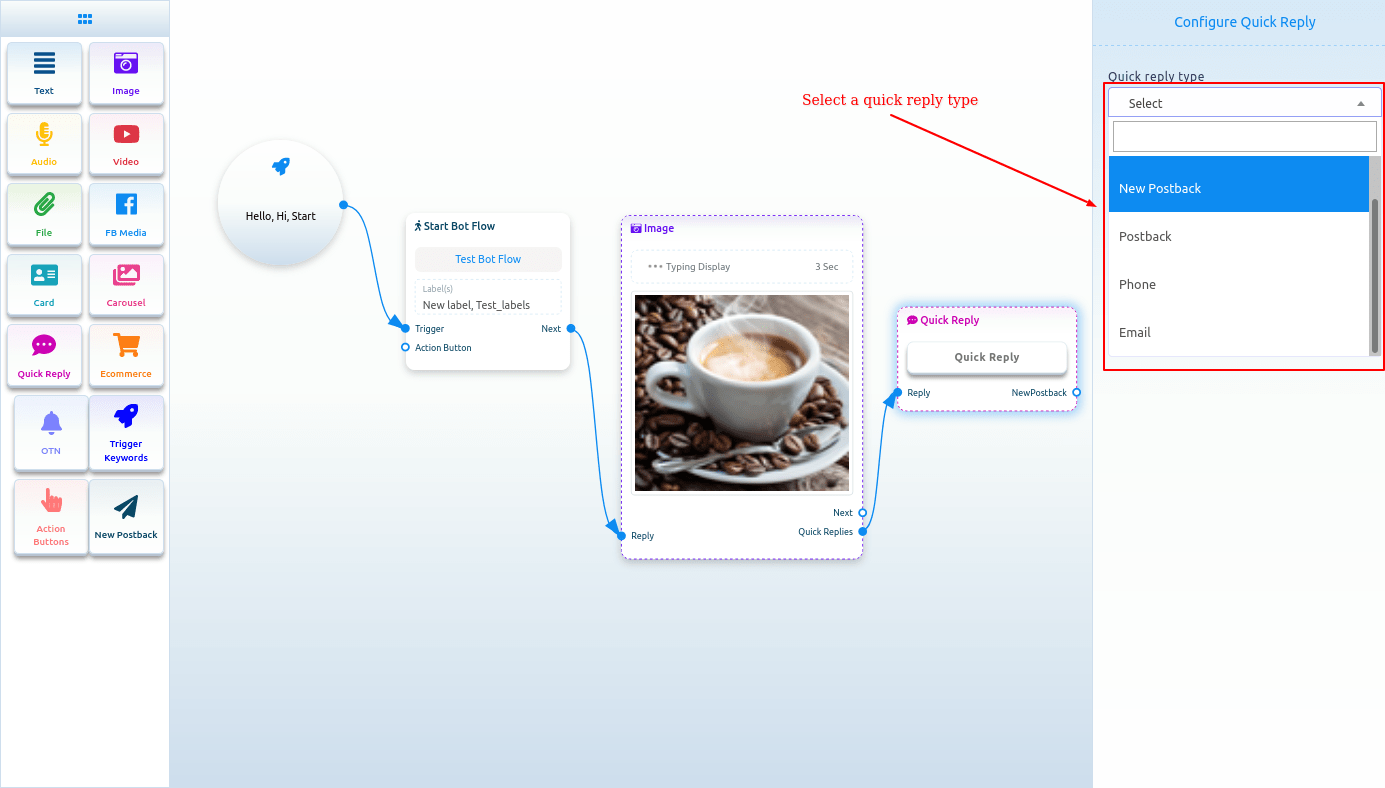
To add Quick reply component, drag the Quick reply component from the Doc-menu and drop it on the editor. Instantly, the Quick reply component will appear on the editor. You can also add a Quick reply component by dragging your cursor from the quick replies output of a component and dropping it on the editor.
Now double-click on the Quick Reply component and a right sidebar called configure Quick Reply will appear. Now in the quick reply type field, you have to select a quick reply type. Click on the quick reply type field and a drop-down menu of different types of quick replies – New postback, Postback, Phone, and Email – will appear.
New postback as quick reply type
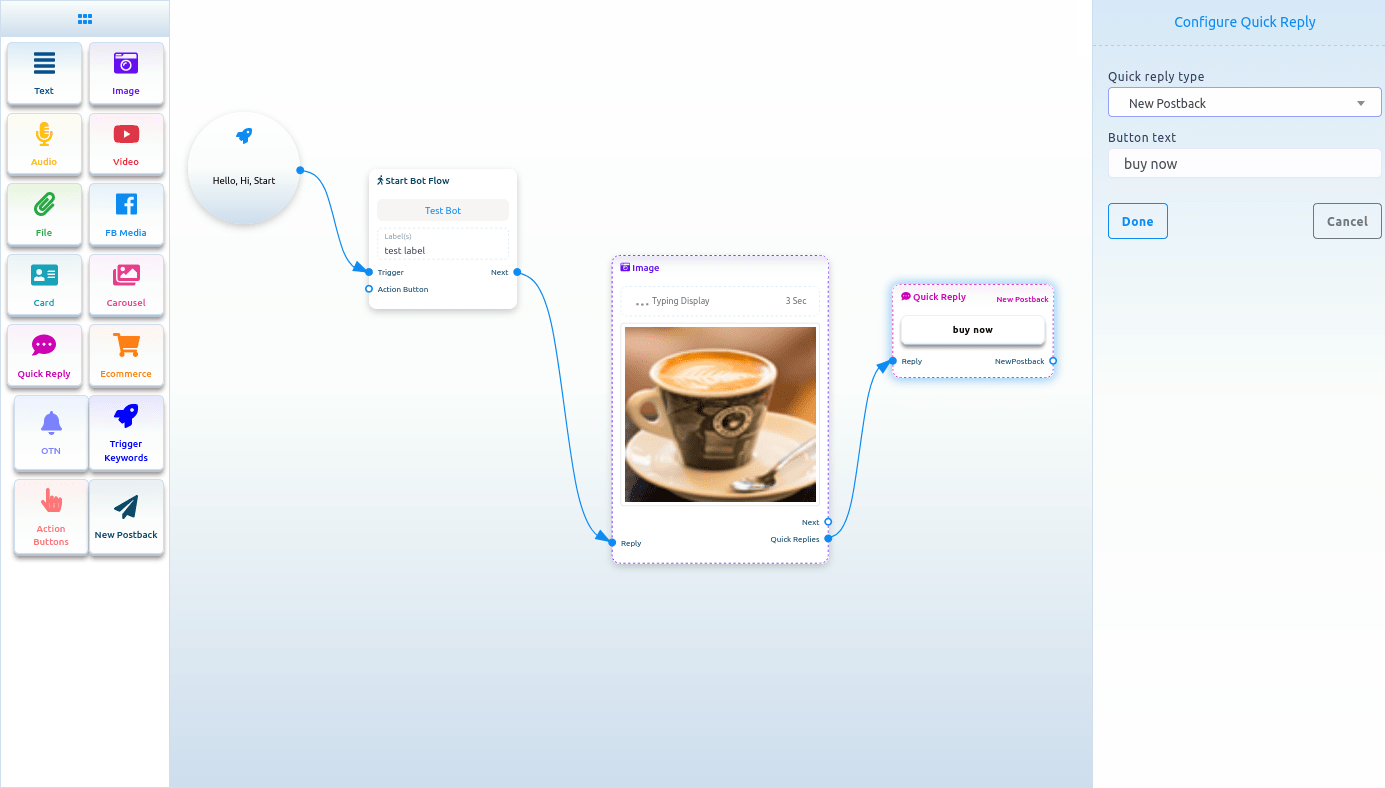
Select new postback as the quick reply type, and instantly a field called button text will appear. Now you have to provide a text for the button in the button text field. Then Click on the done button.
 quick_reply_new_postback_component_connected.png
And instantly, a new postback component will appear connected with the quick reply component.
Now double click on the new postback element and the right sidebar called configure new postback will appear. Give a title for the New postback in the title field. And select label from the Choose label field. Now click on the done button.
After that, you have to add another component with the next output of the New postback component.
Postback as a quick reply
If you select postback as the quick reply type, two fields – button text and postback id will appear. In the button text field, you have to write a text for the button. And from the postback id field, you have to select a postback. Click on the postback id field and a drop-down menu of different postback id will appear. And from the drop-down menu, select a postback id. And click on the Done button. And the postback id will appear on the Quick reply component
Phone as quick reply
Just select phone as the quick reply type in the quick reply type field and click on the done button. In this case, the quick reply will collect your phone number from your Facebook Profile and show in the messenger. When a user clicks on the phone number, the system will receive the phone number. And the user will get a message that the system have received your phone number.
Email as quick reply
Just select Email as the quick reply type in the quick reply type field and click on the done button. In this case, the quick reply will collect your Email address from your Facebook Profile and show in the messenger. When a user click on the phone number, the system will receive the email address. And the user will get a message that the system have received your Email address.
Ecommerce
To add Ecommerce component, drag the Ecommerce component from the Doc-menu and drop it on the editor. Instantly, the Ecommerce component will appear on the editor.
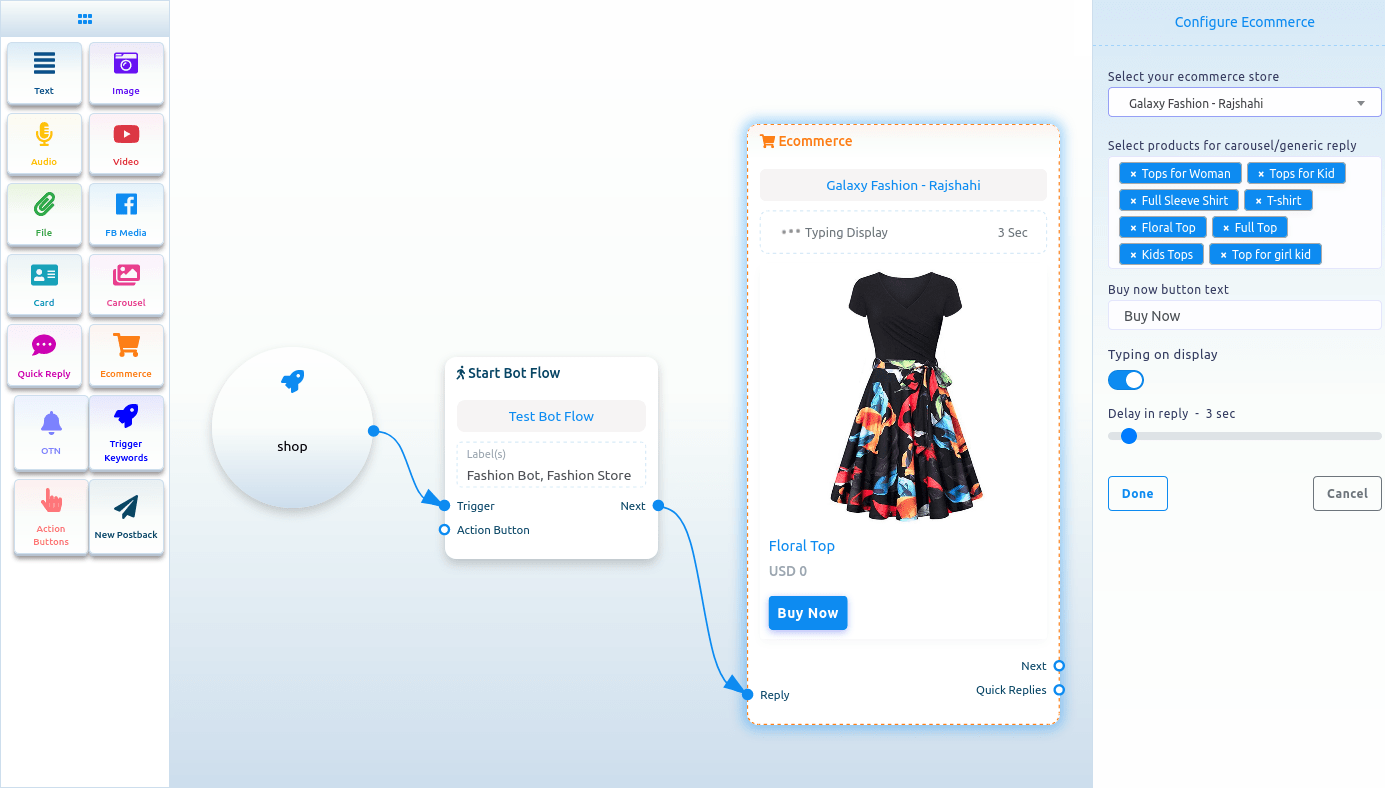
Now double-click on the Ecommerce component and a right sidebar called configure Ecommerce with some fields will appear. First, you have to select an Ecommerce store. Click on the select your Ecommerce store field and a drop-down menu of different predefined stores will appear. Well, to configure Ecommerce component, first you have to create stores.
After you have selected a store, you have to select products for carousel/ generic reply. Just as click on the field, a drop-down menu of different products will appear. Now select products from the drop-down menu. Of course, you can select multiple products. Then you have to write text for the buy now button. Also, you can enable typing on display and select delay time in seconds. Now click on the done button.
Then you have to connect the Ecommerce component with other component.
The products you have selected will appear as carousel/generic template in the messenger. And by clicking on the buy now button, the user will be able to buy the product.
OTN
To add OTN component, drag the OTN component from the doc-menu and drop on the editor. Instantly, the OTN component will appear on the editor.
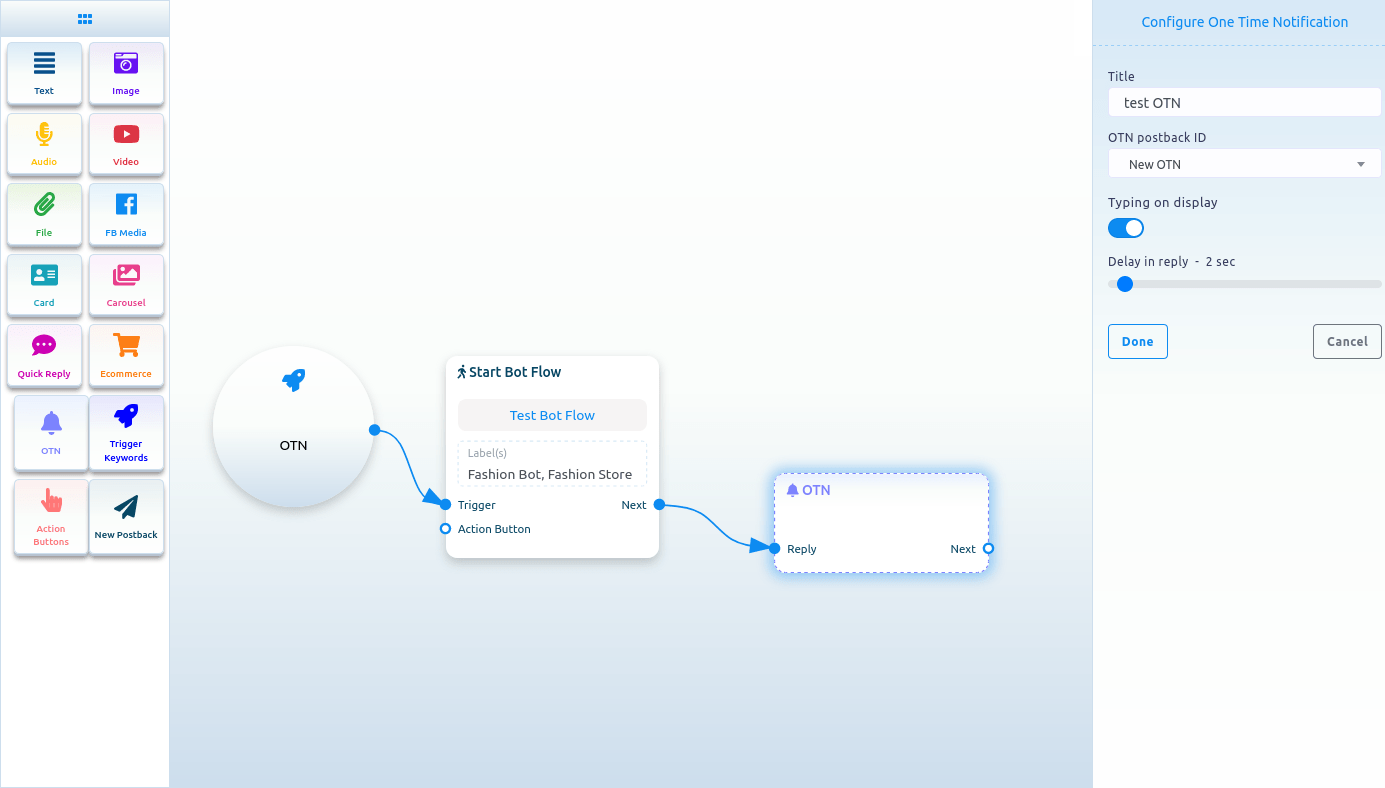
Now double-click on the OTN component and a right sidebar called configure OTN with two fields will appear.
First, you have to write a title for the OTN component in the title field. Then you have to select a predefined OTN postback from the OTN postback id field.
Also, you can enable typing on display and select delay time in seconds.
Then click on the Done button.

Create OTN postback
If you don’t have any predefined OTN postback, you have to create an OTN postback first. To create OTN postback, select New OTN from the drop-down menu of the OTN postback ID field. And click on the Done button.
Now click on the New OTN component and a right sidebar called Configure New OTN will appear with some fields. Give a template name in the template name fields and choose labels in the labels field. You can enable typing on display and select a delay time in reply in seconds. Then click on the done button. And the information will appear on the New OTN template.
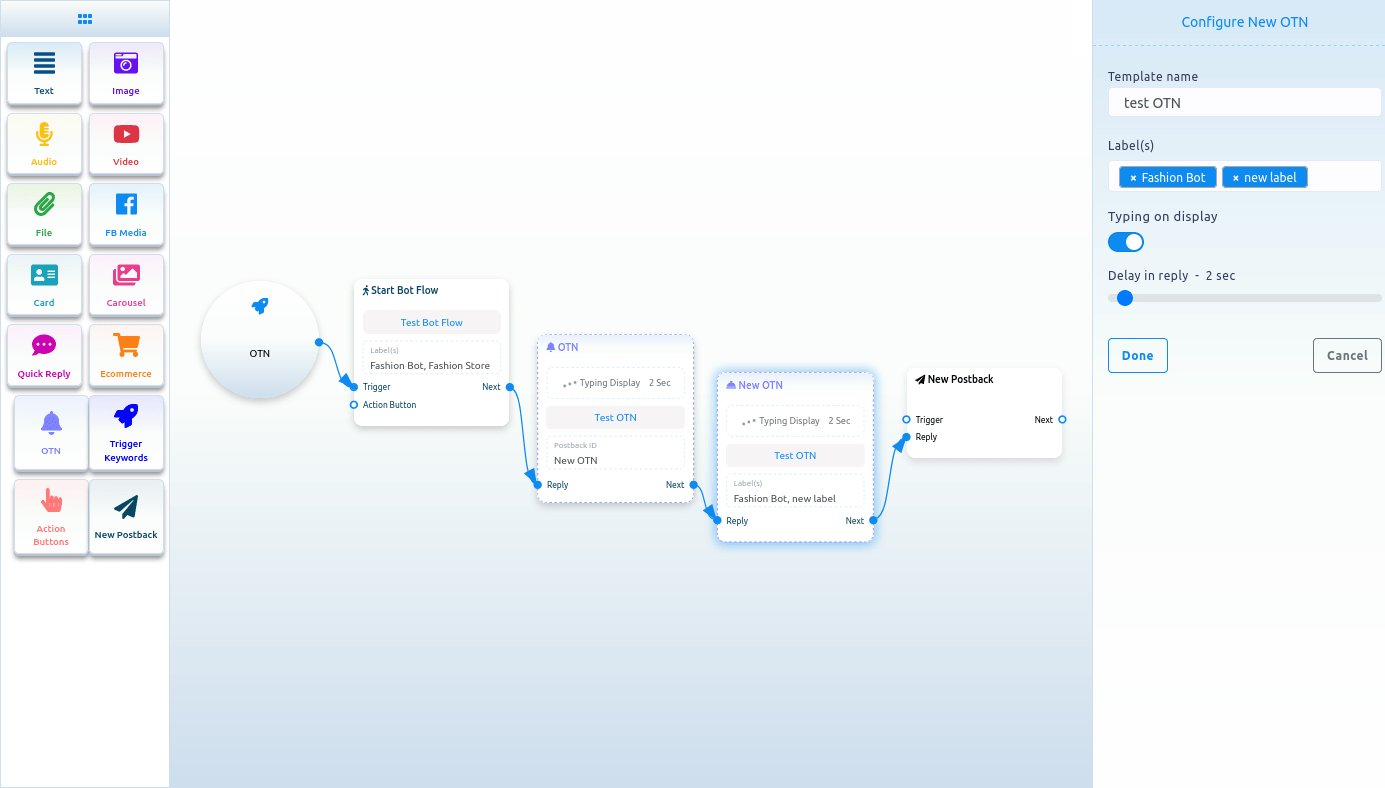
Now click on the New postback Component and a right sidebar called configure new postback will appear with some fields. Give a title in the title field and choose labels in the Choose labels field. Now click on the done button. Now you have to connect a component with the new postback component. After that, click on the Save button and your bot with OTN will be saved.
Action buttons
To add Action Buttons component, drag the Action Button component from the Doc-menu and drop it on the editor. Instantly, the Action Buttons component will appear on the editor.
Now double-click on the Action Button component, and a right sidebar called Configure Action Button with a field called Action Button will appear. From the field, you have to select an Action button. Click on the Action Button field and drop-down menu of different Action Buttons – Get started template, No match template, Un-subscribe template, Re-subscribe template, Email quick reply template, Location quick reply template, Brithday quick reply template, Chat with human template, and Chat with robot template – will appear. Now you have to select an action button template from the drop-down menu. Then click on the done button. Instantly, the name of Action button template will appear on the Action button component.
Now you have to connect the action button component with the start bot flow component.


Social Posting feature is an important feature of Loomsuite. With the feature, you can schedule and publish posts on Facebook, Instagram and other social media such as Twitter, Linkedin, Reddit, WordPress(self-hosted), and Medium. You can schedule and publish multimedia post— text post, image post, video post — CTA post, Carousel/Video post, Link post, Html post, Auto post — Rss Feed and Youtube video post. The Social Posting feature also has Bulk post planner. And with the Bulk post planner, you can create multiple posting campaigns by uploading a single CSV file.
In this article, I will show you how to publish and schedule posts on Facebook, Instagram and other social media with Social posting feature of Loomsuite.
Let’s see how to schedule and publish posts on different social media.
To create Facebook, Instagram, and other social media posting campaign, First, go to the Dashboard of the Loomsuite. At the left-sidebar of the Dashboard, you will a menu called Social Posting.
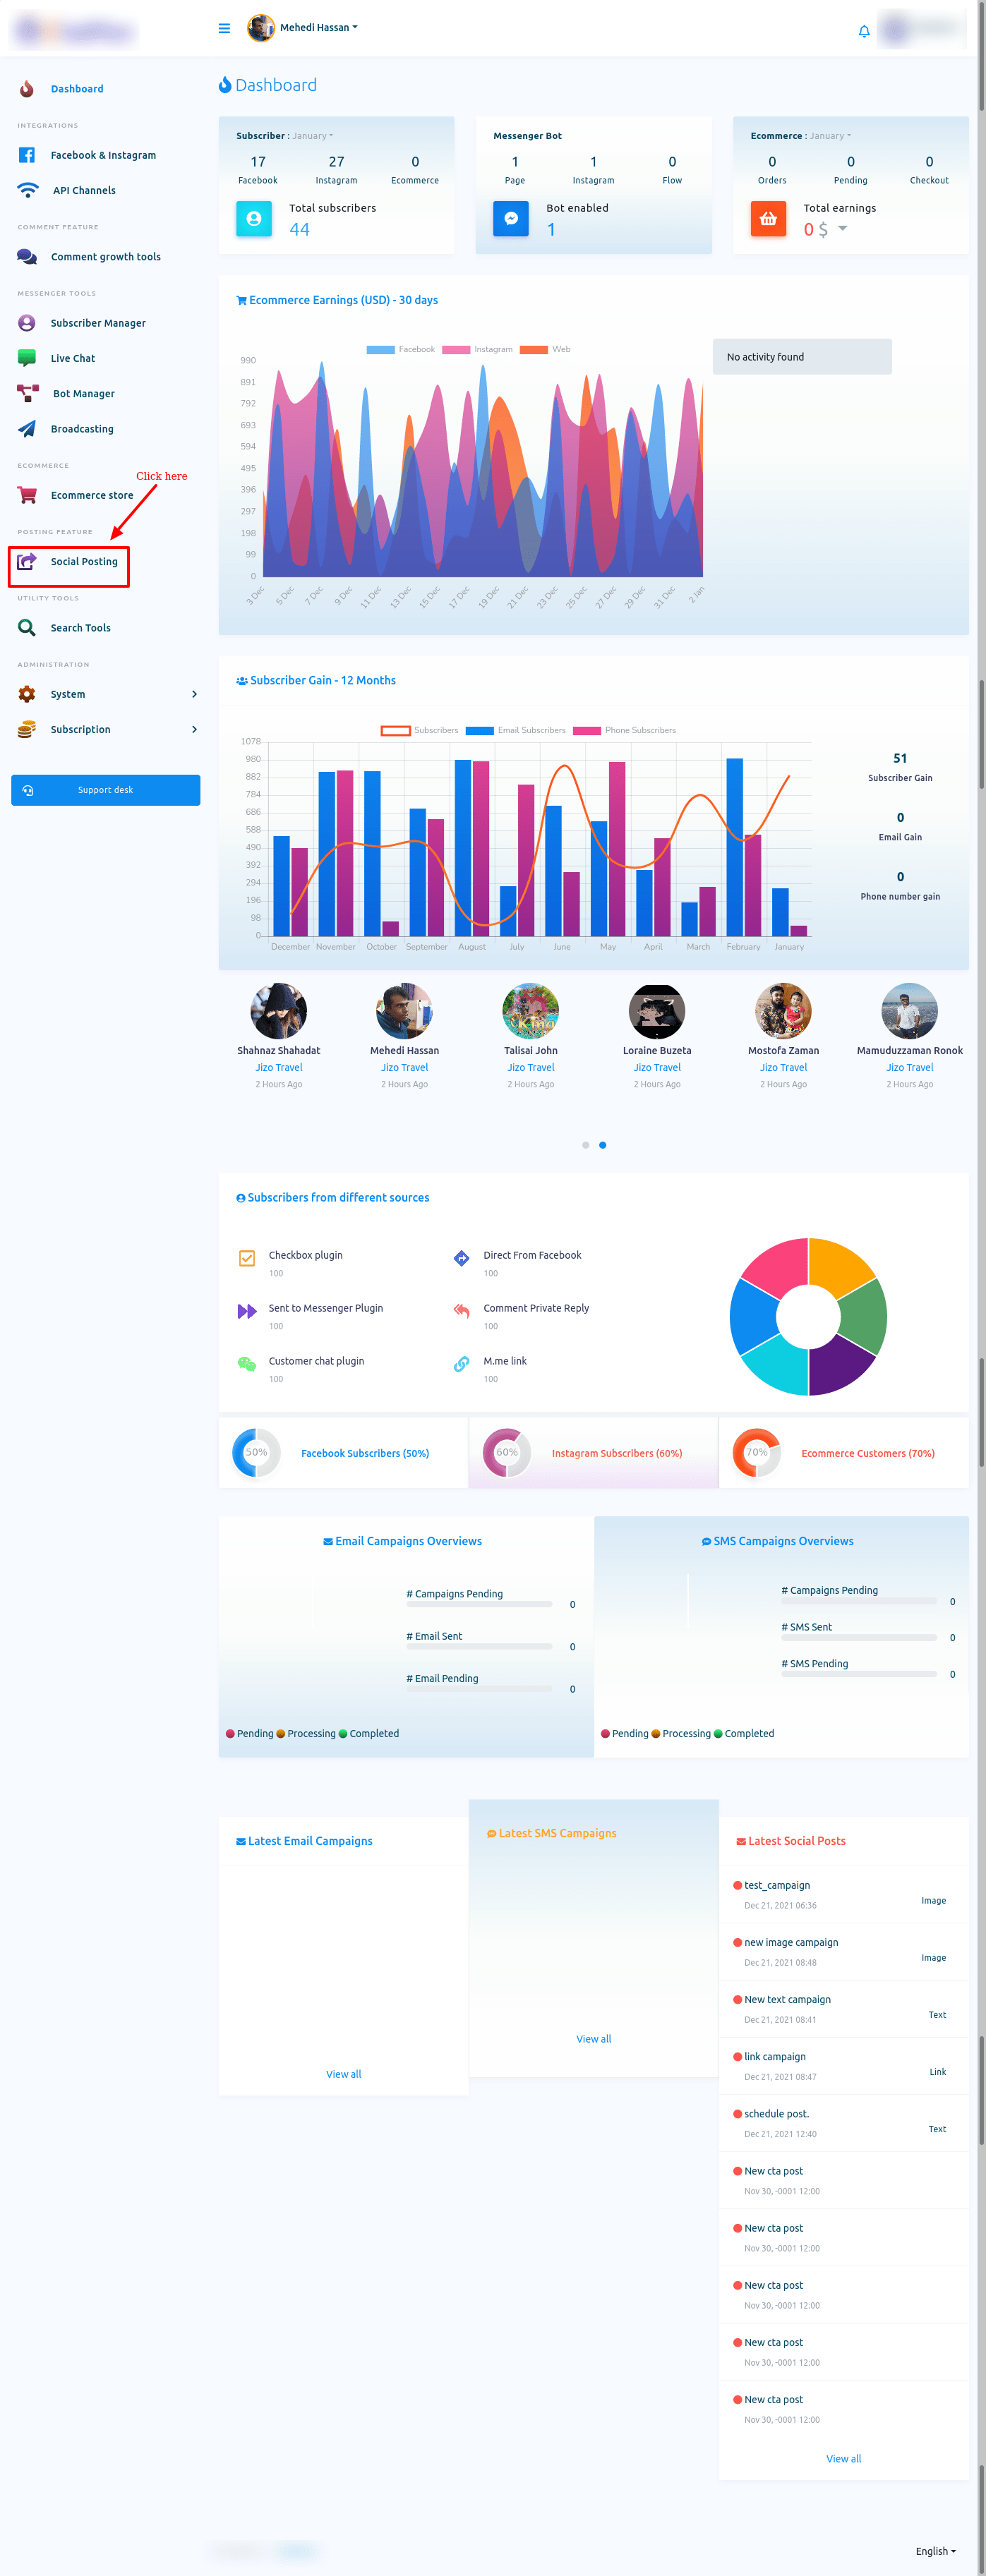
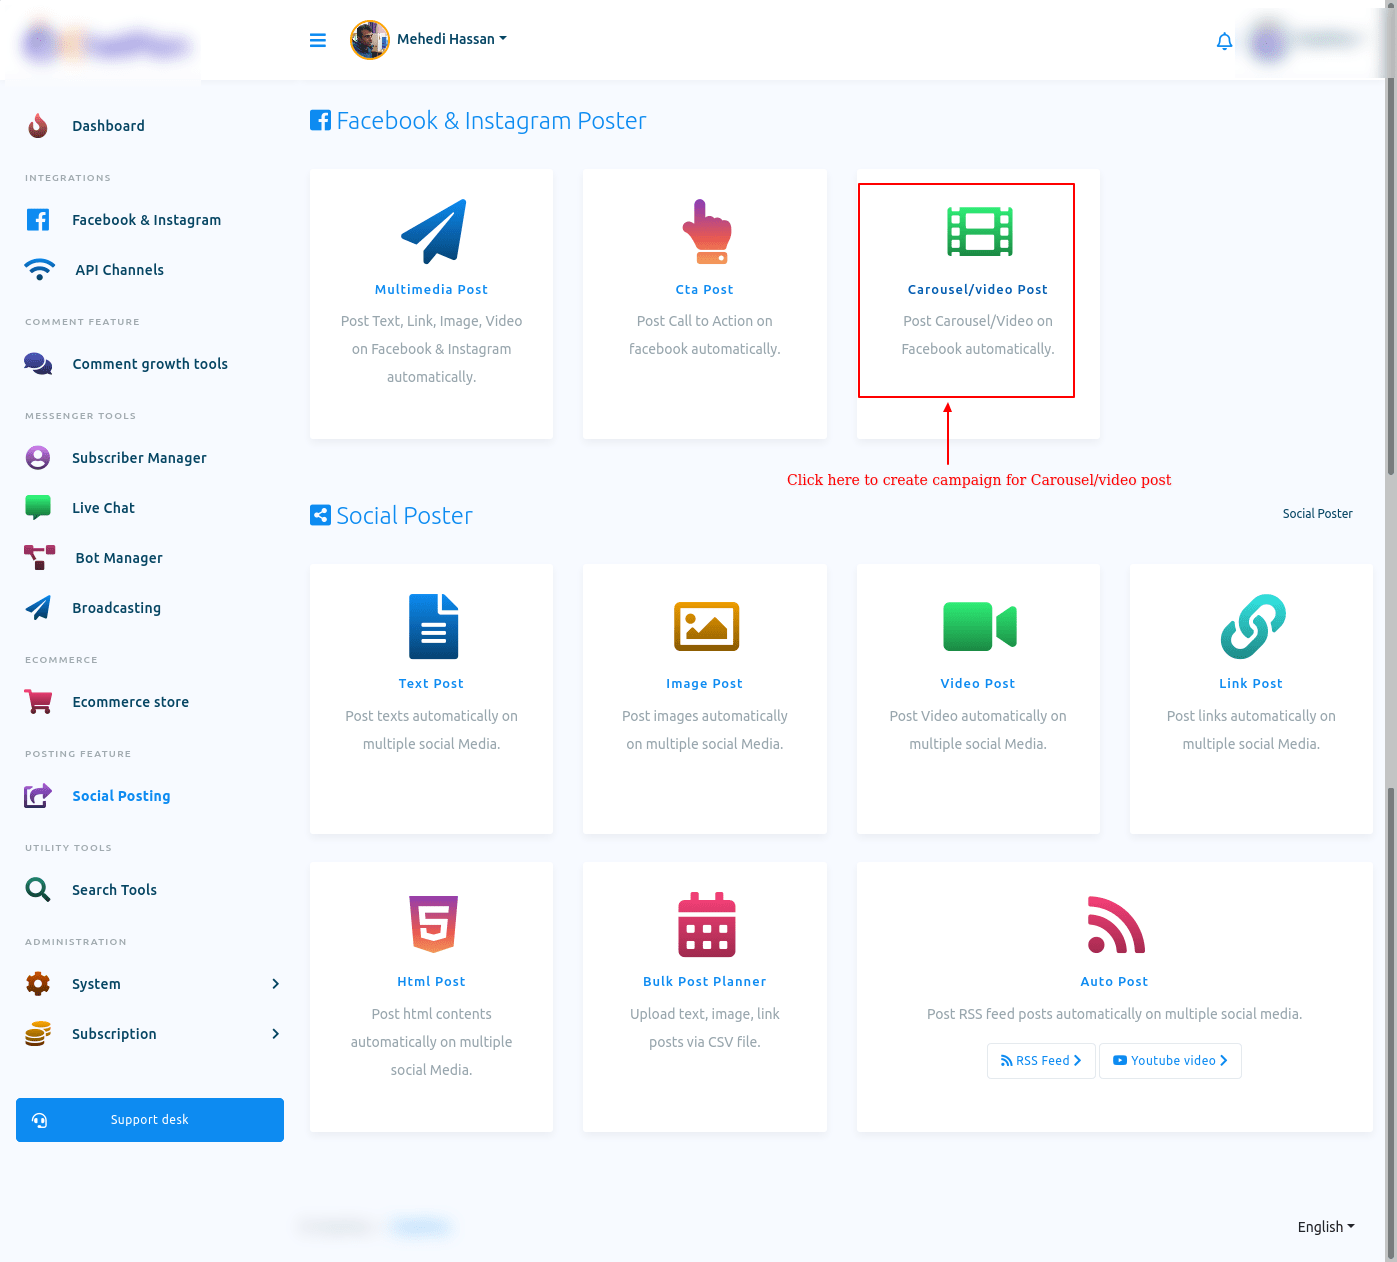
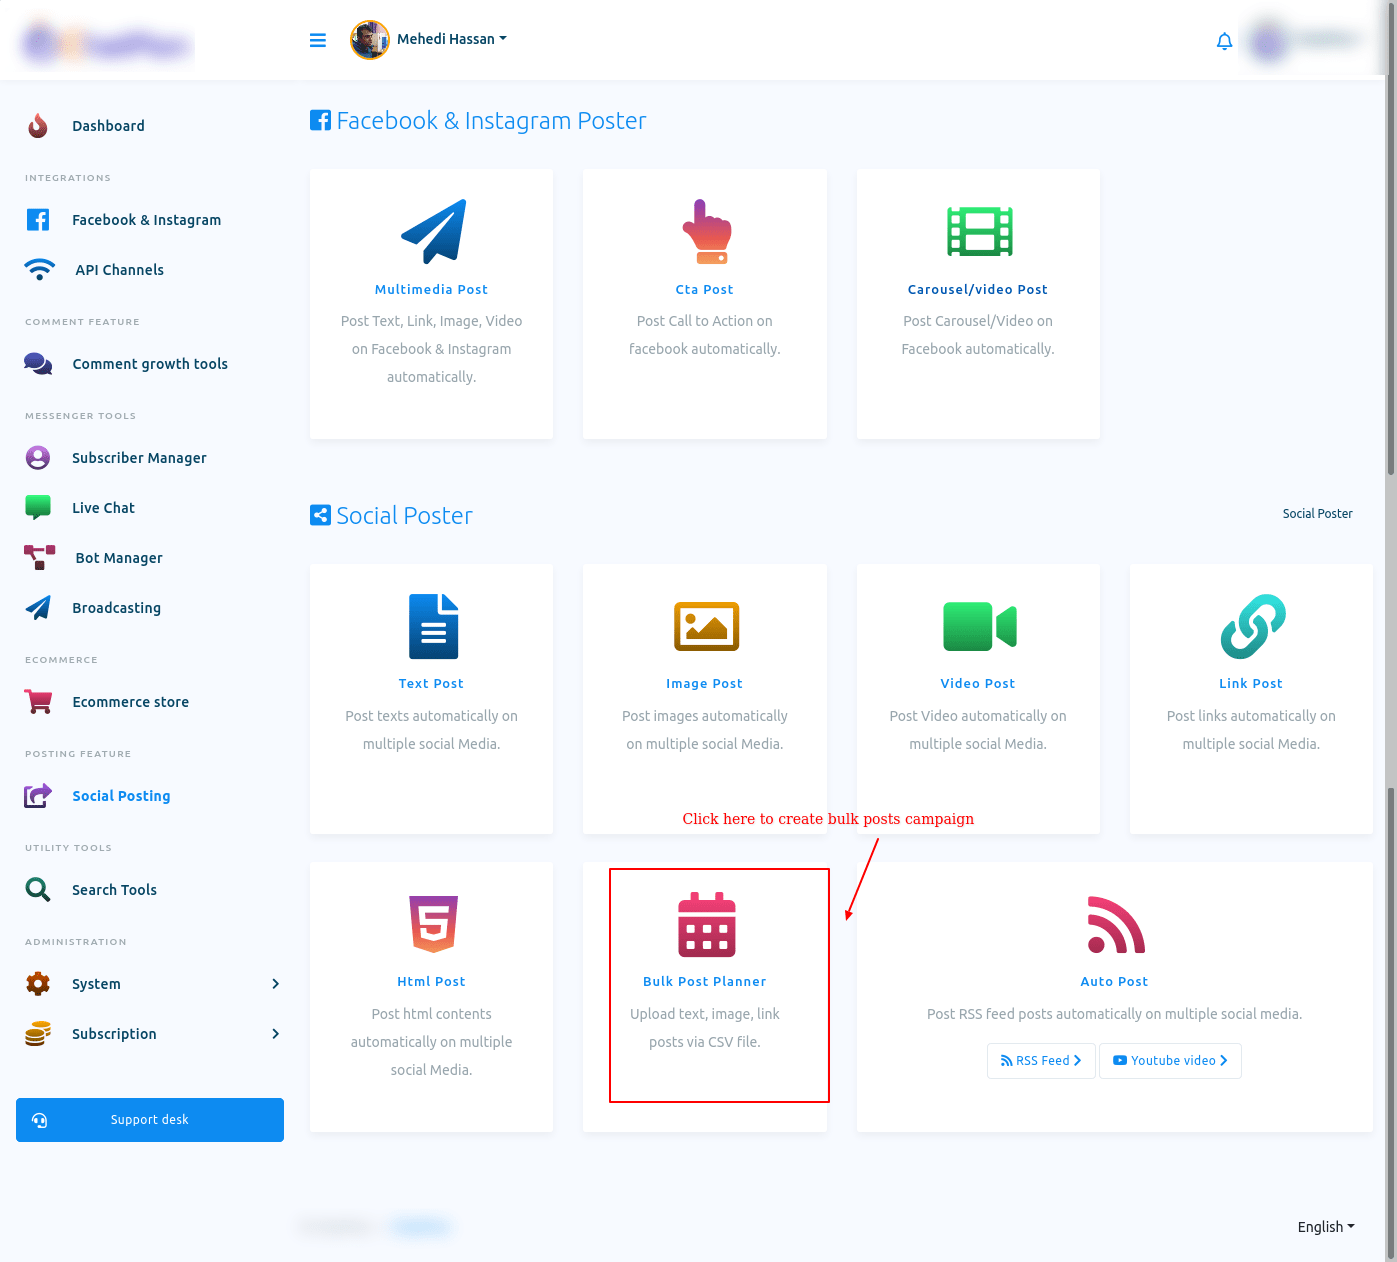
Click on the Social Posting and instantly a page will appear. The page is divided into two sections – Facebook & Instagram Poster and Social Poster. To create a Posting campaign on Facebook and Instagram, you have to work on Facebook & Instagram Posting section.
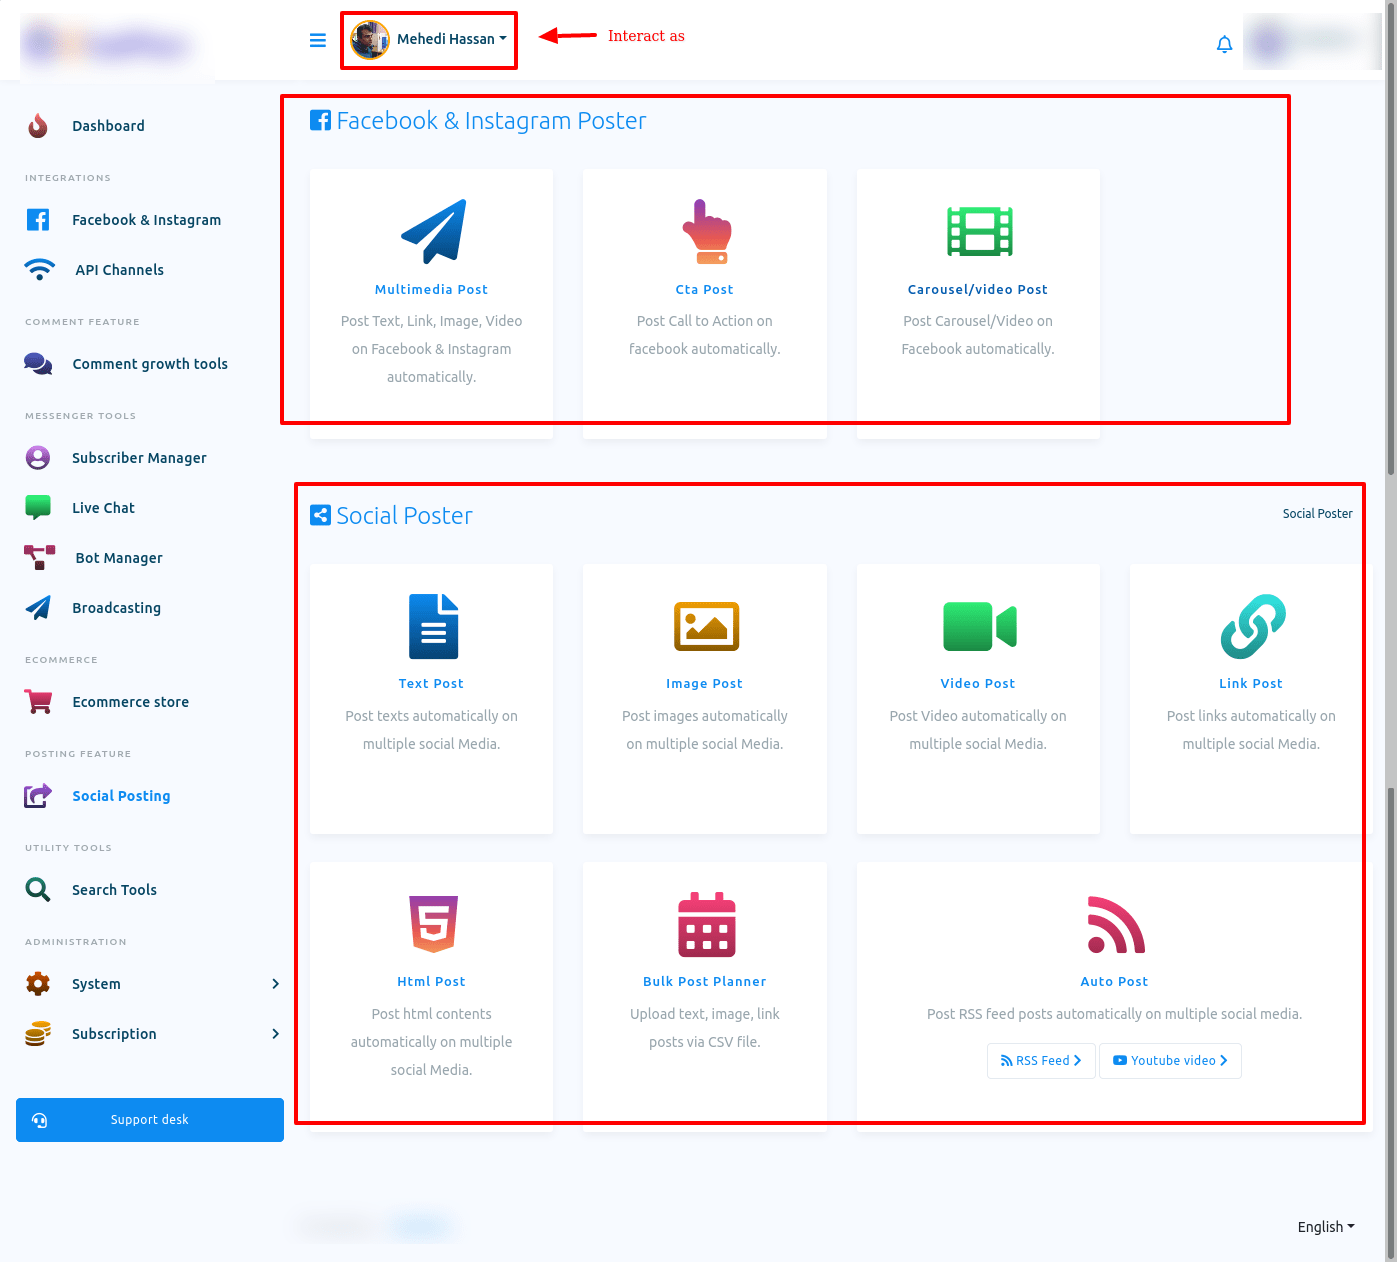
Facebook & Instagram Poster
Multimedia Post
To create Multimedia Post(Text, Link, Image, video), click on the Multimedia Post. Instantly, the Multimedia posting page will appear with a create new post button. And already created campaigns will be here as a list.
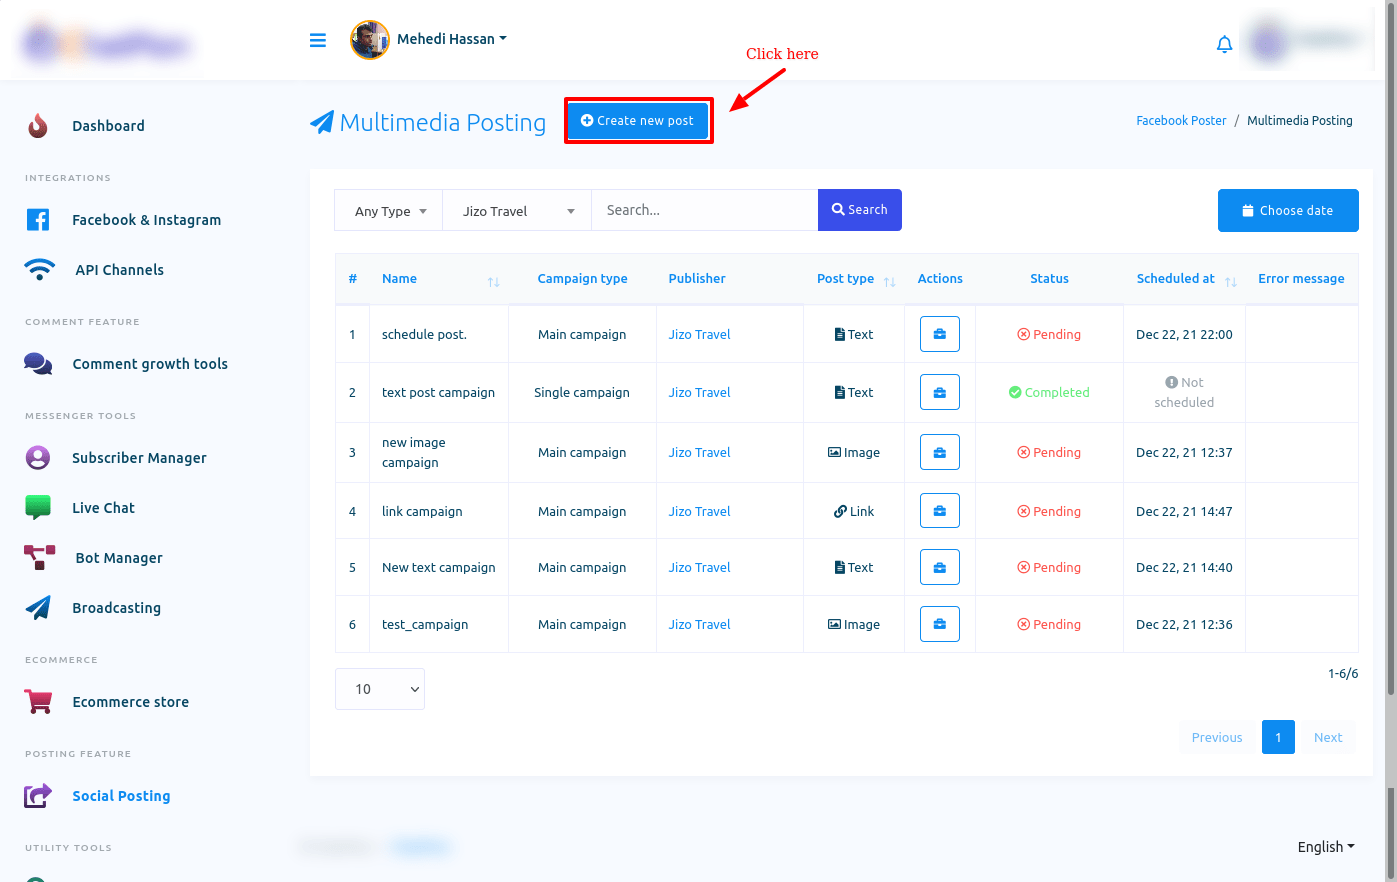
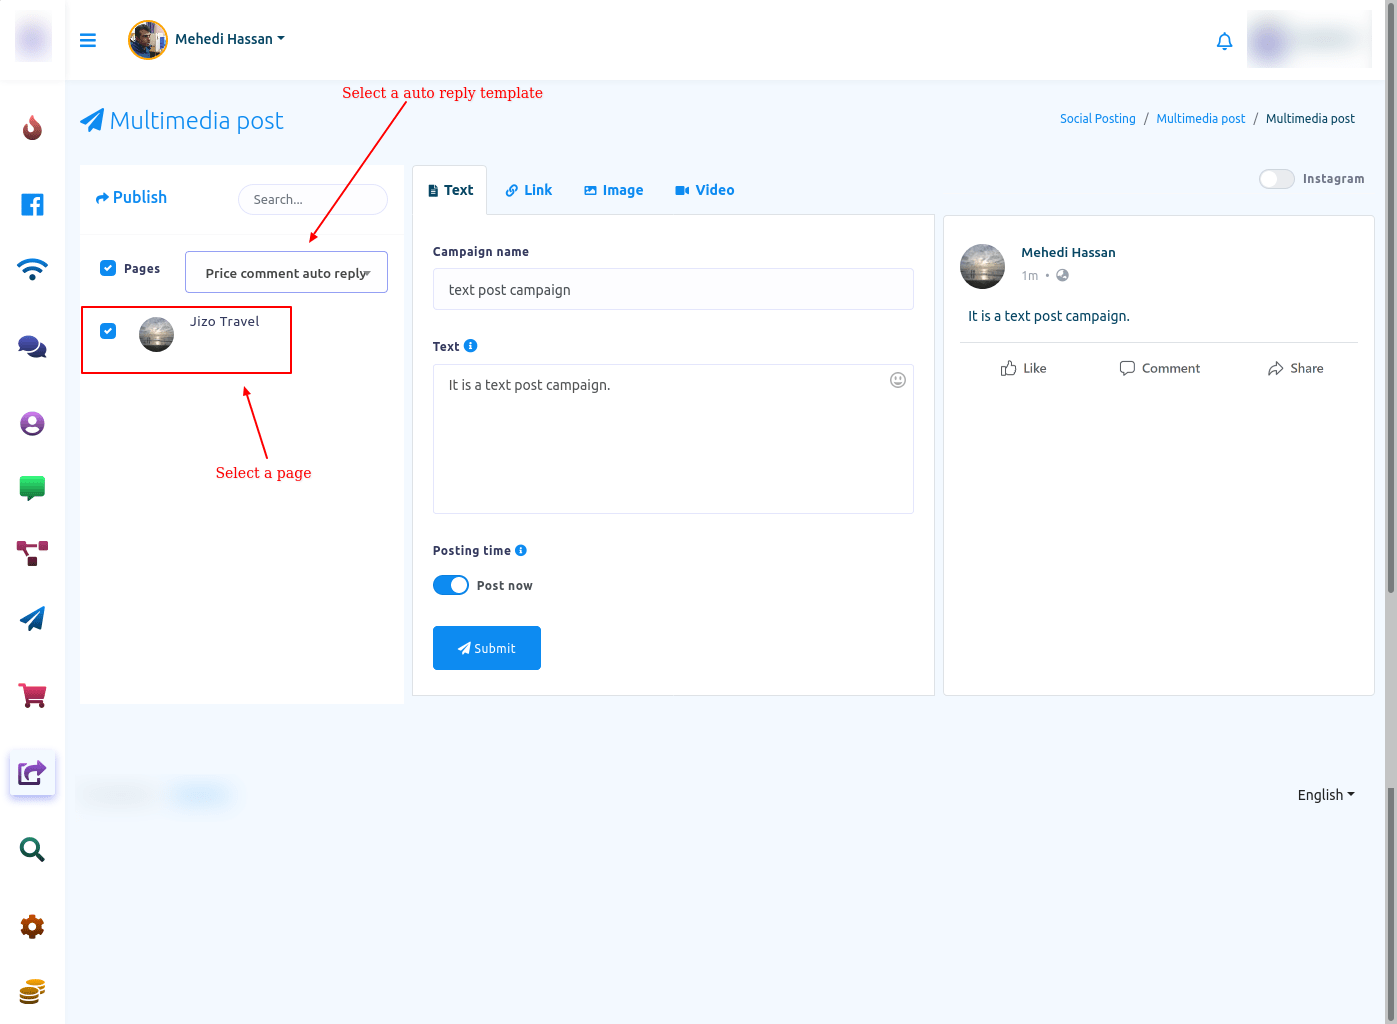
Well, to create a campaign, click on the create new post button. Instantly, a page will appear with some fields. To create the campaign, you have to fill-up the fields. First, you have to select a Facebook page the post will be published. Also, you can select an auto-reply template for the post.
Text Post
Text option is already selected by default. Therefore, if you want to create a campaign for text post, just write the name of the campaign in the field called campaign name. Then write your text in the field called Text.
Posting now is selected by default. Therefore, if you want to publish the post now, click on the submit button. And without delay, a successful message will appear on a box.
On the other hand, if you want to schedule the post, turn off the radio button called Post now. To see the details of the posting time, hover your mouse over the tooltip button.
Well, just as you turn off the post now button, some additional fields will appear. Now you have to fill out the fields.
In the schedule time field, you have to provide the date and time the post will be posted on. Just as you click on the schedule time field, a calendar with the date and time will appear. From the calendar, you have to select the date and time.
After that, you have to select the time zone. Click on the Time Zone field and instantly a drop-down menu of different time zone will appear. From the drop-down menu, you have to select your time zone.
Now you have to specify how many times the post will be re-posted. Give a number on the re-post this post fields. And this post will be posted the number of times you specified.
Now click on the time interval field and a drop-down menu of different time intervals will appear. From the drop-down menu, select a time interval.
Now click on the submit button and the post will be scheduled and you will see a successful message.

Link Post
To create a campaign for Link post, select link option. Instantly, an extra field called Paste link will appear. You have to provide a URL in the Paste link field. Instantly, the preview of the URL will appear at the right side of the page. Other than that, everything is the same as the text post.
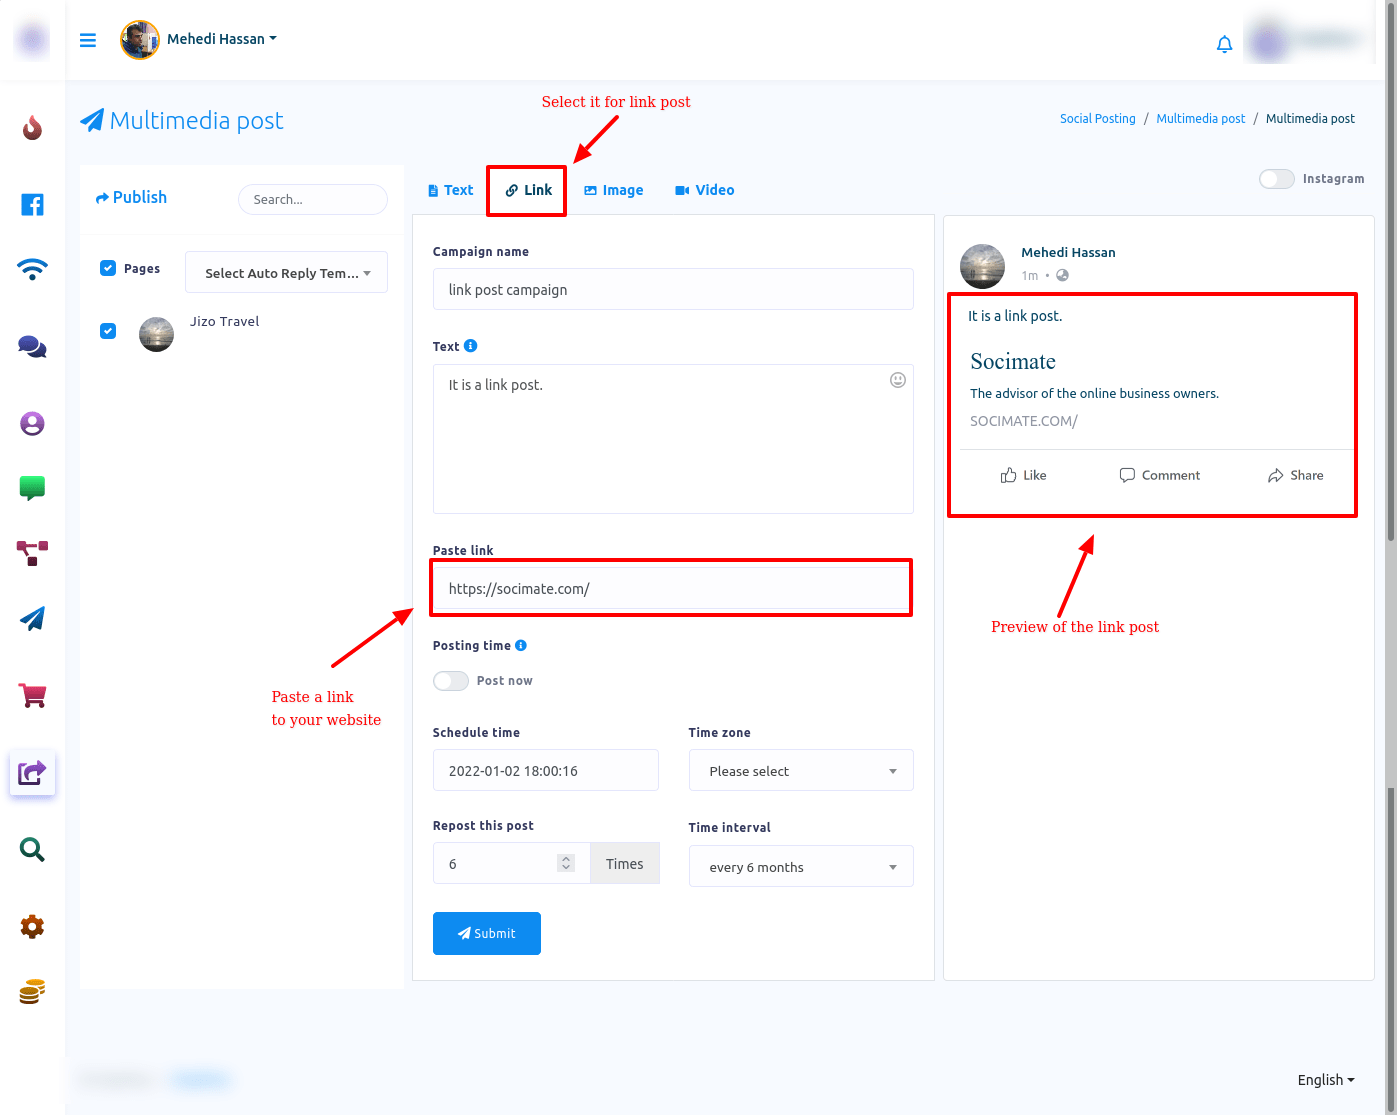
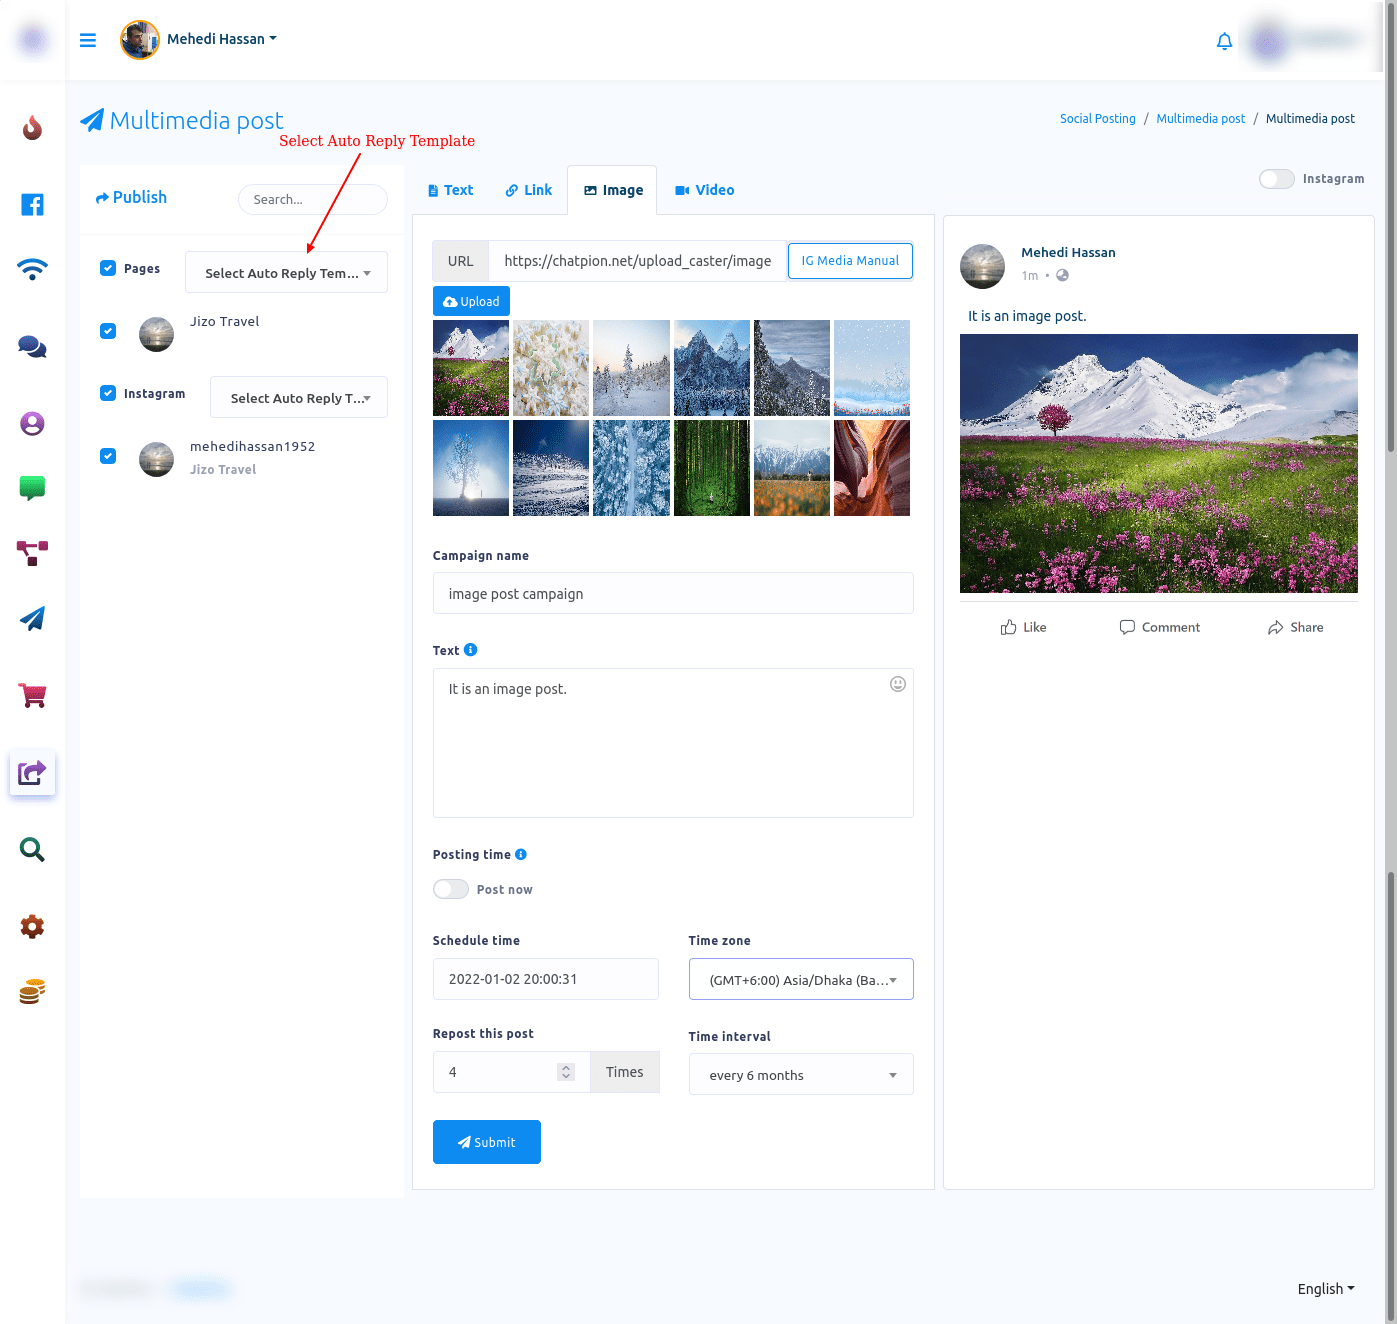
Image Post
To create a campaign for Image post, select Image option. Instantly, a field called url and upload button will appear. By clicking the upload button, upload an image. Just as you upload an image the url field will be filled with the local link of the image and miniature version of the image will appear under the upload button. And the preview of the image post will appear on the right side of the page. By clicking on the upload button, you can upload more images. And the images will be saved for later use. And the miniature versions of the images will appear. By clicking on an image, you can select it for an image post.
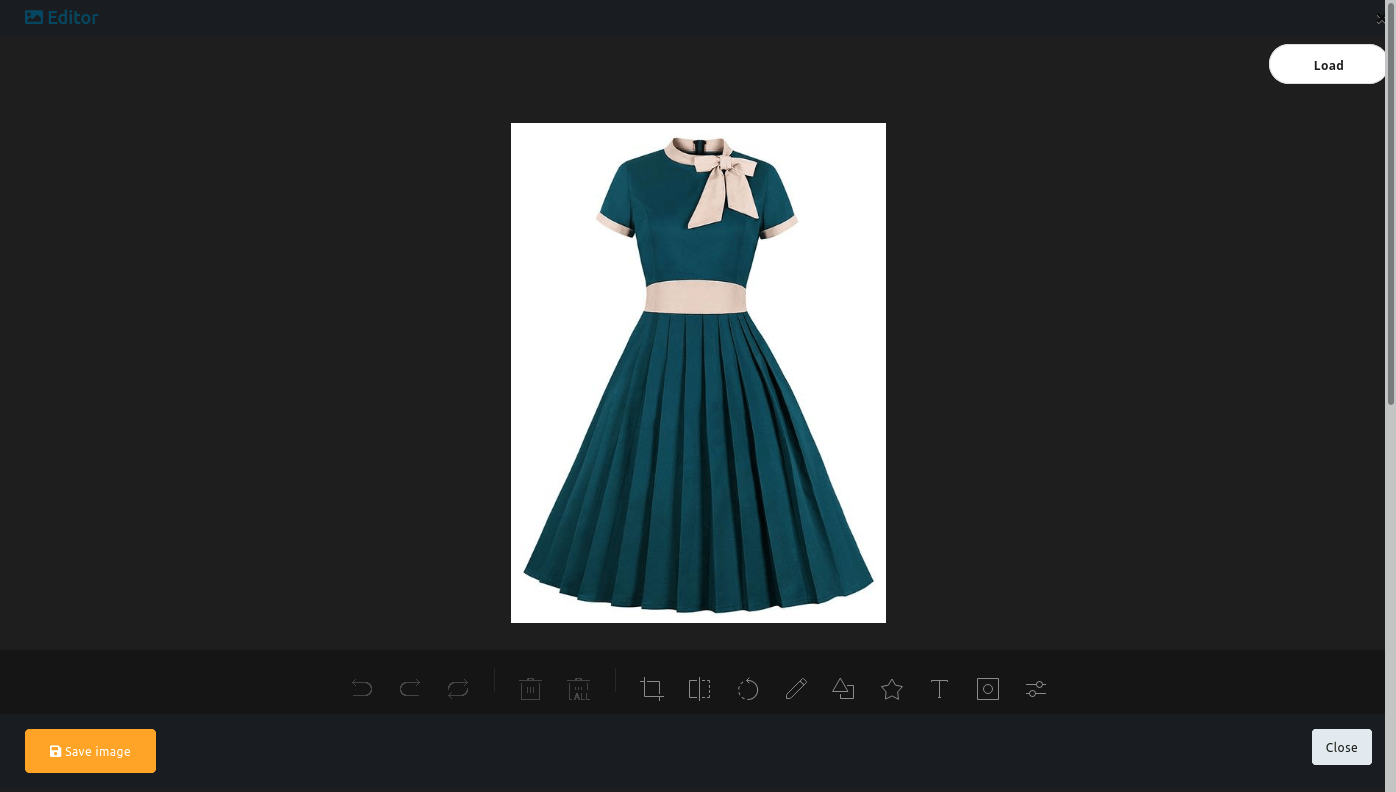
Also will appear two buttons called edit and delete. By clicking on the edit button, you can edit the image. Click on the edit button and instantly, an image editor with the image will appear. On the editor, you can edit the image. After you have edited the image, just as you click on the Save image button, the edited version of the image will appear. And by clicking on load button, you can upload another image to edit. Other than that, everything is the same as the text post.
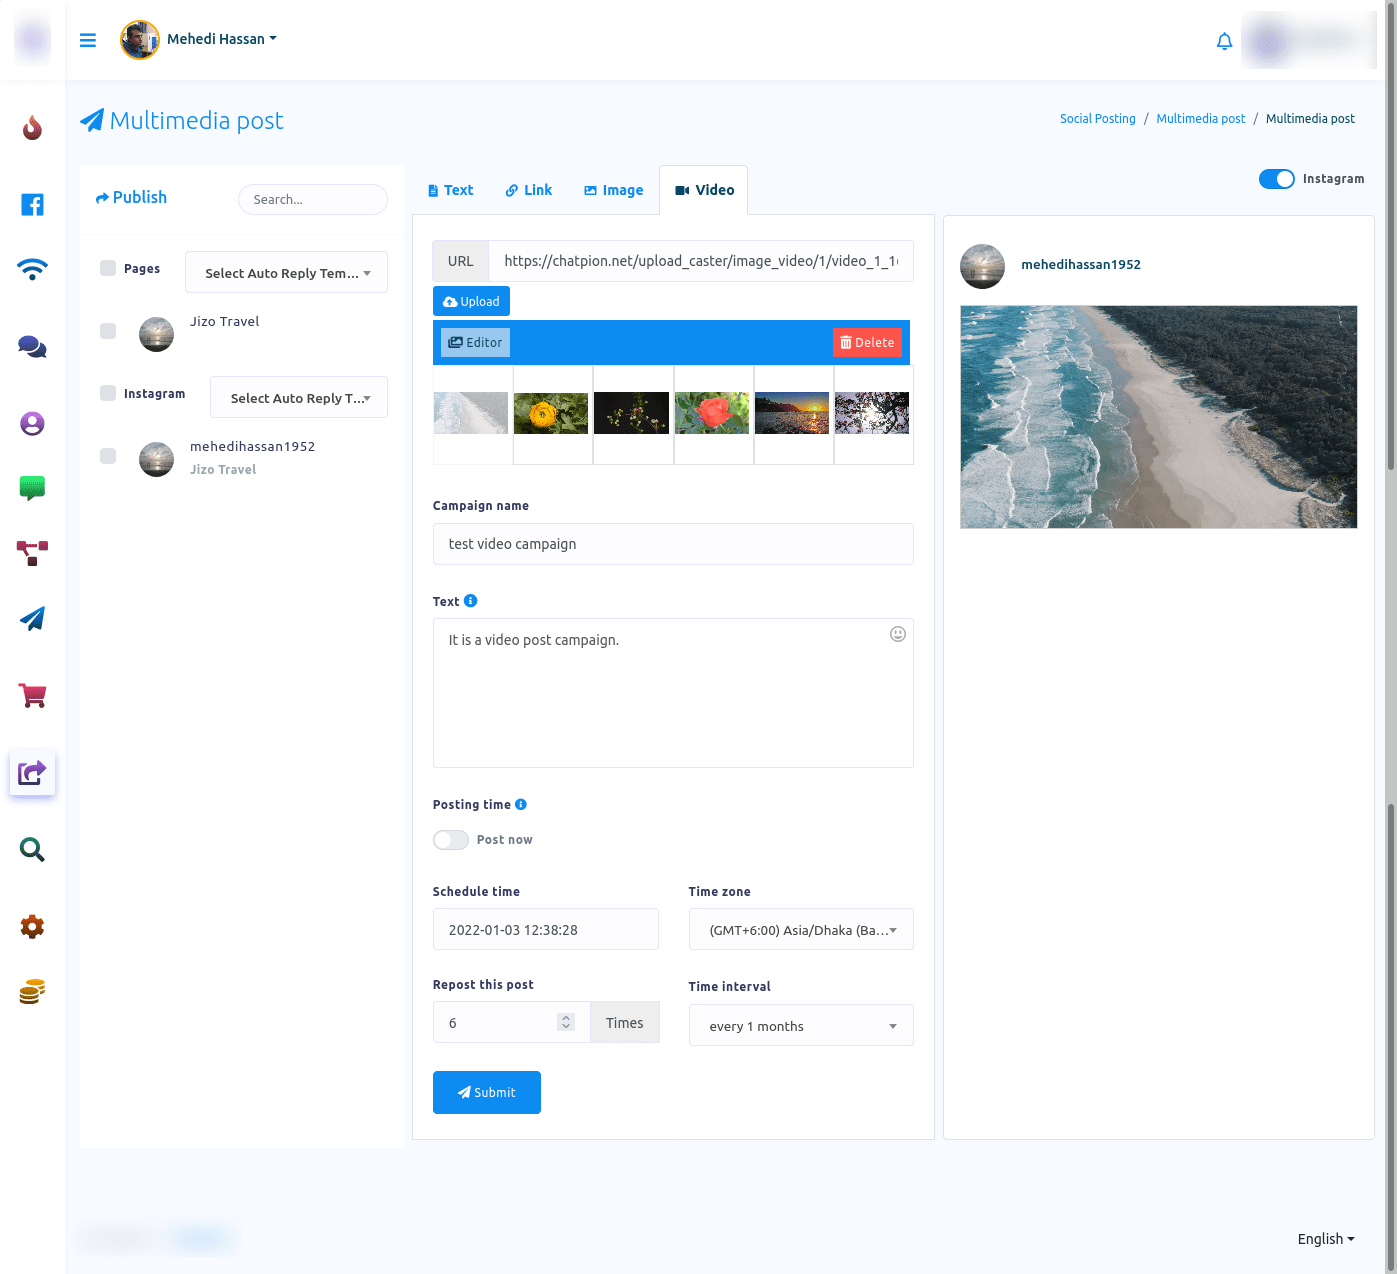
Video Post
Video post is the same as image post.
Call To Action Post
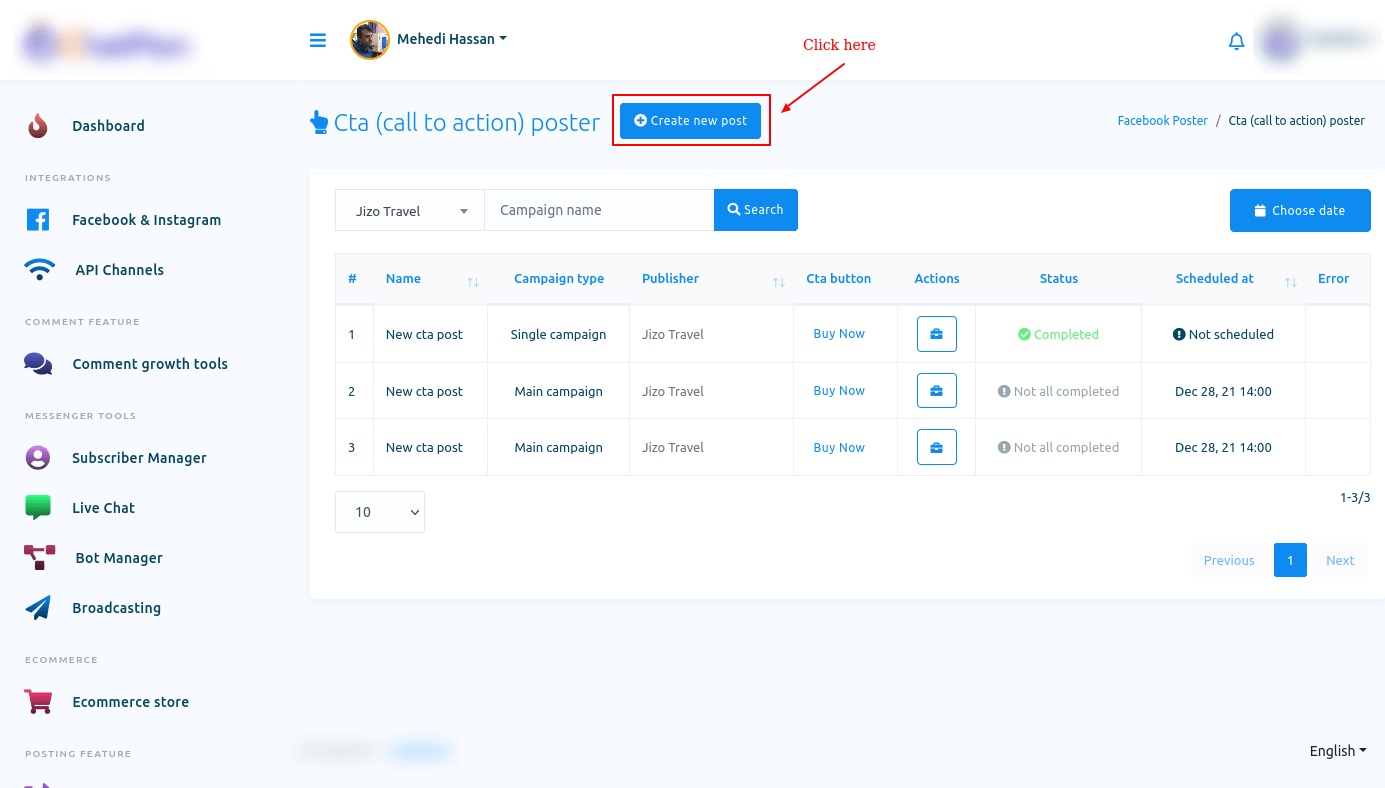
Let’s see how to create a campaign for Call To Action post. Now click on the Cta post and a page called Cta poster will appear with a button called Create new post.
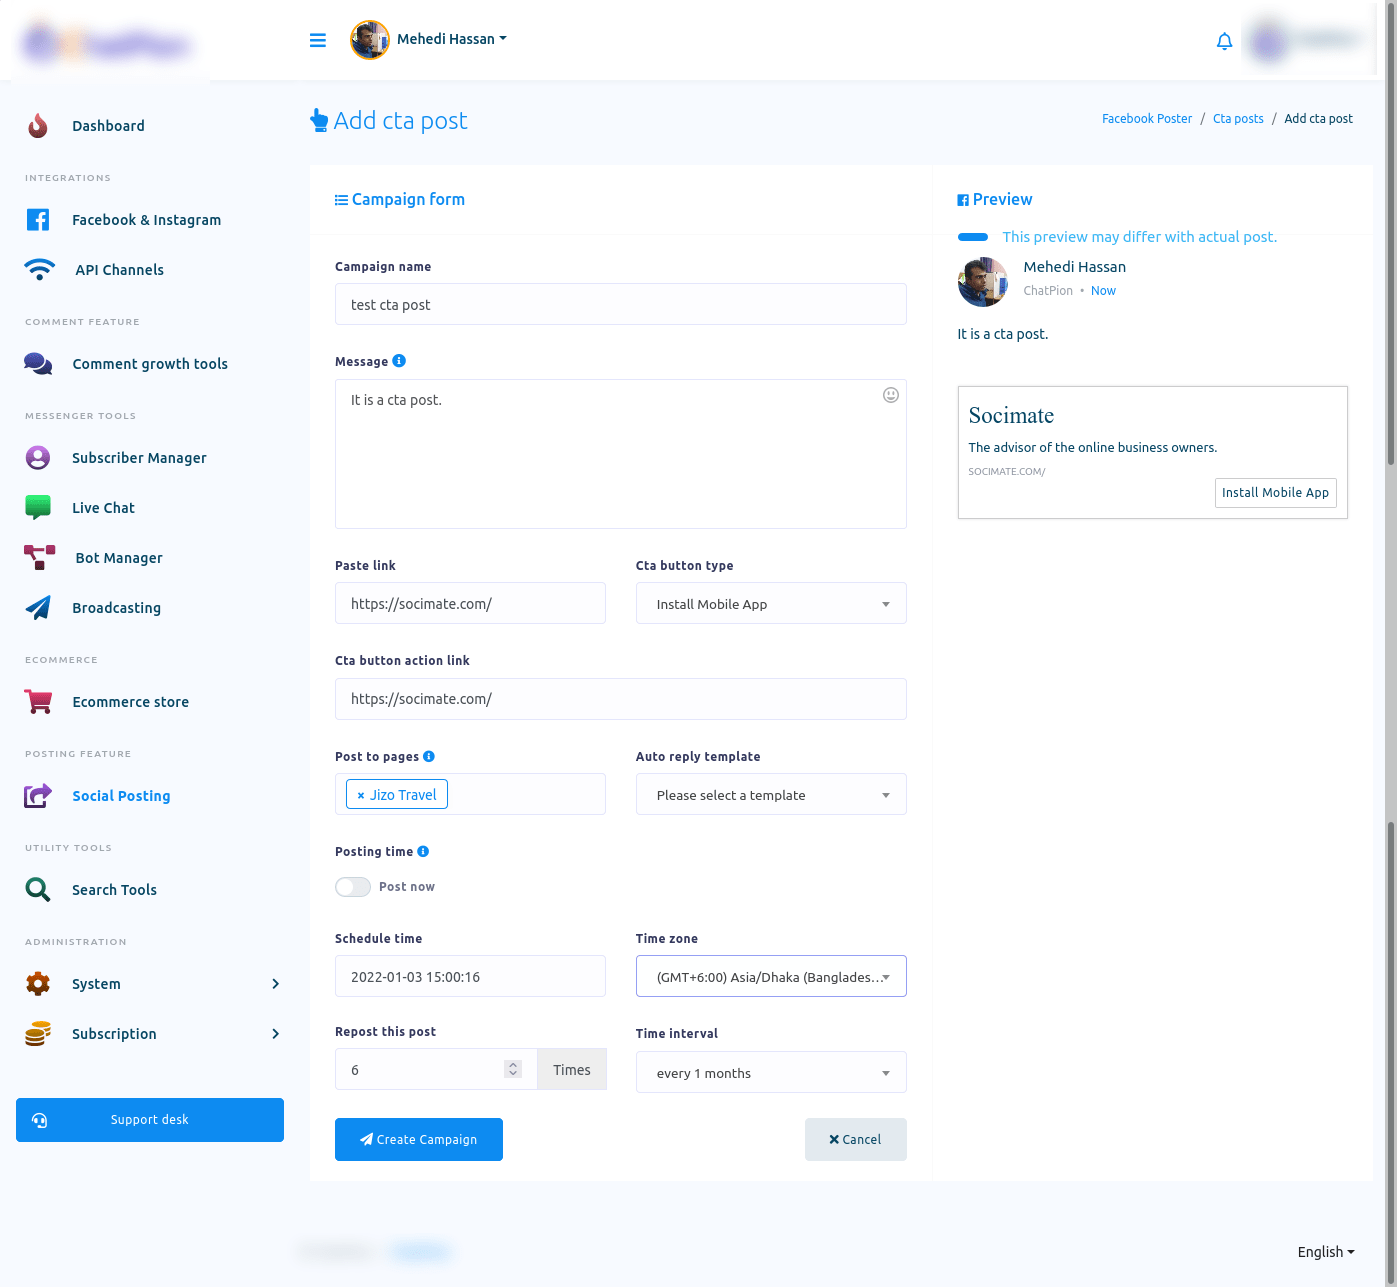
Click on the create new post button and a page called add cta post will appear with some fields. To create a campaign for cta post, you have to fill-out these fields.
First, give a campaign name in the Campaign name field. Then write your message in the message field. This message support spintax. In the past link field, past a link where the user will be redirected. Then you have to select a button from the cta button type. Click on the cta button type field and drop-down menu of different button types will appear. From the drop-down menu, select a button type.
Well, the cta button action link field will automatically filled with the link you have pasted on the paste link field. From the pages to post field, select a page you want to post on. Of course, you can select multiple pages.
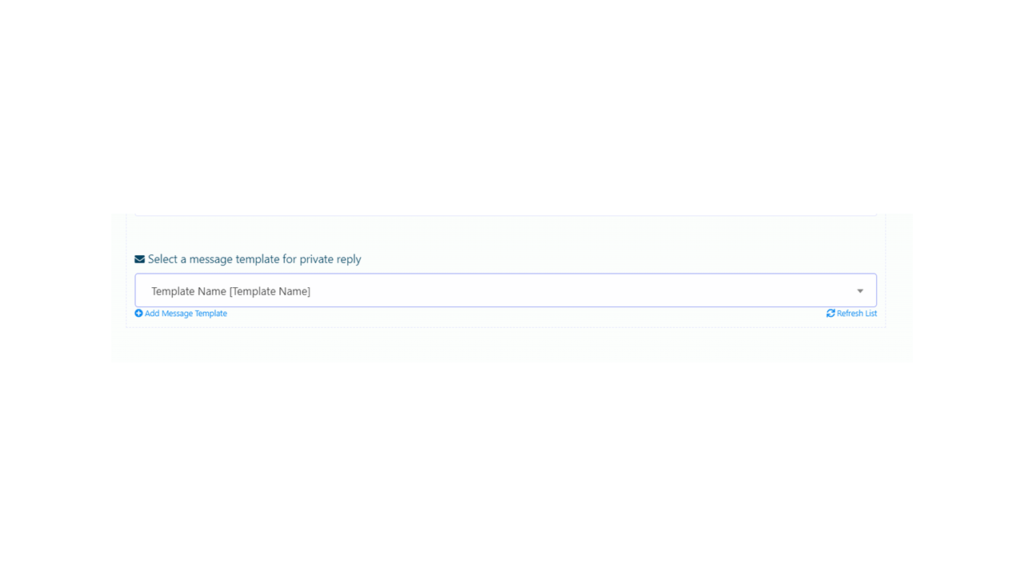
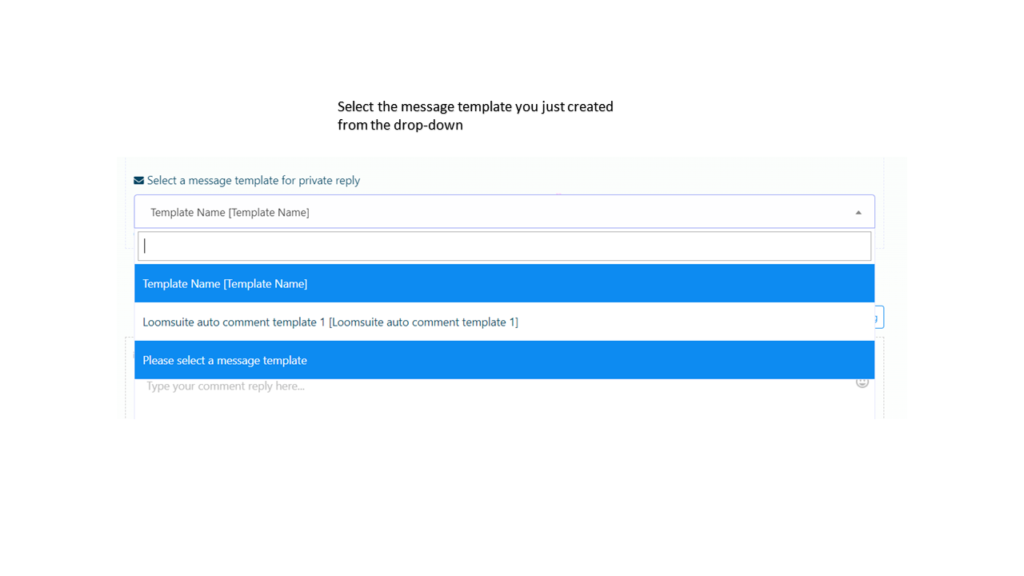
You can also select a template from the auto-reply template field. Click on the field and a drop-down menu of different pre-defined templates will appear. If there is no predefined template, you have to create a template first.
Posting now button is turned on by default. By turning off the post now button, you can schedule the post. Turn off the button and some fields will appear. And like before you have to fill-out these fields to schedule the call to action post.
Now click on the create campaign button, a successful message will appear. That is, the campaign has been created.
Carousel/Video post
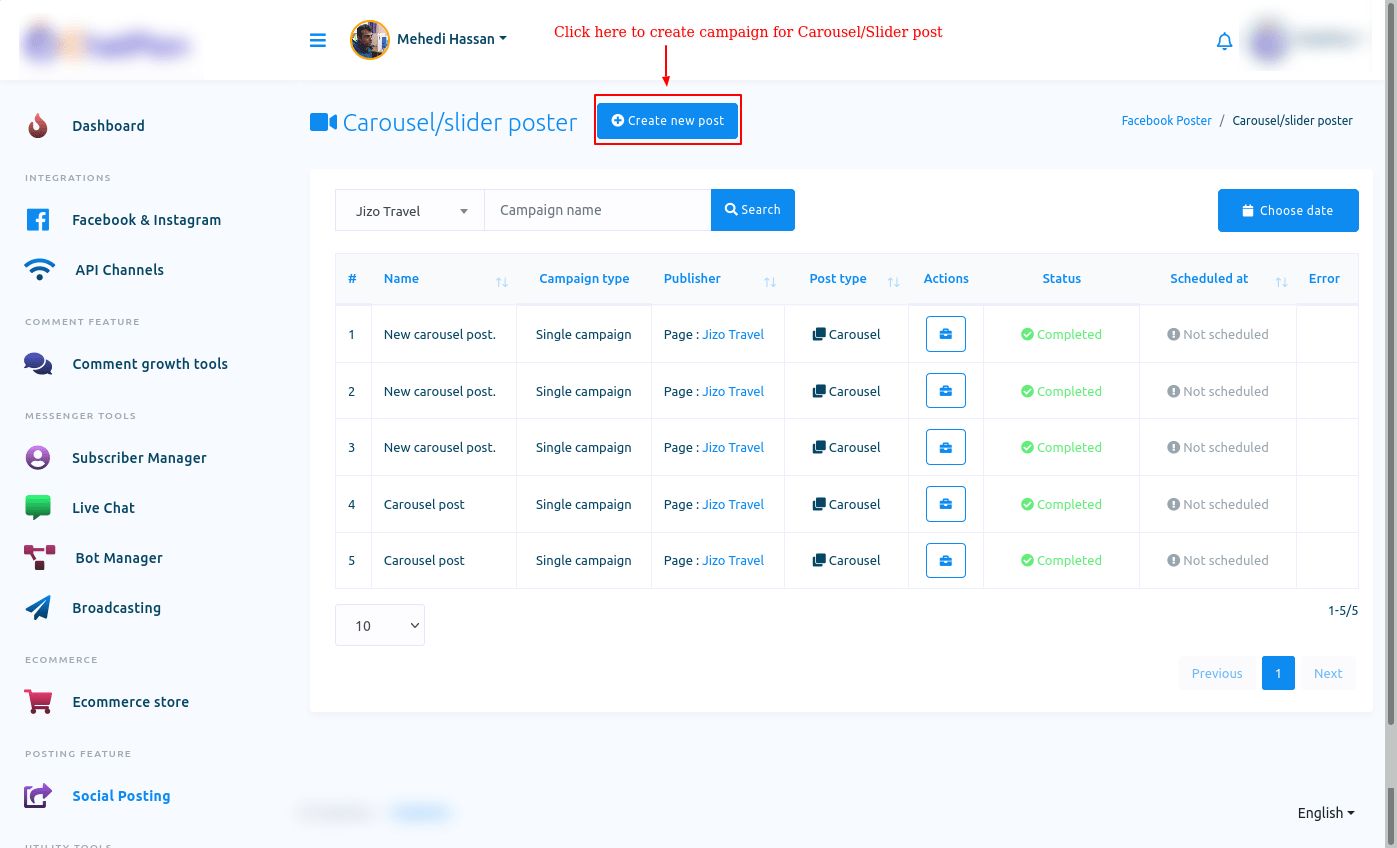
To create a carousel/video post, click on the Carousel/video post option and a page called carousel/slider poster will appear with a button called Create new post.
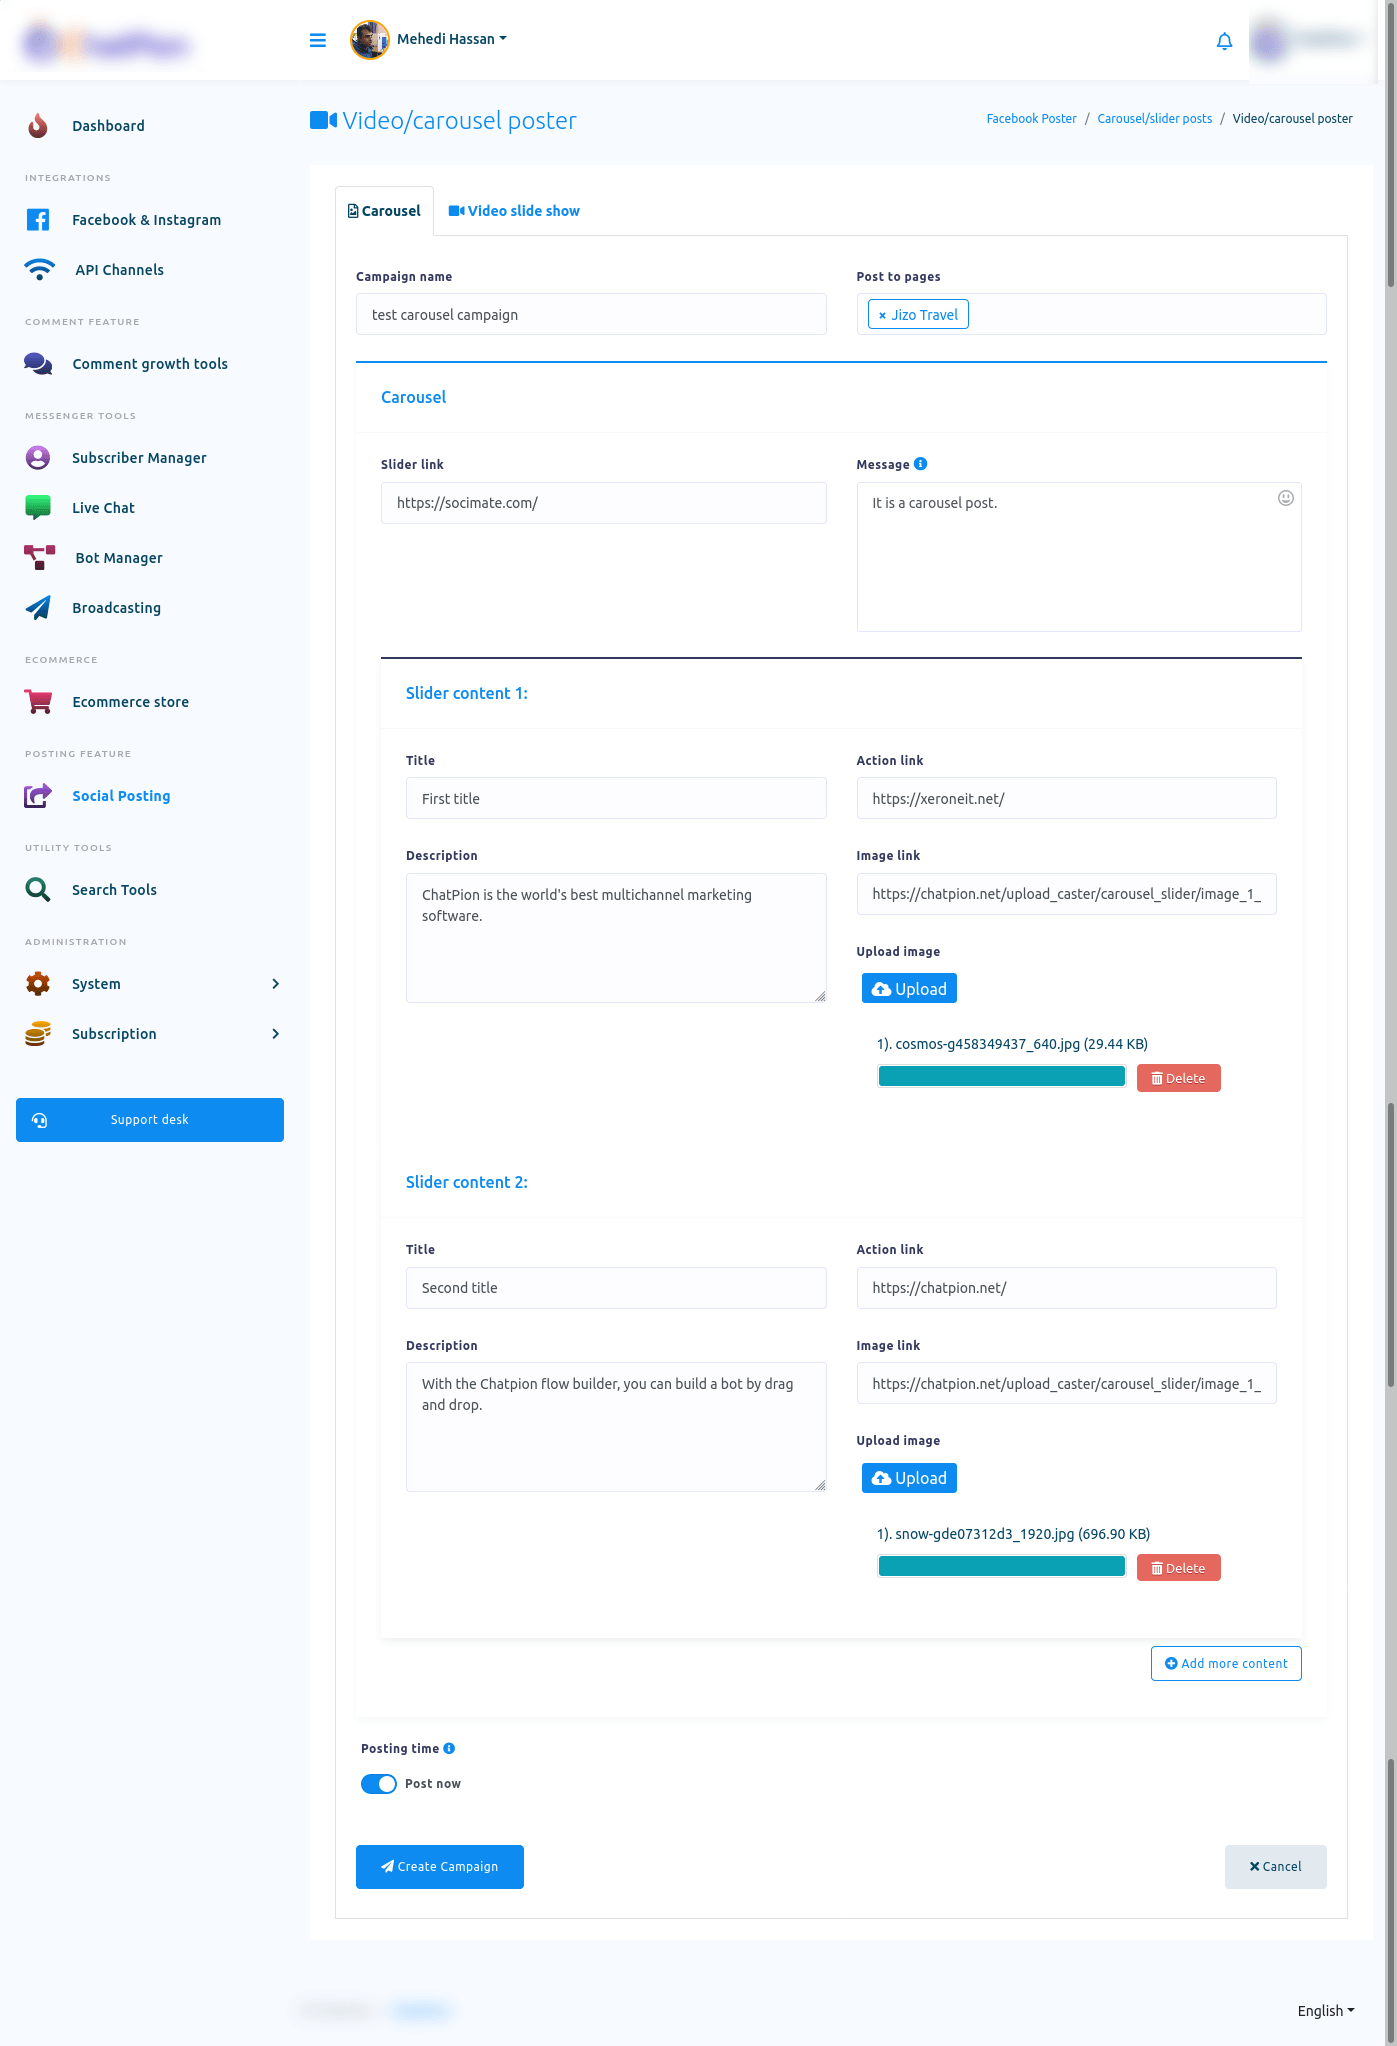
Click on the create new post button and instantly, a page called video/carousel poster will appear with some fields.
To create a campaign for carousel post, select carousel option. After that, give a campaign name in the campaign name field. Then select a page from the pages to post field. In the slider link field, give a link that will appear at the last of the slider. In the message field, write a message.
Then you will see slider content option with some fields. Give a title in the title field. Then paste a link in the action link field. Give a description in the field called description. Then upload an image. After uploading an image, the local link of the image will appear in the image link field.
To create a carousel post, you have to add at least two slider content. Well, to add another slider content click on the add more content button. And instantly, another slider content option will appear. And like before you have fill-out the same type of field.
After that, if you want to schedule the post, just turn off the post now button and some field will appear. Now like before, you have to fill-out the field.
Now click on the create campaign button and you will see a successful message. That is, the campaign has been created.
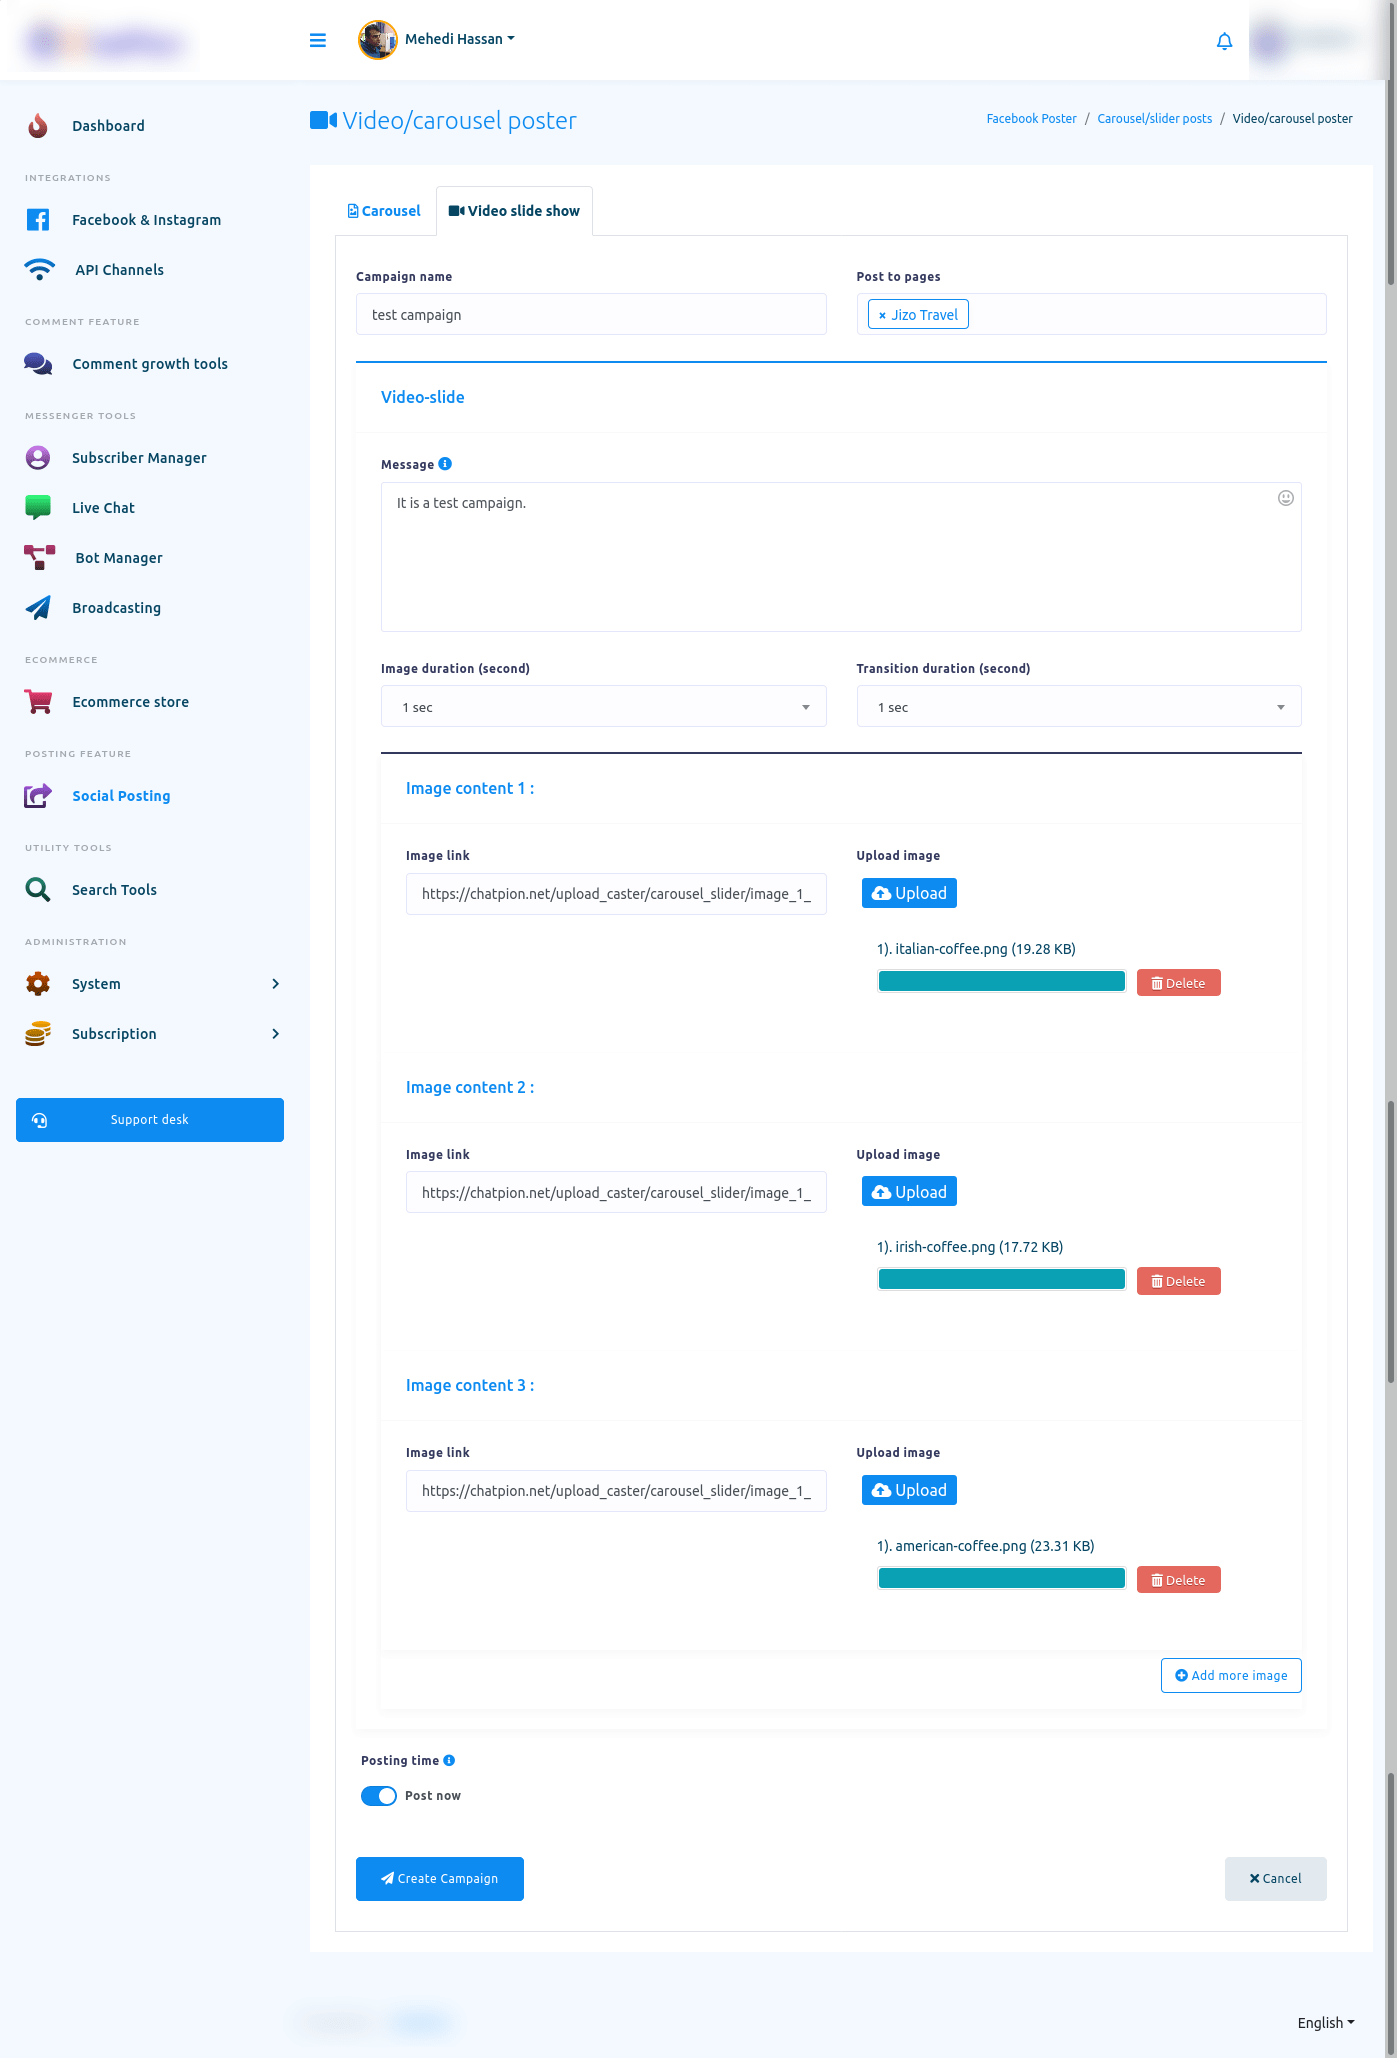
Video Slide Show
To create a campaign for video slide show, please select the video slide show option.
Then you have to give a campaign name in the campaign name field. After that, select a page in the post to pages fields. Of course, you can select multiple Facebook pages.
Then come the video-slide section.
In the message field of the section, write a text message. In the image duration field, select an image duration in seconds from a drop-down menu.
In the transition duration field, select a transition duration in seconds from a drop-down menu.
Then in the image content section, you have to upload an image by clicking on the upload button.
To make a Video Slide show campaign, you have to provide at least three images and corresponding information.
You can provide more images by clicking on the Add more image button.
Well, provide at least three images and click on the create campaign button.
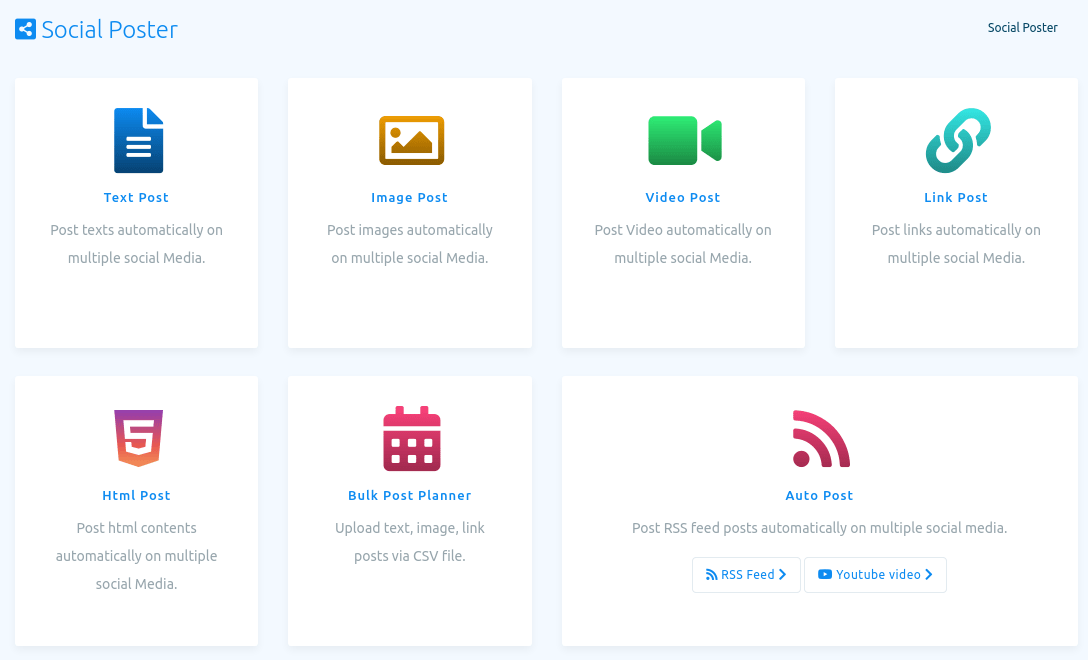
Social Poster
Now come to the Social Poster Section. With the Social Poster, you can create a campaign to post on different social media such as Facebook, Twitter, Linkedin, Reddit, WordPress and Medium. That is, a campaign will publish and schedule posts on different social media.
Social Poster Text Post
To create text post for different social media, click on the Text post option of the Social Poster section. Instantly, a page called Text post with Create new post button will appear.
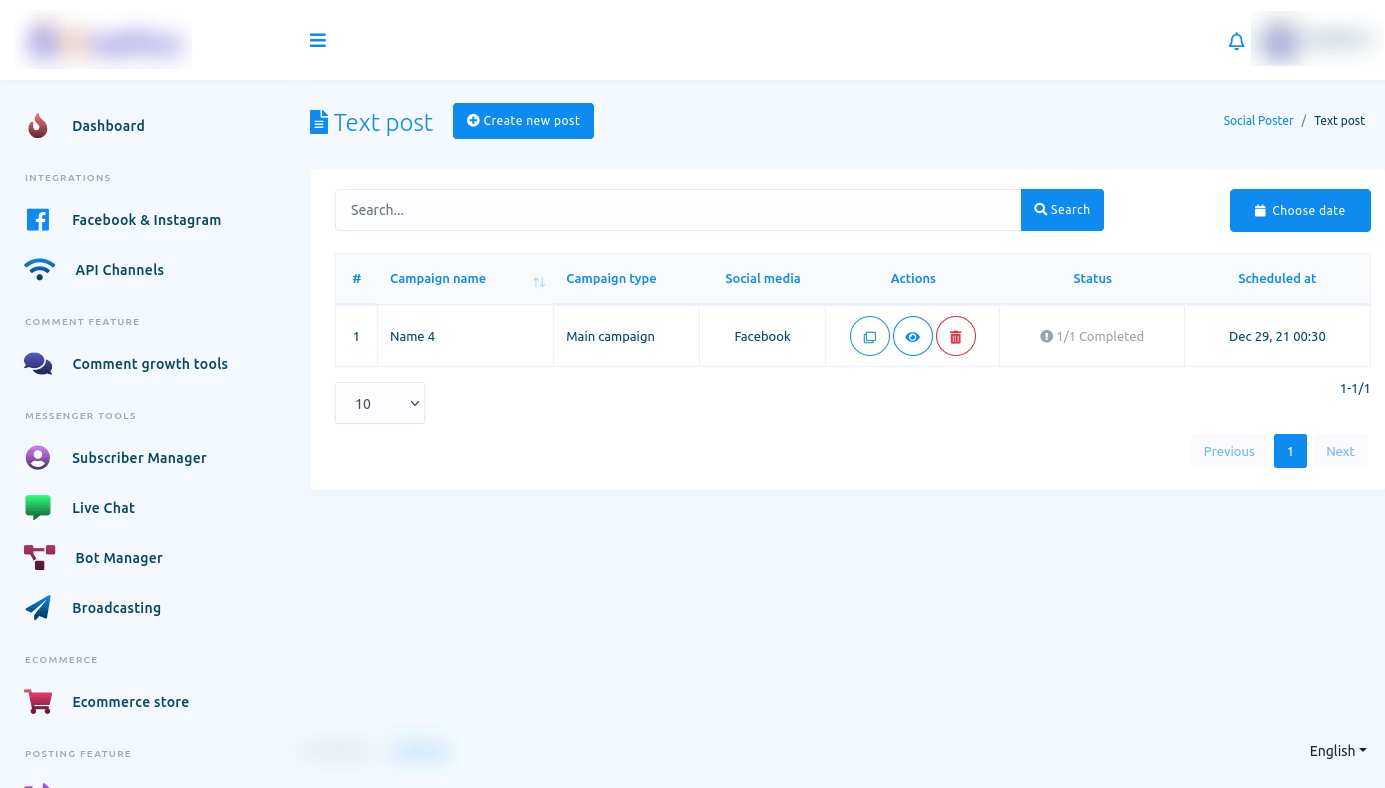
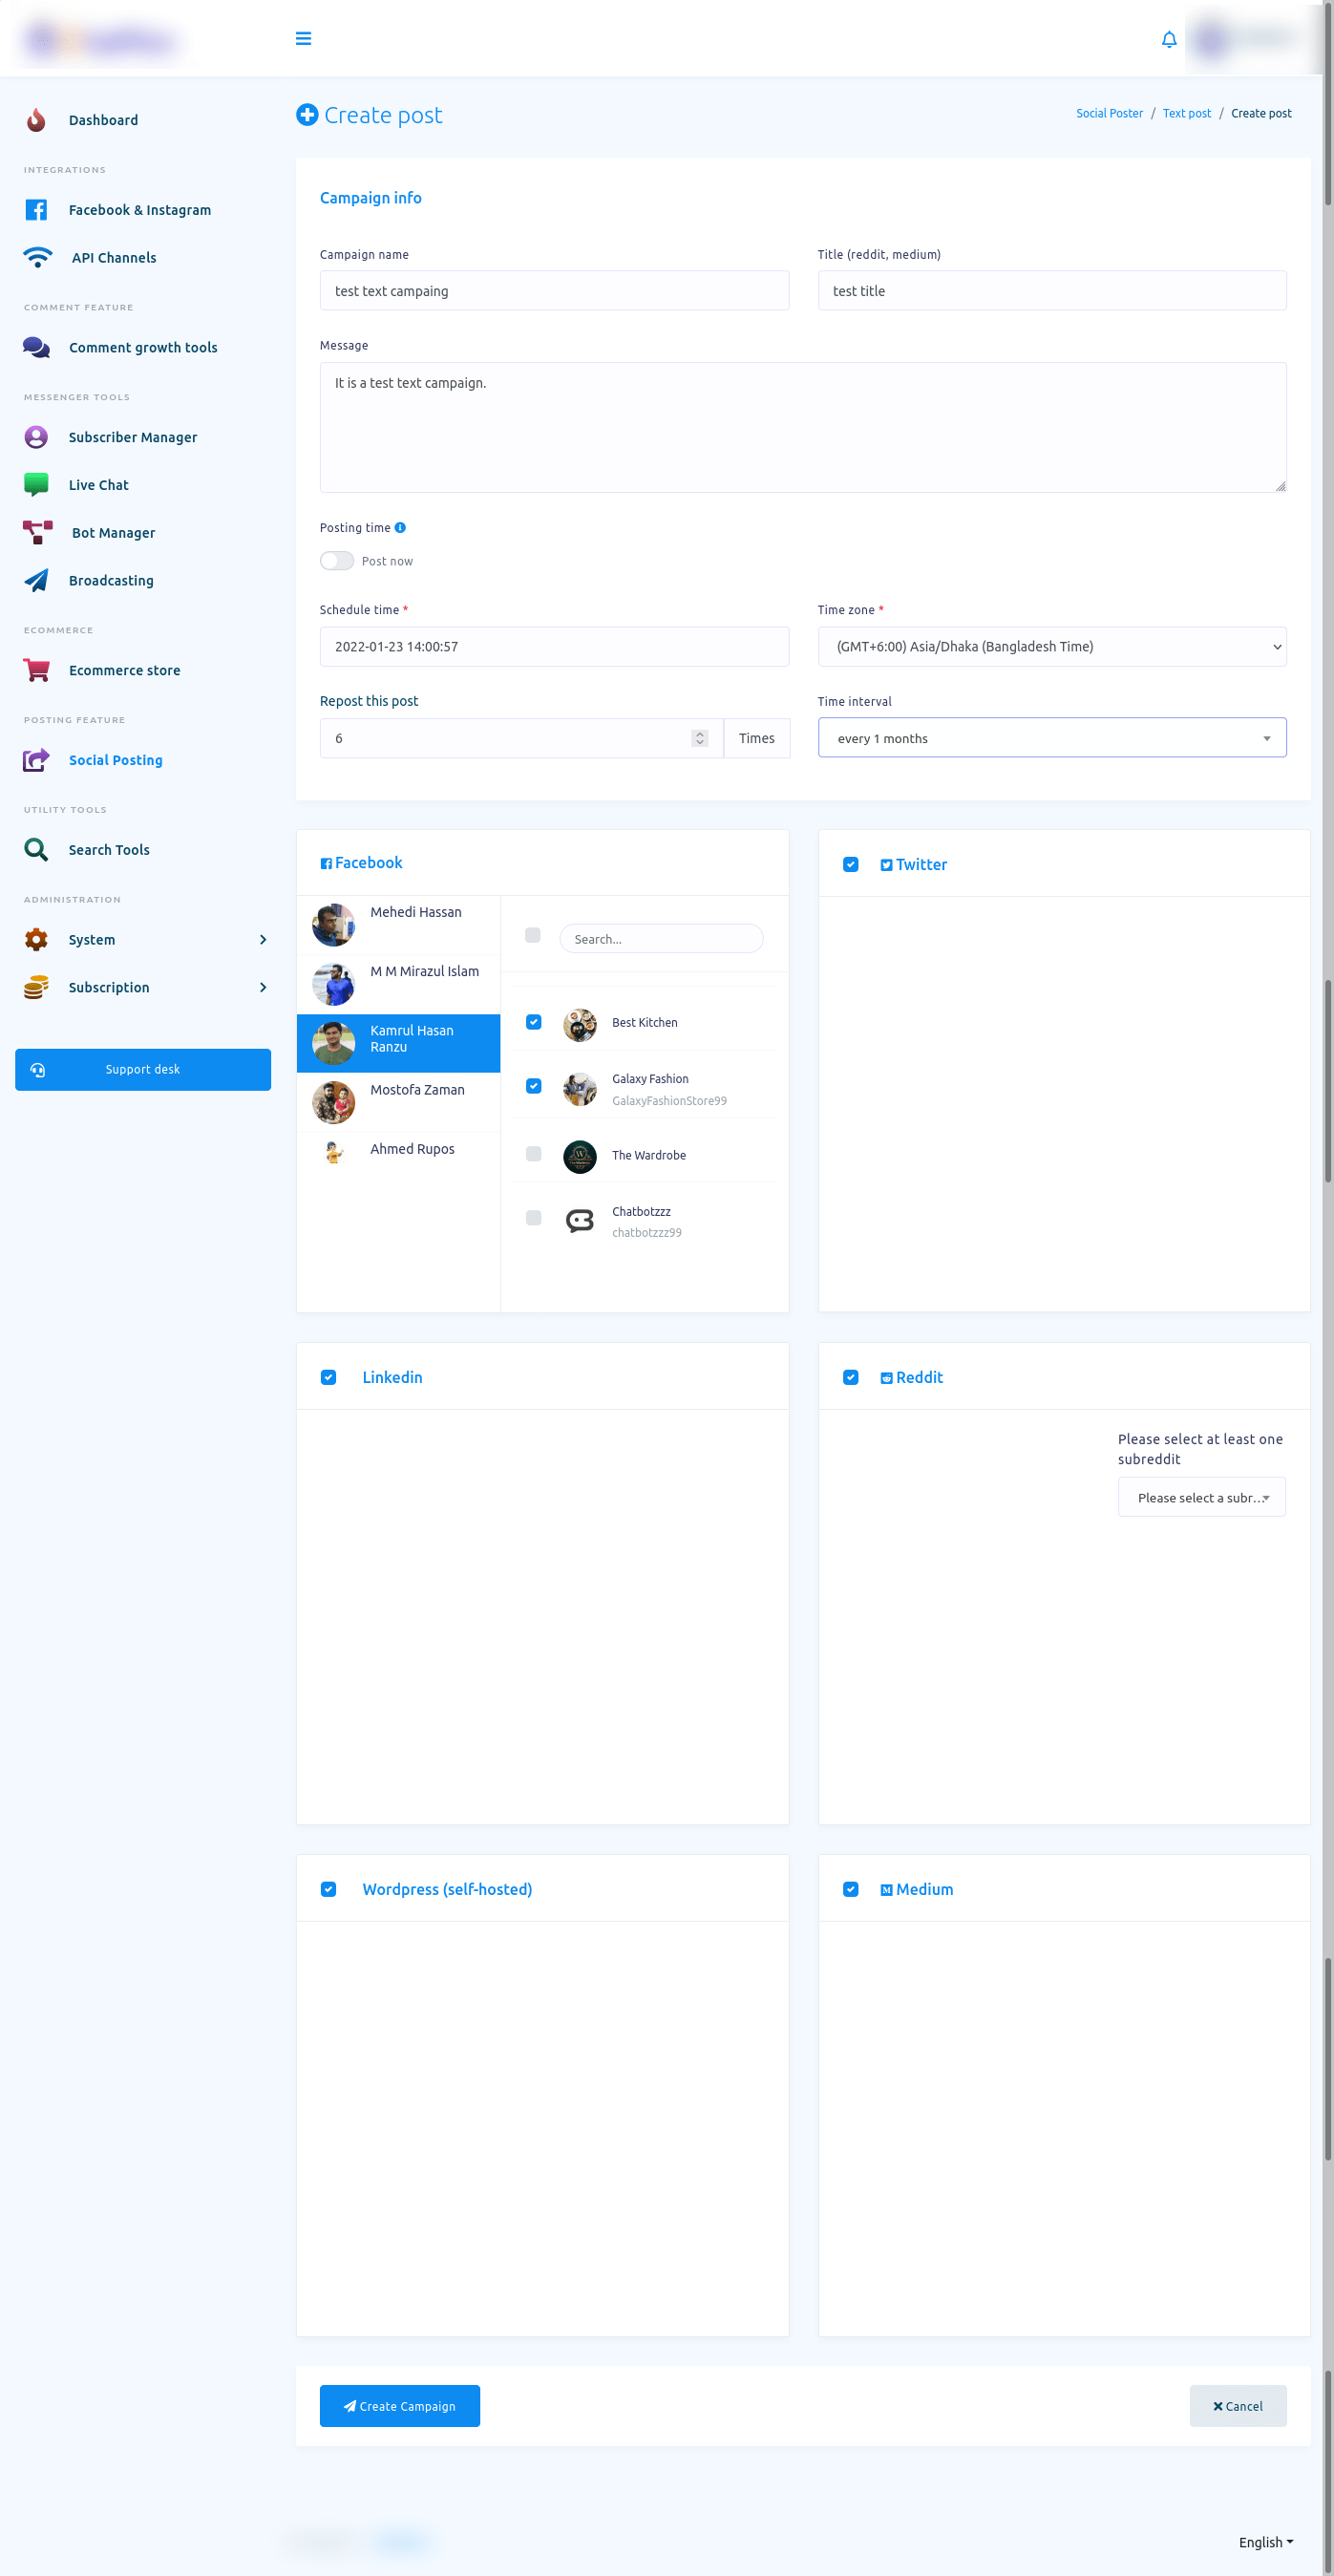
Now click on the Create new post and a page called create post will appear with some fields. To create a text post, you have to fill out these fields.
Write a name of the campaign in the campaign name field. Then give a title for the reddit and medium in the Title(reddit, medium) field. Then write a text message in the Message field.
To shcedulde the post, turn off the post now button and fill out the scheduled time-related fields.
Then you have to select a Facebook account and the pages of the account you want to post on. Of course, you can select multiple Facebook pages. After that, you have to select the social media you want to post on.
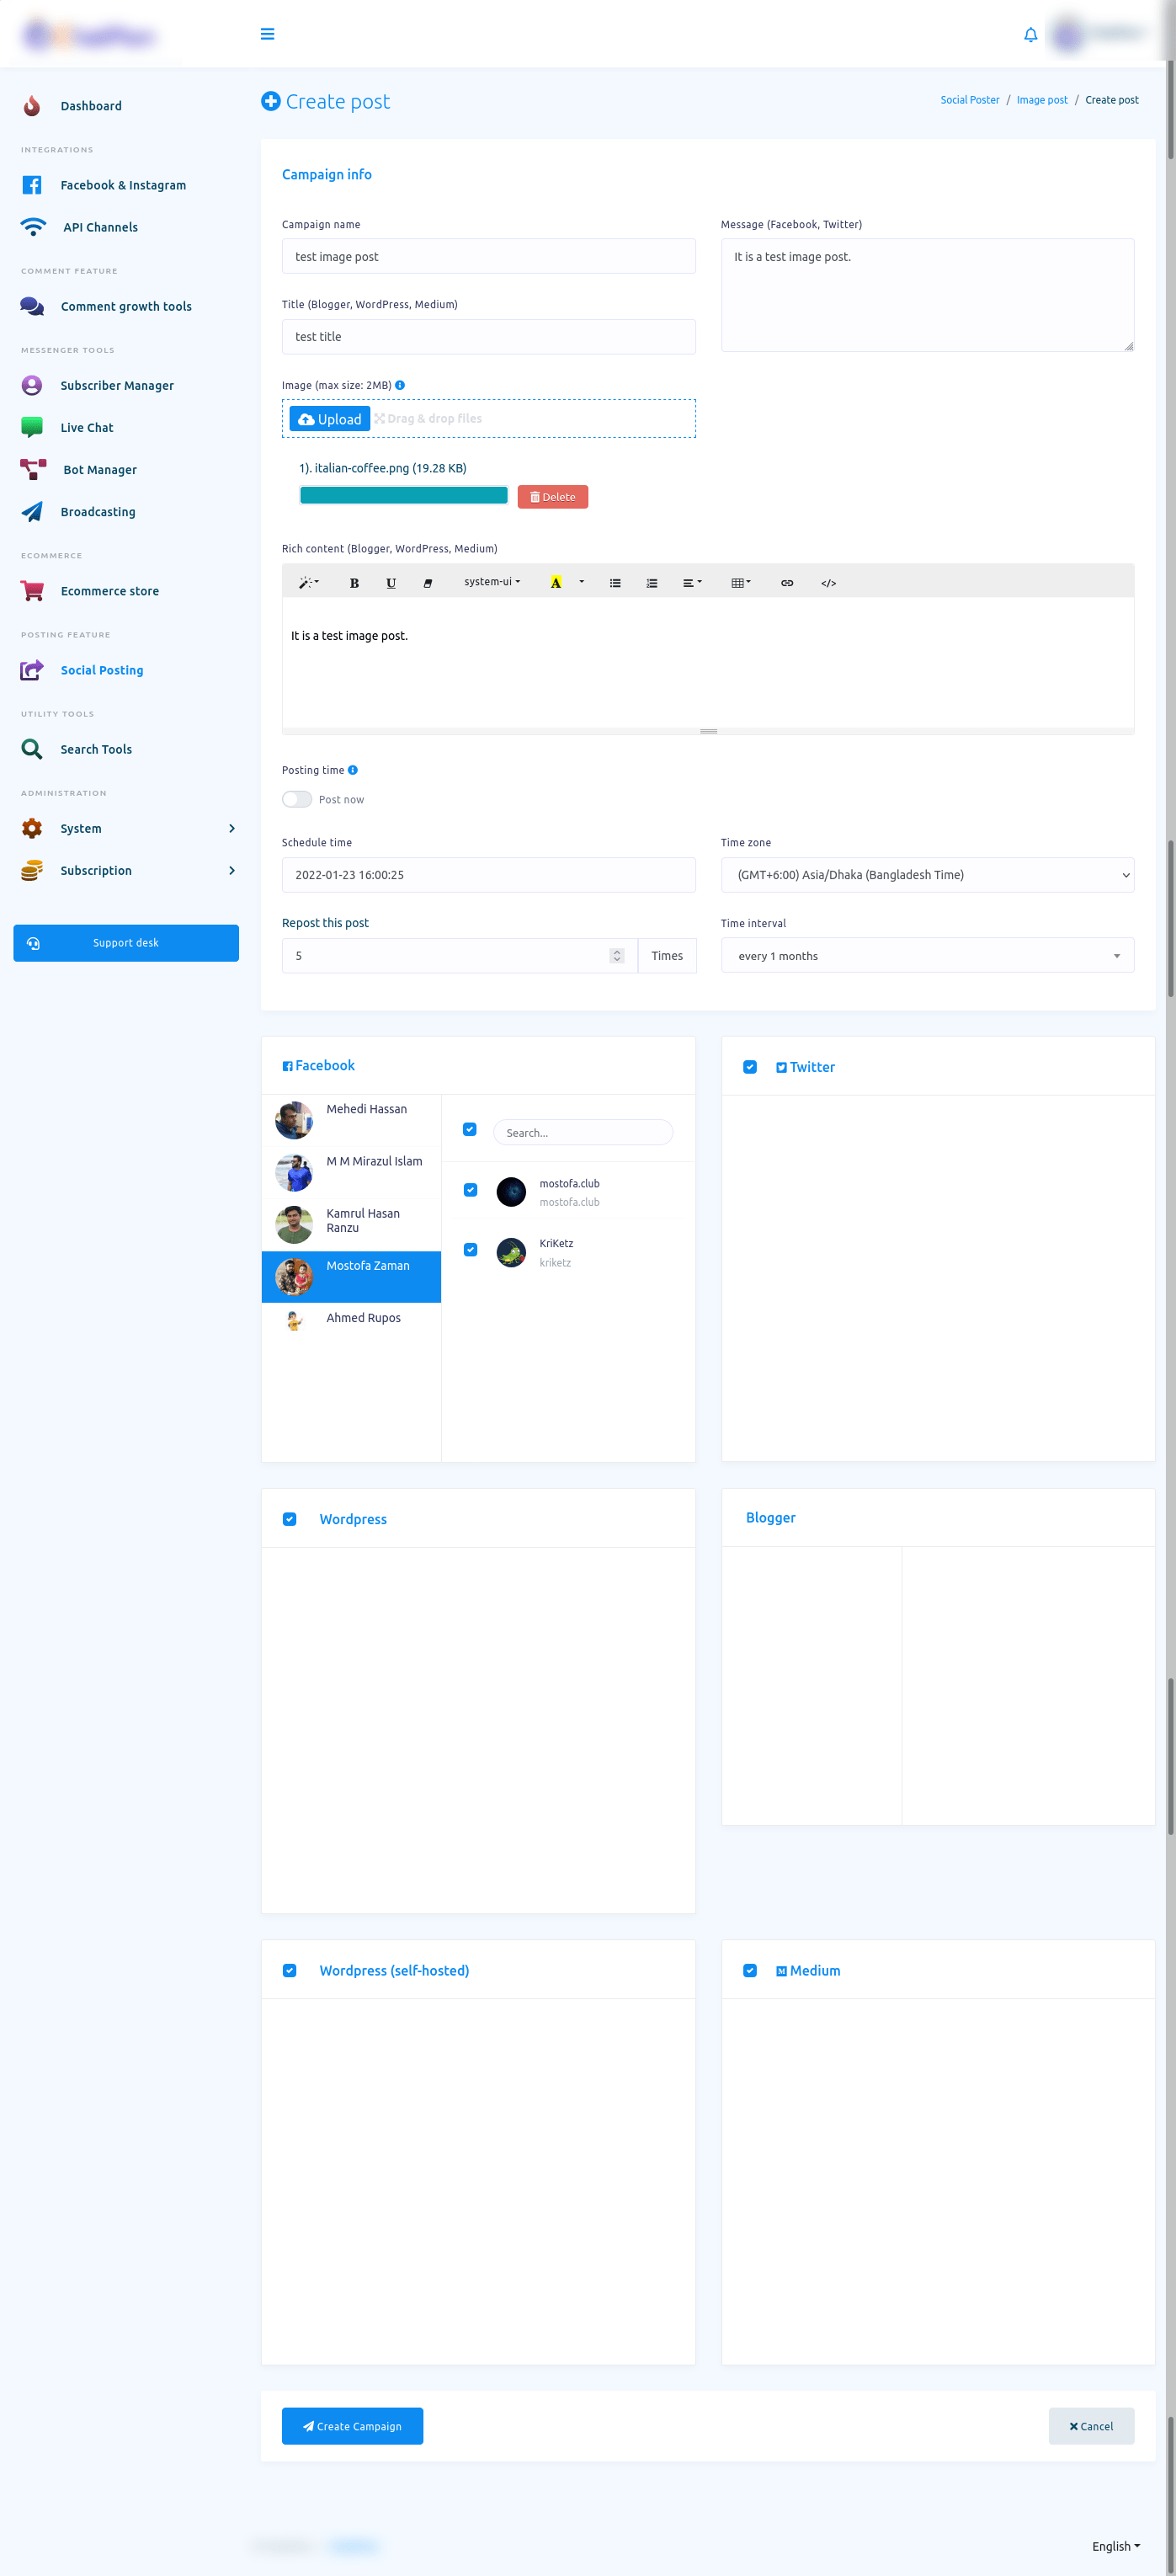
Social Poster Image Post
To create an image post for different social media, click on the Image post option of the Social Poster section. Instantly, a page called Image post with Create new post button will appear.

Now click on the Create new post and a page called create post will appear with some fields. To create a text post, you have to fill out these fields.
Write the name of the campaign in the campaign name field. Then write a message for Facebook and Twitter in the Message(Facebook, Twitter) field.
Then give a title for the Blogger, WordPress, Medium in the Title(Blogger, WordPress, Medium) field.
After that, you have to upload an image by clicking on the upload button.
Then you have to write a text message in the Rich Content(Blogger, WordPress, Medium) field.
To schedule the post, turn off the post now button and fill out the scheduled time-related fields. Otherwise, keep the button turned on.
Then you have to select a Facebook account and the pages of the account you want to post on. Of course, you can select multiple Facebook pages.
After that, you have to select the social media you want to post on.
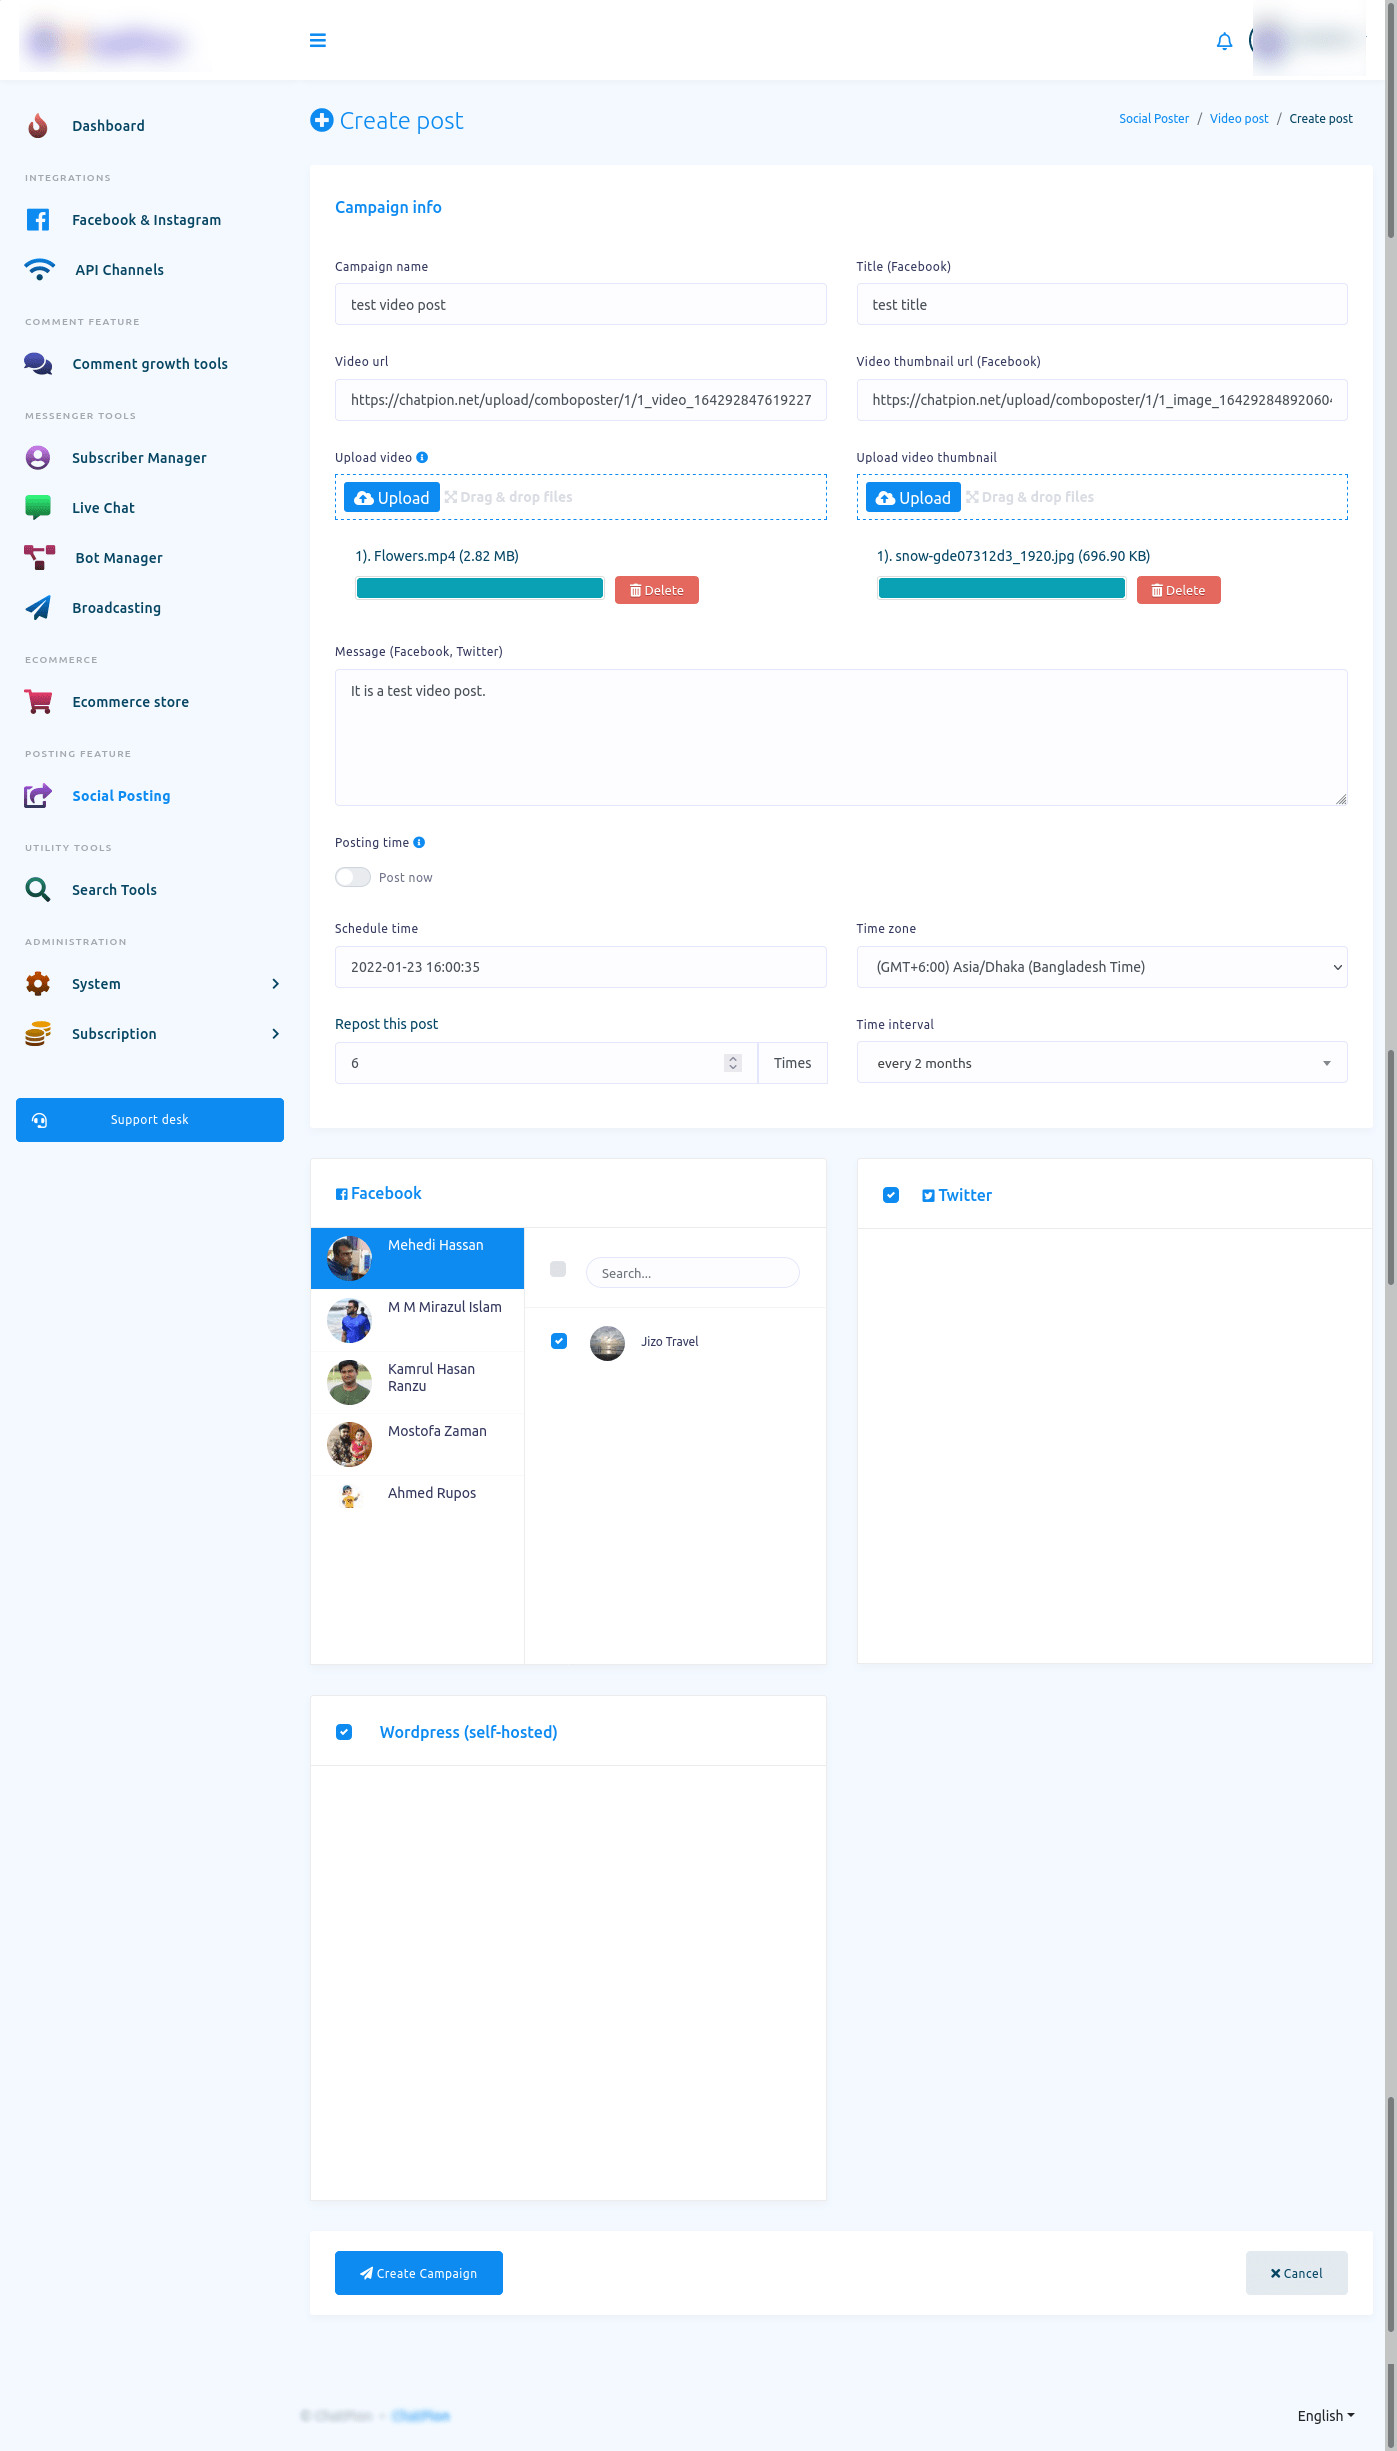
Social Poster Video Post
Creating a video post for different social media is just the same as creating an image post. You just have to upload a video and a video thumbnail instead of uploading an image.
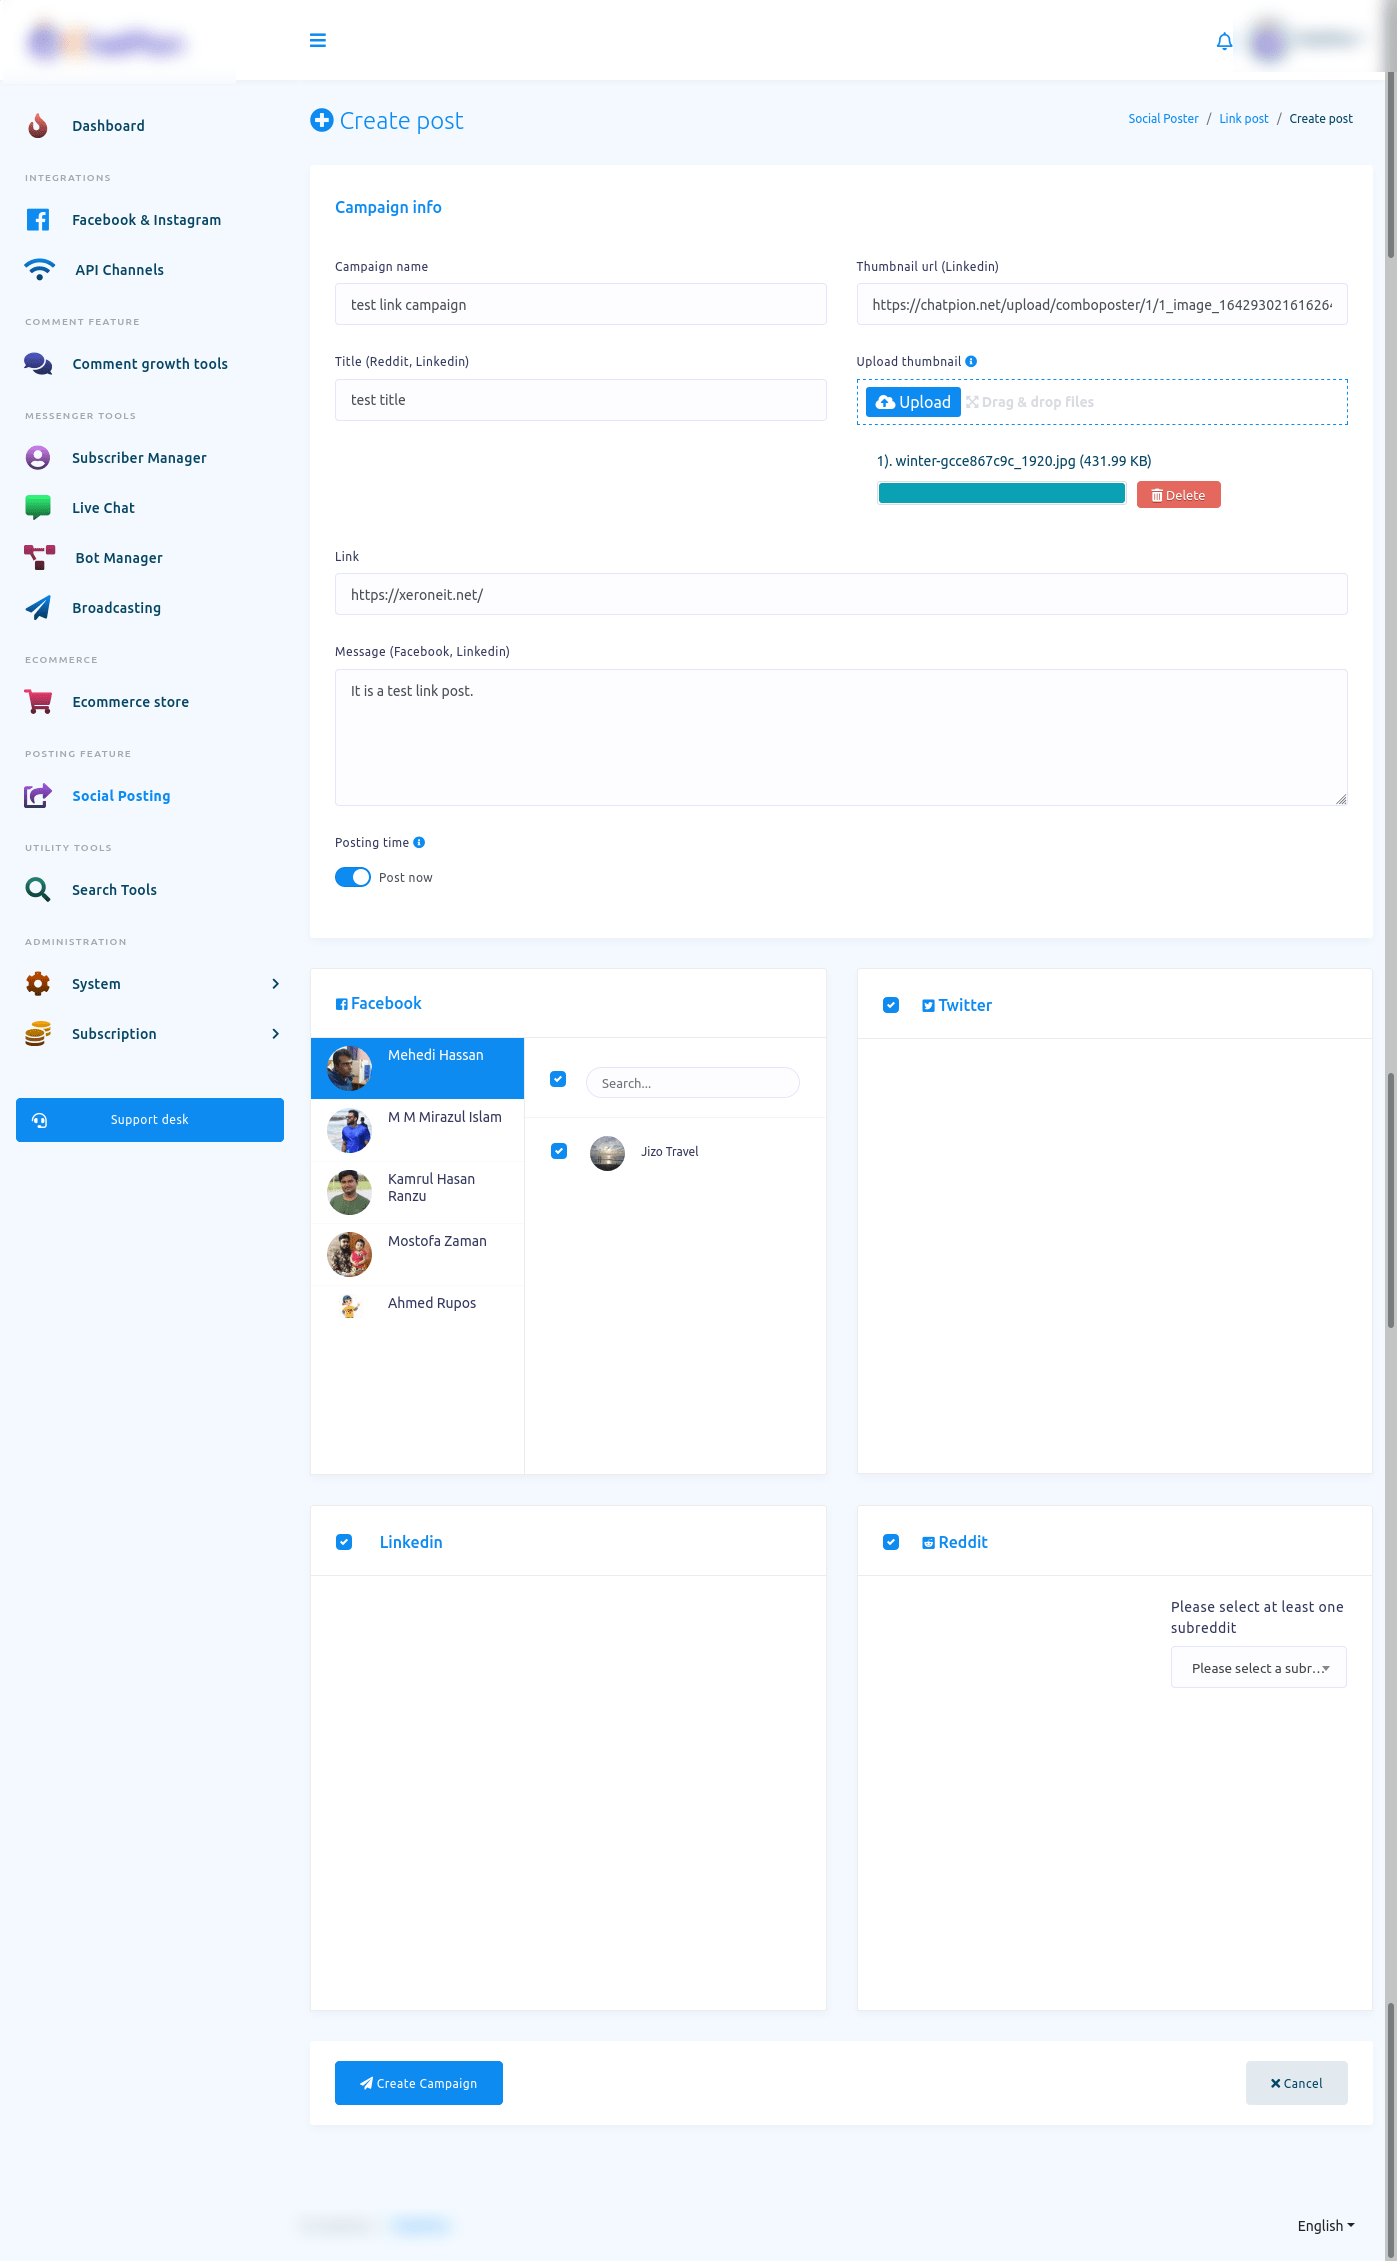
Social Poster Link Post
Creating a Link post for different social media is just the same as creating an image or text post. You just have to upload a thumbnail image by clicking on the upload button and paste a link in the Link field.
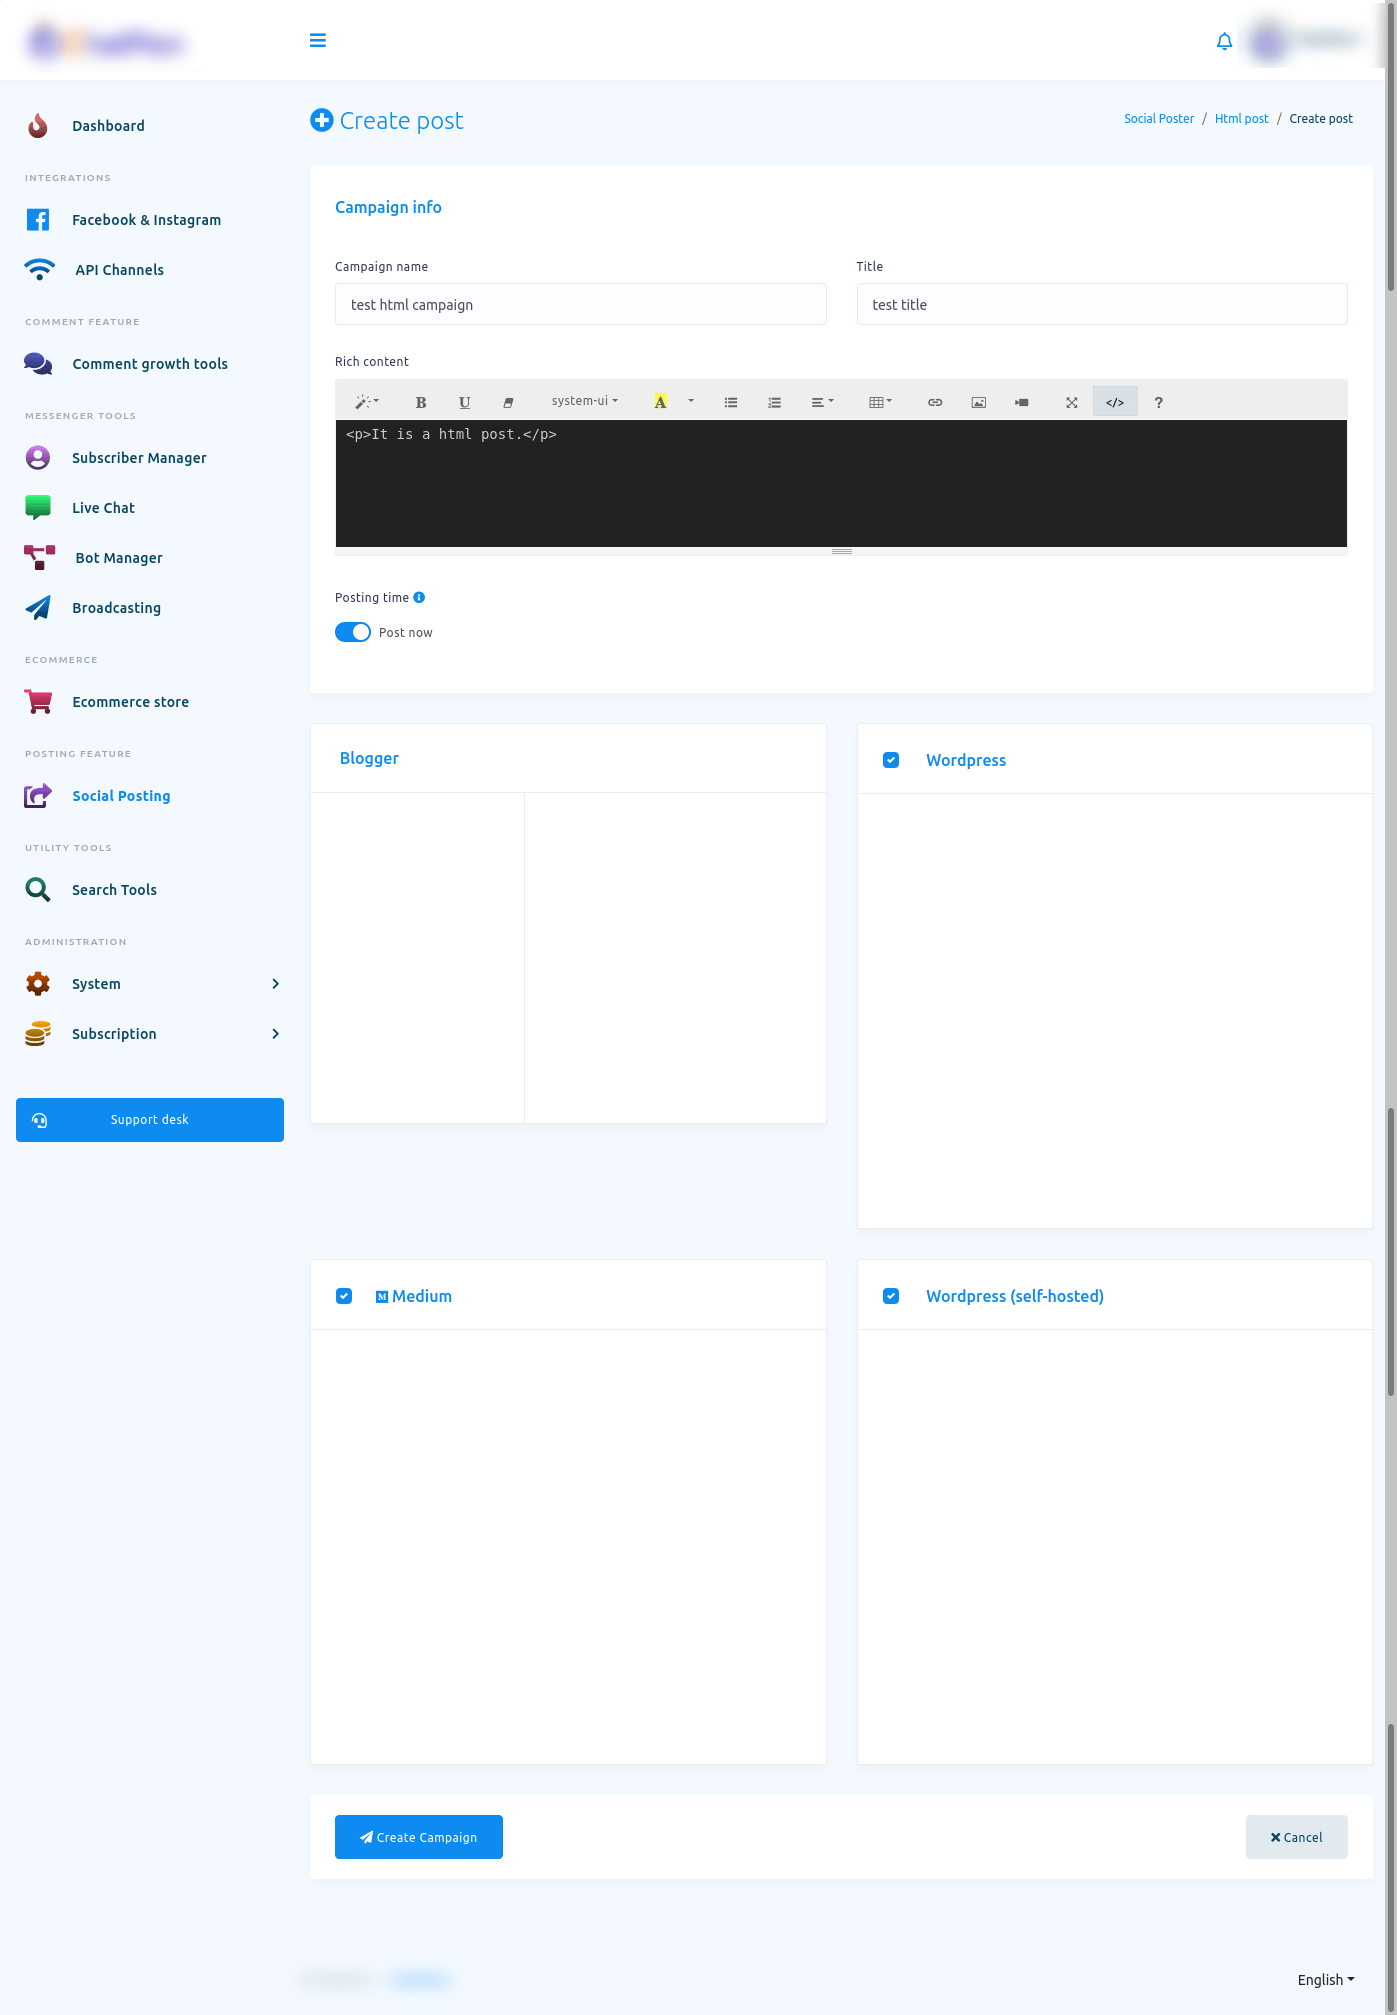
Html Post
Creating a Html post for different social media is just the same as creating a text post. In the Html post, there will be Rich content field instead of Message field. In the Rich content field, you can provide Html by selecting HTML tag in the Rich content field.
Bulk Post planner
With ‘Bulk Post Planner’, you can create thousands of campaigns to post on different Social media including Facebook by uploading a single CSV file.
To create a lot of campaigns with Bulk post planner, click on the Bulk post planner option.
And instantly, a page called post planner will appear. At the beginning of the page, you will see the instruction on how to create a lot of campaigns on different social media by uploading a single CSV file.
Read the instruction carefully, before creating campaigns with the bulk post planner.
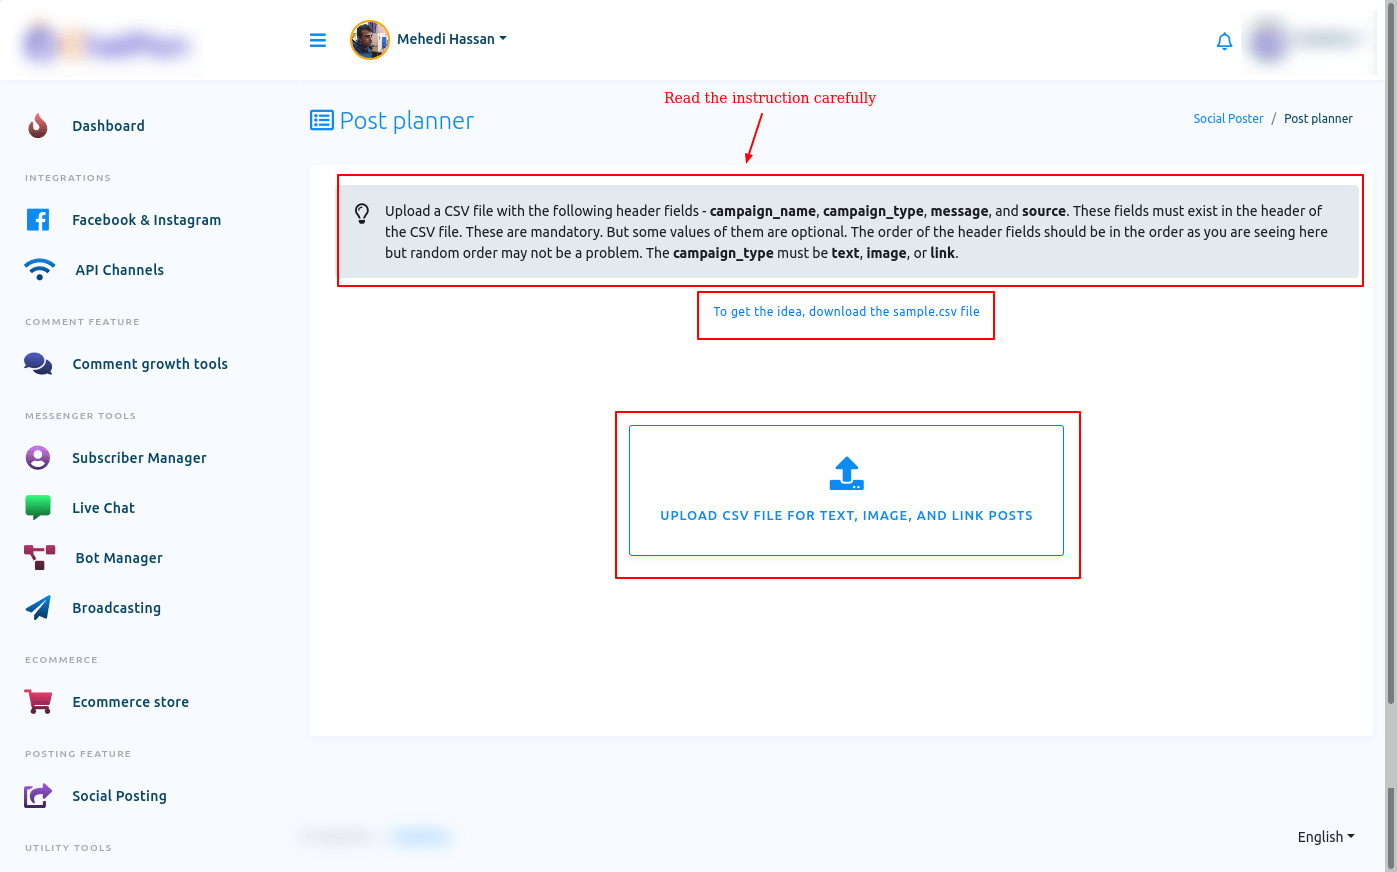
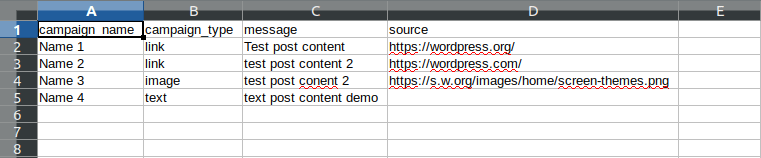
You can also download the sample CSV file to get the idea on how to organize the csv file. With the Bulk post planner, you can only create campaigns for Text, Image and Link post.
To upload the csv file, click on the upload button and upload the csv file.
In the CSV file, you just have to provide the campaign name, campaign type, message and source for link and image post. After you have provided this information on a CSV file, you have to upload the file.
To upload the CSV file, click on the upload button and upload the CSV file. After you have uploaded the CSV file, the post planner page will appear with the two buttons called manual and automatic.
Manual
The Manual button is selected by default. When the manual button is selected, you will see the list of campaigns with the campaign name, campaign type, source, and action.
Under the actions option, you will see the date and time field. And you have to provide the date and time. On the time and date, the post will be published.
Just as you click on the date and time field, a calendar with the date and time will appear. From the calendar, select a date and time. In the manual settings, every post will be published on the specific date and time you have selected for the post. In the manual settings, every post will be posted only once.

Automatic
In the automatic settings, all the posts will be scheduled to be published. When you select the autonomic option, some fields will appear. You have to fill out the fields to schedule all the posts in the campaigns.
In the post start datetime field, you have to select a date. From the date, the posts on the campaign will start to be published. After that, you will see a field called post between two times. In the field, you have to set two times and the post will be published between the times.
In the post-interval fields, you have to select a time from 1 minute to 6 months. Now click on the field and drop-down menu of different times will appear. From the drop-down menu, select a time for the post-interval.
In the field called repost, you have to provide a number that many times the post will be republished.
In the do not post on days field, you can select a day when the posts of the posts of the campaign will not be published.
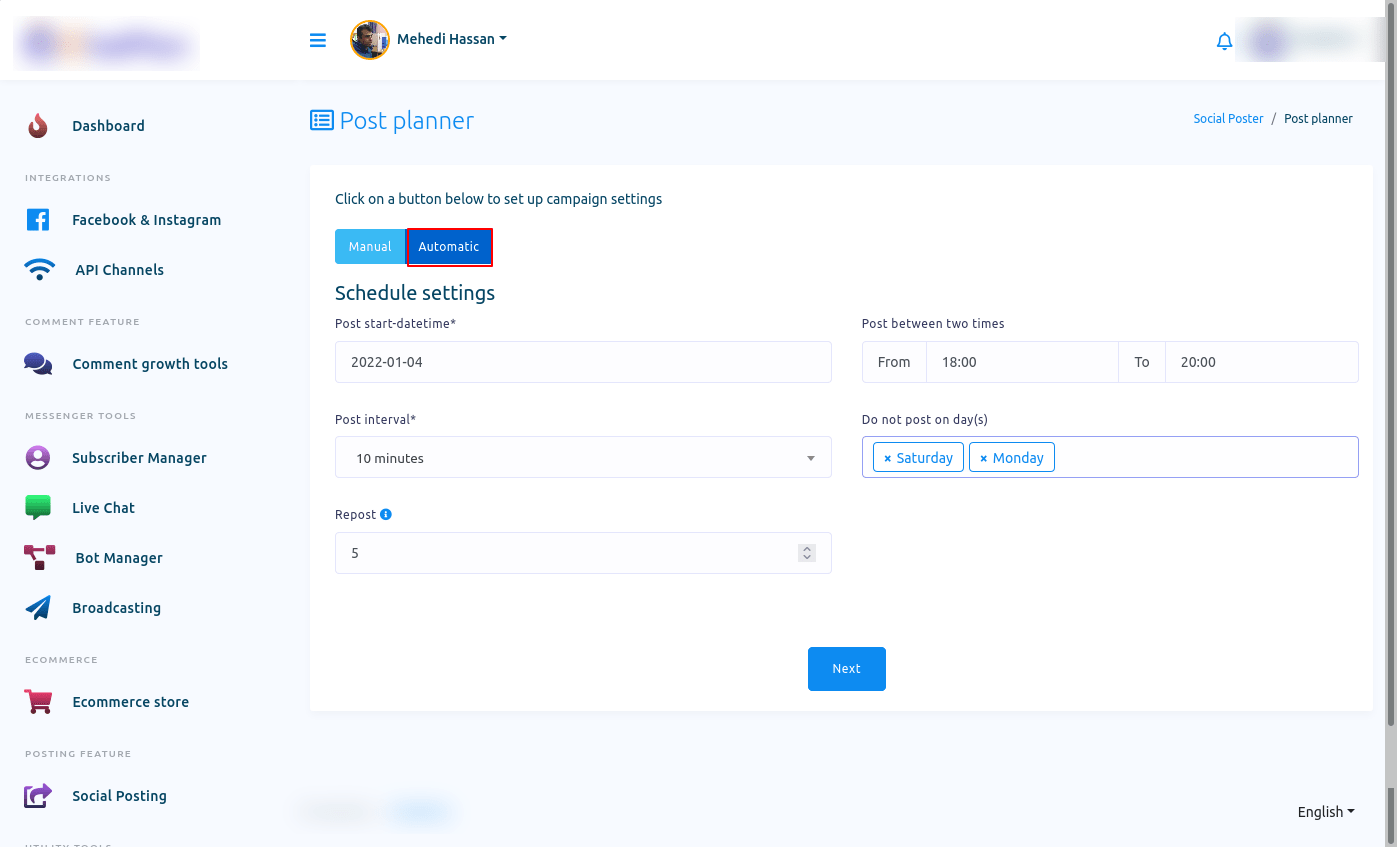
After that, click on the next button and a modal form will appear with some fields. Now you have to fill out the fields.
Select your time zone in the posting time zone fields. Then post to Facebook pages field select Facebook pages where you want to publish the post. You can select multiple Facebook pages.
Then on the post to Twitter accounts, select your twitter accounts – you can select multiple Twitter accounts. Likewise, select Linkedin, Reddit, and subreddit.
Then click on the create campaign button. And you will see a successful message. That is, you campaign has been configured.